How to tidy up writing on photographs in Photoshop. How to write, logo, date and hour of the video. Clean up the written in the color picture online.
Otzhe, we have a visual image:
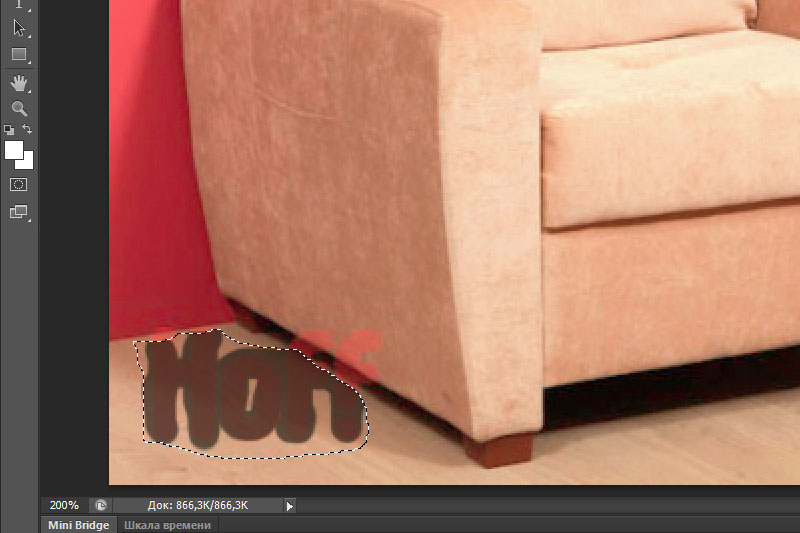
2. For the cob, you need to see the text on the image, whichever you want to clean up, and duplicate it on a new ball 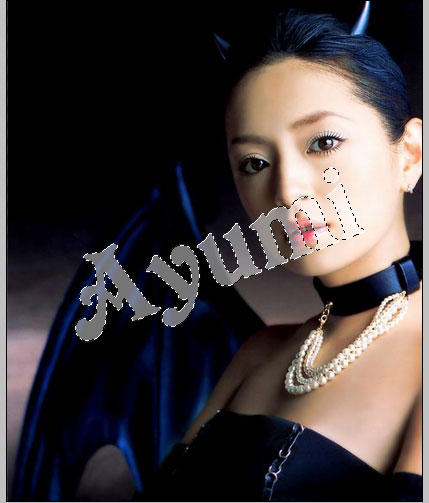
3. Now we are trying to zastosuvat some other type of zmіshuvannya, to marvel that we don’t see a color similar to that one, which mav bi buti, yakbi didn’t write.
We have seen what happens when we mix
To save or share images, press the arrow icon up at the top of the screen. Today you know that you just see the inappropriate parts of the image, and the result of the laying is good, since the editing is not known, that the photograph is taken.
This trick is even simpler, but for those who do not get it, the result can be more laborious. Reveal your respect, that the hour of the hustle will be stale in a lot of speeches, as you want to see. As soon as you saw the instructions on how to see the parts and imperfections of your photographs, you should definitely remember that the trick of seeing the unimportant parts is similar.
plural || Multiply 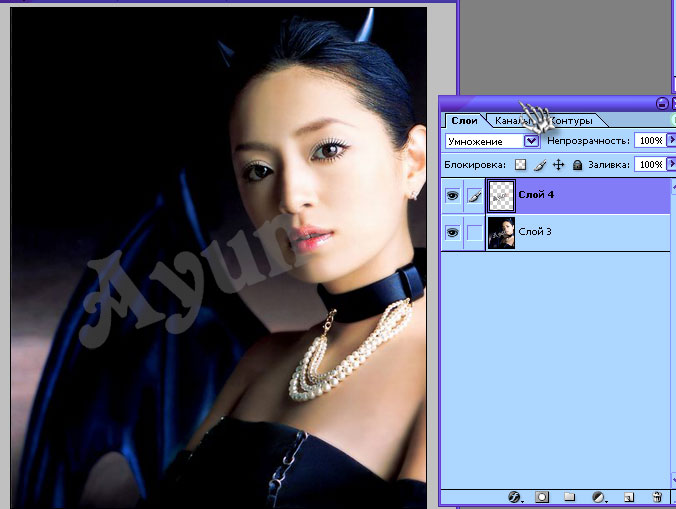
Colors on the faces are practical zbіgayutsya ...
Then we can see the area, which is close to the outer image. 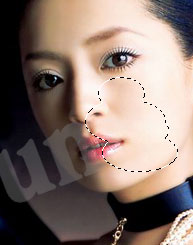
Now dubluєmo її on a new ball
Ball - Duplicate ball || Layer - Duplicate Layer || Ctrl-J
Now there are enough roses and bears for robots. The tools that we will victorious for the hour of work will be offensive. Then select "Clone Tool" and look at the image below as a twist. As the name itself says, the tool is used for copying one part of the image on top of the other part - stars and cloning of the name.
The meanings that are found in the Cloning Tool were offensive. To restore respect, that these meanings were victorious for a distant gloom, and їx next change it to a spaciousness, let's put on a dzherel. To show respect, that you are guilty of choosing the place of roztashuvannya dzherel, as if looking like a whole region, the image, it seems, has not changed. Do not give respect to the nedolіki, to the one who stinks from the attacking tool.
The ball for each ball was dubbed robimo while invisible, and the new one was installed above the ball of the picture and poured out from it.
Ball - Glue from the bottom || ctrl-e
Now popratsyuemo trohi with a finger and roses, to smooth out the sharp transitions. 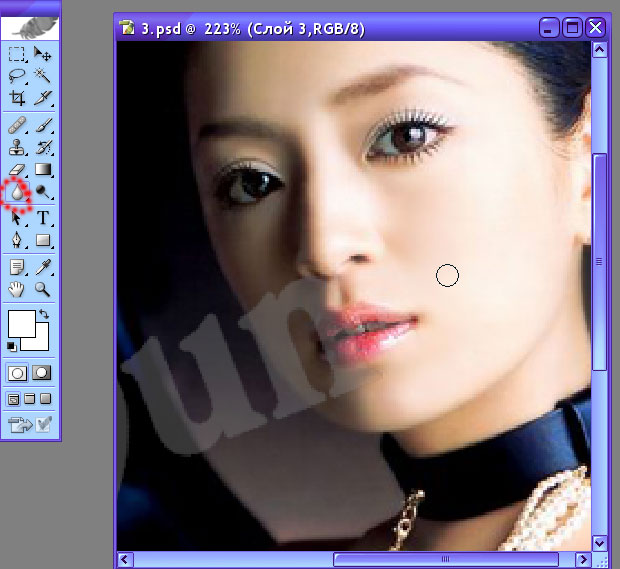
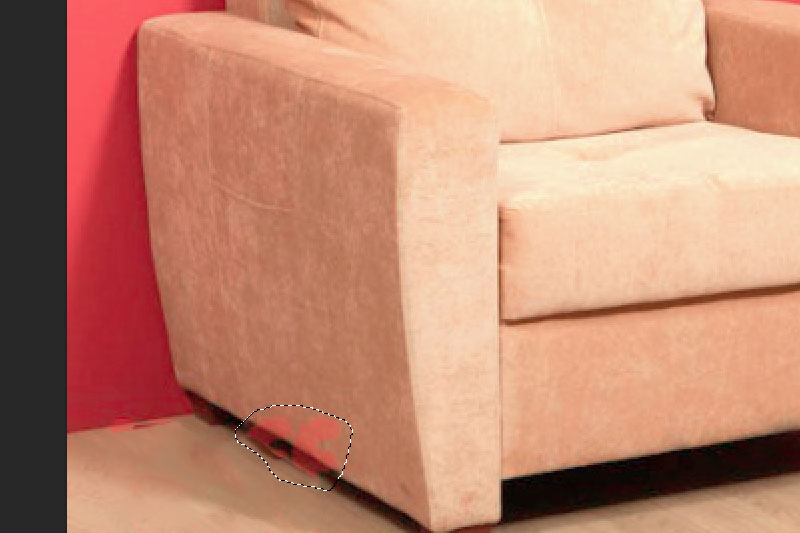
4. Now we can see the ball again with writing and carefully with an eraser that part, as we no longer need it, so we only need that part, so that we still don’t go for the color with the source.
We experimented with balls.
"Instrument of renewal" - the same method as in the trick of erasing, it is all the more to blame for the nobility, like yoga victorious. If you don’t know, you’ll work the same way, like the “cloning tool”. Therefore, choose the place of roztashuvannya dzherel for copying that place of recognition, as it will be renewed.
At the butt of the gloom, the offensive meanings were victorious in the tools. It is believed that such values were victorious in the texture of the sky, so that the colors are already similar and cannot be of any significance in the final result. How do you feel about your image? detailed information about the tickets, maybe change the scale.
Now I have seen that the area of the krill can be adjusted in the mode
Linear mountain || Burn 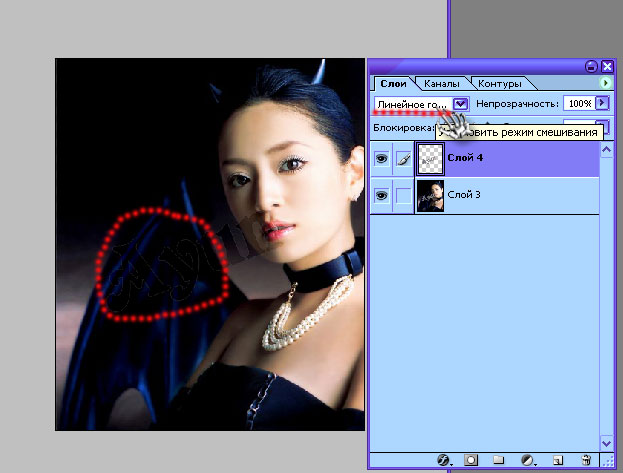
Here I had a chance to improve the brightness and contrast (Ctrl-U), the shards of color balance are not clear, then I take it again with my finger and tidy up the sharp edge. 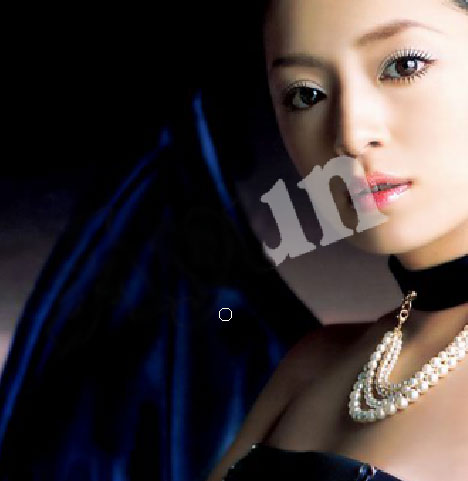
In our small butt, we turn off the darkness of our image. However, for the purposes of alignment, below we imagine the image is ready. You can see more that it is possible to see great objects - for example, a car - but it is also more important and a worker of a robot.
Some photographs are not handy, but, unfortunately, these photographs, as a rule, are old, taken with analog cameras, and until the present hour of stench, perhaps, they have accumulated a lot of saws, scribbles and scribbles. In the first place, you can win over those that come with the hour. Then you can see or change the Skoda, caused by a saw and small cracks, through the filter “Drank and capes”, the topic of today's handyman.
5. On the rest of the ball with the text, the Burn style will be restored and the colors will be edited a little. (Ctrl-U)
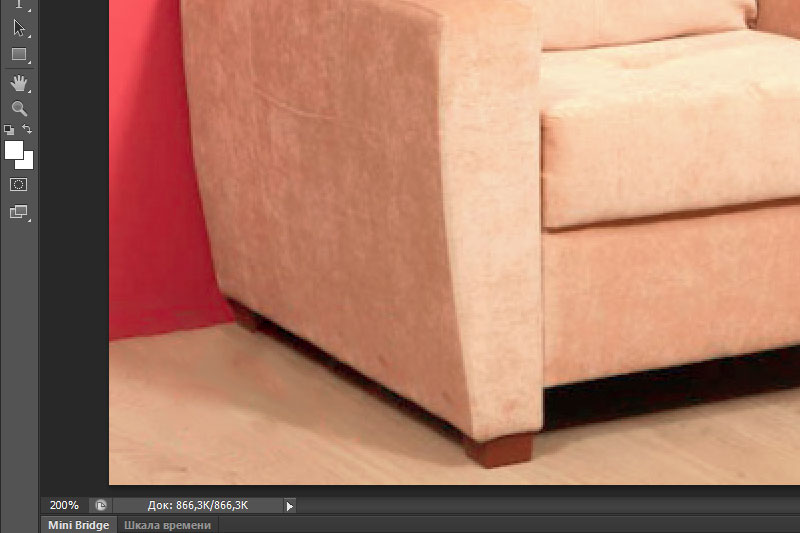
New eraser i finger i axis result: 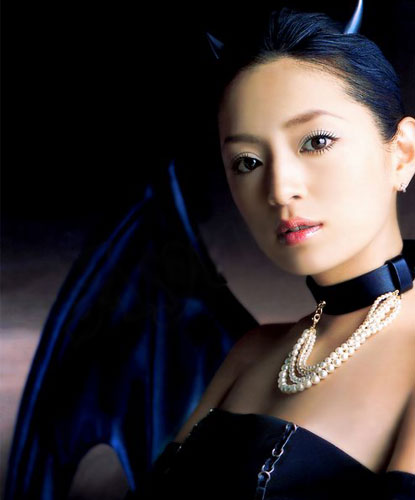
Today, there is a small article about those, how to clean up writing from photographs in Photoshop. For whom it’s not necessary to stick a short Photoshop, it’s easy and fast to fight. The stench is ideal for a non-professional, but to finish a yakish photo editing. I will win Photoshop program CS6, want front versions also competently cope with these tasks.
To find out, how to speed up this function, do your best step by step instructions lower. Find the image you need on your computer and type in “Vidkriti”. The image, as if we were going to victorious in tsomu assistant, looking like an advancing rank. 
The image, chosen for the assistant, may be sharpened and blue dots, called out for an hour, and help us demonstrate the result of the filter.
Access to the function "Drank and capes"
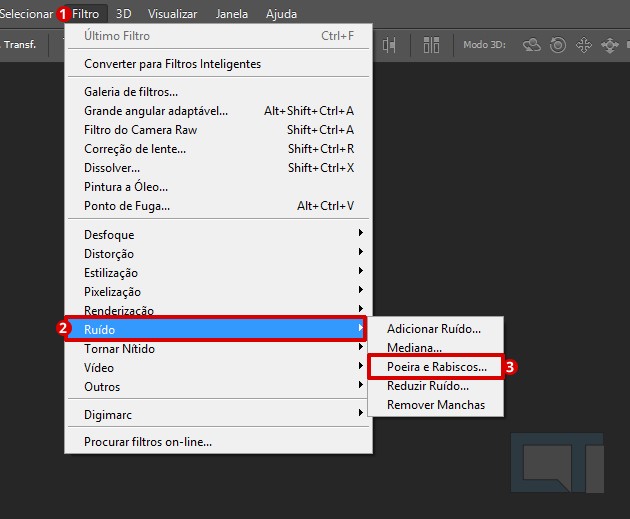
Adjust the filter addon on the image
The dialog box “Drank and swilled” will appear.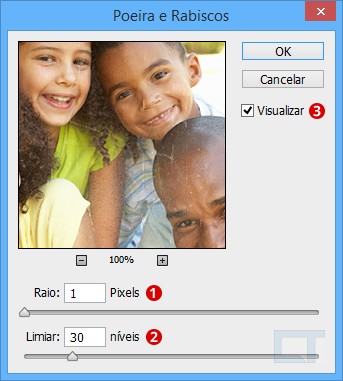
Dialogue show “Drank and scribbled”. At this time you can adjust the filter, vicarious stepping parameters. Ideally, always keep a small amount of radius and a large high border number in order to preserve the overall quality of the photograph.

High rіven: grow even more better by stowing "Drank and shave" only in areas that you need
As much as you can better, we need to change the intensity of the filter so that the sharpness of the photo does not deteriorate.Option 1: Polling Wicon
This way is good and effective in quiet situations, if you write on a uniform background.
I'll need a photo. We select the tool "Rectangular area" and see the place, where it is written. Let's push, push right button mice for weekly addendum menu.
At the end of the day, we choose “to win: with the arrangements together”, embossed approx.
Tse vipadki, if you can otrimati more shortening the result, zasosuvav "Drank and cut" only to the areas of the image, yak require correction. In this manner, you can win the filter with greater intensity. For whom we will win the "History of brush" tool.
The tool "History of the brush" shows the area of the brush stroke to the front of the image. For example, as you victorious yoga in any region, this region will turn to the camp, which saw and scribbles until the filter is stuck. You will know the “History” button for the designated place; Click on the new one, to open the correct palette. Whomever has been rehabilitated rest of the day, Vikonani on the image. The symbol "History of the brush" shows the camp, the protyag of such a tool "Penzel of history" inspires the image in the same way.
Everything, I wrote a call.
Method 2: Point Penzel
The Danish method also manages to cope with the variability of writing from a photo with a uniform background.
You can change cob mill, Clacking a small square on the hand with the skin accepting the action. The camp could be either a frontal deed, or a deed, as it was already foreseen and I would know after the stream. Now, if the brush of history has been set, you will need to fix the scope of the brush. Having pressed on it, two options appear: “Rozmir”, which indicates the diameter of the strokes, and “Hardness”, which indicates the smoothing of the stroke. In addition, we have the “Obscure” option, in quiet situations, if you want, so that there is no overlap, but a compromise between the original and the effect.
We select the tool "Point penzel of inspiration". For the help of the “[” and “]” buttons, set the optimal diameter of the brush, then press the left mouse button and see edit with text or date.
After that, release the button. Write down.
Method 3: Combinations
Like the background in the photo is diverse and first 2 ways not to help, it is necessary to use a combination of decal tools in Photoshop.
For the stock image, we will set the opacity to "100%". In order for the gradation between the area with the filter and without the new bula to be smooth, the “hardness” is to blame but 0%. Rozmir is liable to the establishment of a legally acceptable until the permission of your image. Try to reduce the size of the strokes by 30% more than the size of the element you want to add. In this stock, the brush was marked in this way, and the strokes were smashed in this way.
Isolated dots - all areas, devi are not guilty of cleaning the brush, and then scribbling once or give small strokes of the pencil to hide the important details of the image. Vikoristovuyuchiy type of expanded addenda, combining the filter "Drank and scribble" and "Brush of History", we took such a result.
We will vicorist the instruments "Laso", "Point penzel of inspiration" and "Latka".
Part of the inscription can be seen behind the help of a dotted dotted brush.
The second part for the help of the “latochka” tool. You need to see the area with the text and drag it to a similar background.
The result of the localization of the filter "Drank and cut" set to "Radius 2" and "Threshold". From a distance, a pin and a point of attack on the completion of renewal of your photograph - it is not enough to stop up to grainy plots and blue areas. All of these functions become more effective, as they zastosovuvat їx to specific areas of photography, as it was smashed from "Saw and Twist".
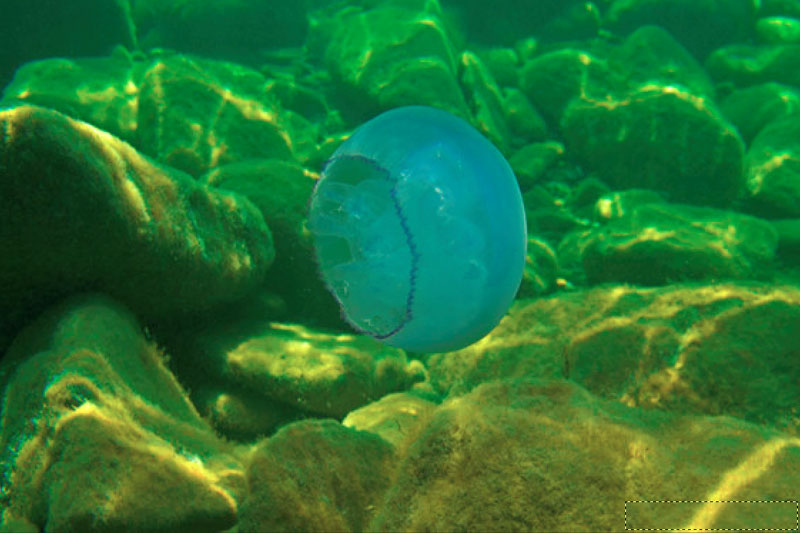
For this lesson, we will use this photograph as an example. We can see a light, which is in the middle, and a “detailed” yogo with a gloomy texture. We will use the same method to remove the windmill in the center through the trees. Like and in times be-like robots, the first thing that needs to be worked out is to practice with a doubling ball, and not with the original. Tse allow us to easily turn around, as if we were missing manipulations and moreover, in one click, the robot was killed Mitse.
As a result, the area will be replaced. The photo is ready.
Respect for the fact that in this article I won just a couple of simple ways for visualization, write from the picture. In fact, the functionality of Photoshop is richer and allows you to create more wide possibilities in terms of the type of writing and objects, in the fallacy of the set task.
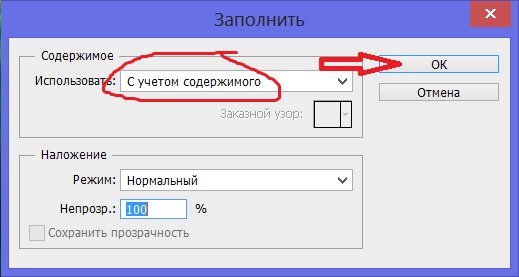
If you choose, you will change the color palette. Select "Repair". Tse “roztane” your subject in another area, as we choose later. To scale, move the slider to the right, if you want, so that the retouch area is larger. Adjust її to the size of the element, which you want to see. 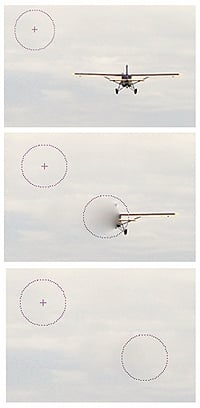
This region will appear at the hour of your manipulation, here the region is evil, as you can hit the stake and cross in the center.
Tim, who wants to play more and more on the spot, I'm going to watch the video.
video1