Update the BIOS or flash the BIOS. How to install flash drives in different versions of BIOS How to create a flash drive for flashing the BIOS
Every system administrator knows how Capture a computer from a USB flash drive. This is most often necessary when the operating system is installed. Even the Windows distribution does not necessarily need to be released on a CD. And, for example, you won’t be able to install Windows on a netbook anyway, because You see, there is no disk drive.
Today we will find out how to install the settings from flash drives in the BIOS of various devices. Regardless of what version you have, the procedure will be as follows:
1. We insert our fancy flash drive into the USB port of the computer. It is necessary to insert them into the port located directly on the motherboard. From the back side of the system unit.
2. Turn on the computer and press the key Delete(or F2), then go to the BIOS. However, depending on the version of the BIOS, other keys (Esc, F1, Tab) may be affected, so you need to carefully follow the prompts on the screen.
In Bios, you can navigate between tabs and rows only using the keyboard.
Below I will briefly describe this process using different BIOS versions.
Setting up Award Bios for acquiring a flash drive
Award Bios: Let’s check now that the USB controller is installed. Demo up to “Integrated Peripherals”. Use the arrow on the keyboard to navigate to the USB Controller item. Press the “Enter” key and select “Enable” from the window (also follow “Enter”). The “USB Controller 2.0” checkbox may also be “Enable”.
  You can exit from this tab by pressing Esc.
Then we go to “Advanced BIOS Features” – “Hard Disk Boot Priority”. In my case, I initially have a hard drive, and maybe a flash drive.  Place it in a row with the name of our flash drive (Patriot Memory) and move it up using the additional “+” key on the keyboard.
  You can exit by pressing Esc.
Now the “First Boot Device” row is stamped with “Enter”. We have selected “CD-ROM”, but we need to select “USB-HDD” (if you don’t want to be attracted to flash drives, turn here and try to select “USB-FDD”). Other devices cost a Hard Disk.  Exit from this tab by pressing Esc.
Now we exit the BIOS, saving the changes. For whom the “Save & Exit Setup” is embossed, the “Y” – “Enter” key is embossed. 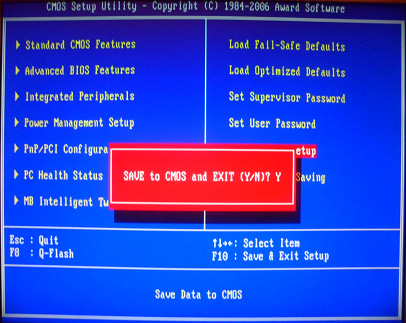
Setting up AMI Bios for acquiring a flash drive
If you upgraded to BIOS and see such a screen, it means you have AMI Bios: Let’s check now that the USB controller is installed. Go to the "Advanced" - "USB Configuration" tab.
  Opposite the items “USB Function” and “USB 2.0 Controller” may be “Enabled”.
  If this is not the case, stand on this row and press the “Enter” key. From the list, select “Enabled” (also use “Enter”).
Then exit from this tab by pressing Esc.
Go to the "Boot" tab - "Hard Disk Drives".  Right now I have a hard drive in my first place, and I need to put a flash drive here. We stand on the first row, stamp “Enter” and in the window that appears, select our Patriot Memory flash drive.
  Please do this:
  You can exit via “Esc”.
Select "Boot Device Priority". Here, the first most exciting device is a flash drive.  Embossed Esc.
Then we exit the Bios, saving all the settings. For whom go to Exit - Exit & Save Changes - OK. 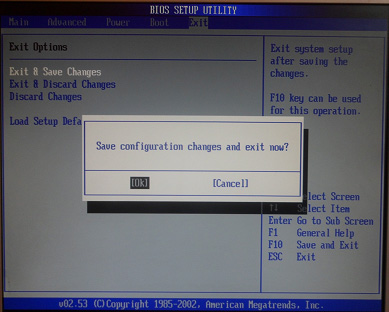
Setting up Phoenix-Award Bios for flash drive acquisition
If you upgraded to BIOS and see such a screen, it means you have Phoenix-Award BIOS: Let’s check now that the USB controller is installed. Go to the “Peripherals” tab - opposite the “USB Controller” and “USB 2.0 Controller” items are “Enabled”.
  Then we go to the Advanced tab and under First Boot Device, install the USB-HDD.
  After this, exit the Bios, saving the changes. For this, go to “Exit” - “Save & Exit Setup” - press the “Y” key - “Enter”
 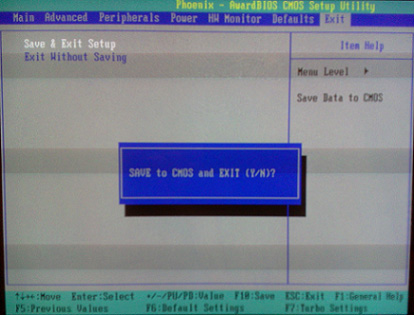 The axis is practical and everything you need to know in order to become interested in flash drives. In my article, I described the process of adjusting the BIOS to the most popular versions: Awardі AMI. The third one has ideas Phoenix-Award Bios, which is becoming more common.
For different versions of BIOS descriptions, the order of actions may vary. Alas, let’s make sure you understand the very principle of adjustment.
One more thing we would like to add: in order to select which device to use on your computer, do not necessarily change the settings in the BIOS. You can immediately, after opening your computer, click on a special menu for selecting accessories (you can use the additional keys F8, F10, F11, F12 or Esc). So as not to guess about the keys, pay attention to the monitor immediately after turning it on. We need to be able to write on the icon: “Press Esc to select boot device”. My option required pressing “Esc”.  Where on your computer BIOS UEFI, and you need to be interested in flash drives - you can get acquainted with .
What do you need reset the forgotten password of koristuvach For help, get a valuable flash drive - how to earn it.
Are you experiencing problems with Windows and don't want to fix your computer? Viruses have come up again and you want to use a third-party disk to scan and clean up your system? In many cases, you will be tempted by USB flash drives or CD/DVD drives. Ale for starters it is necessary to “say” about this biosa. Our article is about how to install data from a flash drive/disk in the BIOS settings of a desktop computer or laptop.
Why not go out and fix the bios?
As a matter of fact, you will soon be able to quickly install a customized BIOS and install Windows from a flash drive/disk onto a new desktop computer or laptop. What's the reason?
Reason No. 1: the computer has an unknown bios
There are three types of BIOS that are most widely used today:
- Award BIOS from Award (old versions) and Phoenix Technologies;
- AMI BIOS or simply AMI from American Megatrends;
- UEFI is the new current BIOS from Intel.
When you are on your computer, turn it to the top left corner of the screen. The BIOS appears there. Depending on the firmware version, the BIOS interface of one device may look different.
Reason No. 2: it’s impossible to get to the BIOS menu
If you can’t access the BIOS menu using the primary keys, pay attention to the prompts at the bottom of the screen. If there are no prompts, and they still exist, try pressing the Esc, Del, F2 keys. They are most often used for logging into AMI and Award bios. We’ll talk about the peculiarities of working with UEFI later.
Reason No. 3: BIOS “do not boot” the flash drive
- The flash drive must be connected before starting or restarting the computer (this can be done immediately before shutting down the PC).
- Connect your device to a USB 2.0 port, as there are USB 3.0 drivers in the Windows 7 installer.
- It is necessary to check whether the USB controller (section Integrated Peripherals/Advanced Chipset Features Award BIOS).
Award
- Click BIOS using the additional Del or F2 keys.
- We know in the menu the item “select it”.


- It’s possible that your window will look completely different from what it looks like in our screenshot. This means that your computer has a different Award BIOS firmware and First Boot Device setup, you need to go to the additional option Boot Seq & Floppy Setup.
- After inserting a flash drive (USB-FDD) or a disk (CDROM), as the first storage device, a hard drive (HDD) is installed with another storage device (Second Boot Device).
- This point is also valid when selecting USB-FDD. We go to the Hard Disk Boot Priority parameter and transfer our USB flash drive to the first place in the list using the additional key +/-/ Page Up/ Page Down.
- We complete the setup process by returning to the main menu (Esc key), selecting Save & Exit Setup and pressing the Enter key.
Setting up AMI on a desktop computer
- Click AMI BIOS using the additional Del key and go through the Boot tab to the Boot Device Priority window.

- We install the flash drive/disk as 1st Boot Device and turn it at the main menu (Esc key).
- Go to the Exit tab and select the Exit & Save Changes item.
- This tab has a Load Setup Defaults item, which allows you to configure the bios settings manually.
Setting up AMI on a laptop
Setting up storage from a flash drive/disk on laptops works differently than on desktop computers. Let's take a look at setting up the AMI BIOS on the laptop.
- Click bios using the F2 key and go to the familiar Boot tab.
- To secure the disk, go to the Boot Priority section, install Select 1st Boot Priority in the Internal Optical Disc Drive.
- To download from a flash drive, you first enable downloading from an external device by setting the External Device Boot parameter to Enabled in the Boot Configuration section, then in the Boot Priority section, installing Select 1st Boot Priority in External Device (flash drive).
- Rotate to the main menu (Esc key).
- Go to the Exit tab, select the Exit Setup item and switch to power "Save configuration & reset?".

Setting up UEFI
UEFI provides a graphical interface and supports selected targets. Setting up this bios is much easier, you can use it below. For example, in the setup menu of an HP laptop, we press the Esc key and then press F10 to go to the Bios Setup section. And Asus users will have to quickly access the axis using the Del and F2 keys.
For Windows 8 users who were unable to upgrade to UEFI, we have two options for you.
- We go into setting up the computer through the control panel and we know the mode for setting up the electrical life. The Fast Boot mode is disabled and the computer is rebooted. Hints in the bottom row of the screen will help solve the problem.
- Press Shift+Restart to restart Windows 8. In the Windows installation menu, which opens after restarting, select Troubleshoot, then Advanced options. Press the UEFI Firmware Settings button and go to UEFI after rebooting the computer.
And now there are two options that allow you to install UEFI to transfer from a flash drive/disk.
- In the Boot Priority section, which is located in the lower part of the screen, drag the icon with the mouse over the images of the flash drive/disk in the first place.
- We press the Exit/Advanced mode button, we confirm the transition to the extension mode by selecting the Advanced Mode item and selecting the settings.

We assume that you can now install Windows from a USB flash drive/disk, since the BIOS interface of the computer is slightly different from the interfaces described in this article. First of all, understand the very principle of adjusting the BIOS.
More and more users are talking about how to install settings for flash drives in the BIOS. Even though flash drives are increasingly used to install an operating system on a computer, DVD drives have become a thing of the past. Should we pay pennies to the master when we can earn everything on our own?
The USB standard appeared in 1994 and was developed by a number of companies: US Robotics, Microsoft and other companies. In the 90s, the standard began to be adopted in the BIOS of corporate PCs (in the mass segment only in the early 2000s). This made it possible to reinstall the OS from flash drives, in which case USB support in Windows was printed with version 95 OSR2.
The first USB storage devices appeared in 2000 (distributed by the Israeli company M-Systems). The ability to launch the installation of an operating system from a USB drive allows you to both reduce the complexity of the procedure itself and ensure its reliability.
This PC has two types of BIOS. The first, the simplest and the oldest, having appeared in the hours of MS-DOS (80s). This browser only uses a keyboard, with an interface similar to Norton Commander (MS-DOS shell). The UEFI system is supported by a window interface, a method of interaction with the OS (mouse and keyboard), and an installation procedure.
The UEFI standard has been developed by Intel for Itanium processors. Due to optimized code, high stability and security, the technology has become popular on ARM architectures, as well as x64 and x86.
The main advantage of UEFI for a simple developer
The new type of bios initially supports GPT hard drive layout. Therefore, you can connect storage devices up to 2 TB in size to the PC motherboard. Windows operating systems began to support GPT with the release of version 8. Until then, the type of layout was MBR. Its main feature is the support of more than 4 sections (for GPT, their number is not divided). Remember that the standards are absurd, which means that if you install an older OS in place of a new one, problems may arise (for example, when downgrading Windows 10, 8.1 to 7 or Vista). It is also important to remember that the inclusion of flash drives in the BIOS will require some adjustments. You will need to go to the service menu by clicking on the previous keyboard commands (for your own skin dialer).
Installation from USB requires a low operation:
- USB storage device connection;
- entering the BIOS menu through the dedicated section, it is called Boot Device Priority (which is what the F2, F11, F12 keys are used for);
- then select “USB Drive” or simply select the name of the flash drive from the list of devices;
- Save changes and exit the BIOS menu.
USB is often listed as USB HDD (in older BIOS versions).
Setting up the BIOS for acquiring a flash drive
Remember that you have configured the BIOS to download from flash drives and have a lot of foreign language knowledge. To permanently set up the BIOS for priority access to the USB port, you need to go to the service menu and press one or more keys on the keyboard. You will need to press F2, Esc, Delete. If the skin fragments are changed, the processor changes its input algorithms, and keyboard commands may be disrupted. For example, in Phoenix BIOS you can enter the combinations Ctrl+Alt+Ins, Ctrl+Alt+Esc or Ctrl+Alt+S (depending on the release date and specific model of the motherboard device).
Using the additional combination Ctrl+Alt+Esc or simply pressing Del, you can go to the Award BIOS, accessed from a flash drive, and then proceed to the standard level. After logging into the BIOS Setup Utility, look for Boot Device Priority and select USB Flash, which is the only one. As a flash drive with an operating system, we call it a flash drive. Remember that selecting devices and migrating through the menu is done using the arrow keys on the keyboard, entering a section or confirming using the Enter key. To save the settings in the BIOS, you can use the F8 or F10 keys (depending on the driver) or the Save and Exit Setup menu section.
Installation of the operating system
To re-install "from scratch" the Windows operating system, it is important to remember how to get hold of flash drives, use the software, and configure your PC (this stage is described in more detail). However, what should you do if there is no option for flash drives in the BIOS (you searched all the menus and did not find such a section)? Remember, if the flash drive is faulty and the PC is not running, then it may simply not appear in the menu. Since everything is fine with the flash drive, but in its section the storage is not visible, then, having seen everything, you are looking at the right side of an even older PC, which does not have the storage system transferred via USB. There are prices for desktop PCs and laptops up to 2005 release. Sometimes you can enter the menu not to name your flash drive, but to write USB HDD, which you select for installation (the system installation will be prompted). Remember that if there are a number of storage devices connected to the PC that operate via USB, then it is necessary to select the priority of storage in the advanced settings, indicating to the first ones your “storage flash drive”.
Remember that you can download from USB older OSes, even up to Windows XP, otherwise your installation will differ from installation from disk. At the same time, the new OS, starting with Vista, is installed from a flash drive with great satisfaction.
Preparing the distribution for installation from a flash drive
In front of you is a PC that has US ports, you can install it from a flash drive of the operating system. You will now have to prepare both your PC and storage before the OS installation procedure. Since the inclusion of flash drives in the bios is already established (the description of the procedure is clearly stated above), there is no need to prepare before installing the storage device. For this purpose you can use Microsoft's free service program - Windows 7 USB/DVD Download Tool (suitable for both Vista and 7 and Windows 8, 8.1, 10). Then you can quickly use the universal paid program UltraISO, which will help you create an attractive flash drive with any operating system, such as Linux and Windows (Vista and newer). If you want to create a great savings for older Windows systems like XP, then the Win Setup From USB program will help you. Each of these programs contains instructions for creating advanced OS images. This will allow you to quickly launch the installed operating system on your device.
While installing the OS on a PC, it can be run in Live mode (Linux distributions) or in troubleshooting and update mode (Windows OS starting with Vista version).
Adjusting the system without reinstallation
Correctly installing the Windows distribution will allow you to deal with emergency situations such as wasting valuable data on the system partition of the hard drive after a virus attack, or restore the system to an early stage through update points (Windows 7 ,Vista). Since it is possible to connect a computer from a flash drive to work in Live mode, customizing the BIOS for accessing from USB is even more popular. Proper storage from a flash drive allows you to comfortably work on Linux systems without installing the rest on the hard drive of the device. With this you can watch streaming video, edit documents, listen to music, and listen to social media.
This method of accessing a PC is convenient and allows you to work on the machine with a password. If you can gain access to flash drives in the BIOS (be sure that the rest are not locked with a password), then you can use virtually any computer for your own purposes. In addition, Linux OS will help you access files on such a computer that were not previously accessible from Windows (using the administrator password). Also, you can access the flash drive through the BIOS using the method of removing information that will save you.
Why you need to work carefully in the BIOS
Remember that installation from a flash drive through customized BIOS must be carried out very carefully, following the instructions. It is important not to set a password for access to the BIOS, because if you forget it or enter it incorrectly, the system will be locked and the settings will be lost in it forever (only flashing the PZP of the BIOS chips will help). It will cost you a fortune to repair your PC.
First, install a new operating system from a flash drive, it is important to save all your personal data, and not only from drive C (My Documents, Vanity, Desktop, Pictures, Music), but also D. Since there is no password on the BIOS, then “in indu" It doesn't matter if you install a flash drive. All new Windows operating systems, after installing the latest BIOS settings during installation, do not differ in anything from such storage conditions in the form of a CD or DVD disc. All menus and commands are the same, only the operation is significantly faster (faster data exchange from the USB device, rather than from the drive). Before installing, simply download the OS that has the license and support on the side of the device.
Is the flash drive annoying for hours?
Having learned how to set up the BIOS for installation, and having completed all the settings and installed the system, the user may wonder whether to deprive him of his data or erase the flash drive. If you installed Windows 7, Ubuntu 16.04 or more, then you will need a storage device of 4 GB or more. On the one hand, such a price is cheap, but on the other hand, it may be good for everyday use. If you're a computer expert, you're trying to install Windows from a flash drive, so you can't use your storage system and use it all the time, including an uninstalled OS. Since the flash drive does not sit idle while it is idle, it can save hundreds of files, which cannot be said about optical disks.
Having learned how to install backups from flash drives in the BIOS, the user must first prepare the storage, select the type of downloaded content, save all important data and complete the installation.
Depending on the strength of the PC and the data transfer standard it supports, installing an operating system via a USB port 1.1, 2.0 or 3.0 may take a few minutes or even a year. All devices (laptops, netbooks, stationary machines) with less than 10 devices require flash drives.
Incorrect adjustment and inheritance
The buyer is responsible for understanding that if you configured the BIOS incorrectly, you can reset the configuration in the future by setting the values for the settings. In this case, you need to quickly select the Save and Exit Setup menu item before saving the parameters.
If you want to enable this mode, it’s very simple - you need to select the Load Defaults BIOS item (sometimes it will read Load Safe-Fail Defaults or Load BIOS Setup Defaults). You can also remove the BIOS battery on the motherboard of a desktop PC or in a laptop (however, you will have to remove the remaining one). For stationary devices on the system board, you can find a jumper or jumper that can “reset” the BIOS settings to factory settings.
These are all ways to help resolve problems with the BIOS, unless you remove the password from it, so it is recommended to lock them only as a last resort.
You’ve already written down a valuable USB flash drive, but don’t know how to install it from the flash drive? There is nothing complicated here. Transferring Windows from a flash drive is even simpler, and all you need to do is go into the BIOS and change the settings.
If you haven’t yet recorded a licensed digital copy of Windows, I recommend reading –?
How to get started with flash drives?
If you simply connect the USB flash drive to your PC or laptop and restart it, you will not have to install Windows. For this you need to enable the flash drive in the BIOS.
It’s not easy to fight. There is a nuance here. On the other hand, the use of Windows with flash drives on PCs and laptops affects differently. First of all, it should be stored in the BIOS. Or in another way – the type of laptop brand (Asus, Acer, Samsung, Lenovo, HP etc.).
Thus, the Bios menu will be different from now on, and you may find it difficult to navigate. Below we will look at a number of applications so that you can understand and be able to independently navigate the BIOS menu (in case you have another option).
So let's see. To enter the BIOS, you need to press a button on the keyboard while your computer or laptop is turned on. Yaku yourself? You can find out when you are attracted to the screen.
You can find out about those who have gone to BIOS by opening the submenu in front of you. Check out the following options:


If you were unable to reset the BIOS, then make sure to turn off your PC or laptop, reset it and try again by pressing another key.

In this box, Boot was selected, and then Boot Device Priority (this gives priority to launching devices). As a result, a menu similar to this will appear:


As you know, there is a stench of carnage, but in the case of skin problems, we need the rows - First (1st), Second (2nd) and Third (3rd) Boot Device. It is indicated here which device is attracted first, which one is attracted by the other and the third one after that. As a rule, the hard drive (HDD) comes first, and then the disk drive (CR-ROM).
When you connect a flash drive, another USB-HDD will appear. It is necessary to select the USB-HDD option in the First Boot Device section. Butt:

You still need to carefully save the changes, otherwise you will have to repeat everything from the beginning. Which button should I use to save? This information is written at the bottom of the screen. For example, in the screenshot you can see: F10 - “Save”, ESC - “Exit”. Save changing and exiting the BIOS. I see, setting up the BIOS for downloading the flash drive is complete.
The computer (or laptop) will automatically re-engage, after which the following sequence will appear:

Press any button and the Windows installation will begin.
If you have a BIOS UEFI then everything is as simple as shelling pears
Go to Bios and see a menu similar to this:

To set up a flash drive in UEFI, select the Boot Priority item. Drag the USB device icon to the top of the list (be the first) and exit (exit button in the upper right corner). When you exit, the system will power you up - save your changes. Wait until your PC or laptop is re-engaged.
Before we speak: it doesn’t matter at all what type of recordings you have on a USB flash drive – Windows 7, 8, 10 or XP. The price doesn’t add up to anything. Getting the OS from a flash drive will happen in any case (it’s clear that it’s written correctly).
And finally, another very important moment. Once the unpacking of Windows files is complete, the computer will restart.

After which you need to go into the Bios again and change the priority to launch devices. So, put the hard drive (HDD) in the first place, and the USB flash drive in the second place. These problems are not to blame.
In principle, you don’t have to bother anyone. Once a black screen appears, NOTHING don't push.
Otherwise, you will be interested in installing Windows again, and you will install the operating system again.
Once Windows is installed, you still need to go into Bios and change the priority to launch devices. Otherwise, the computer (or laptop) will first have to download data from the flash drive (for the reason that it is connected).
The world does not stand still. Since it became so popular, it was necessary to save information on a disk or floppy disk. Nowadays, the advantage is given to more handy and portable flash drives.
To access the BIOS via a flash drive, you need to select a number of features:
- It is recommended to move the hard drive up to the slot located on the back of the system unit. She herself is dependent on her mother;
- Connect the device until you turn off or restart your computer.
Regardless of the BIOS setup, to successfully install Windows from a flash drive, you need to complete the following steps:
- Open Bios. For whom is it necessary to press Delete or else Esc. The service keys may vary in different versions of the program. Make the smell appear at the bottom of the screen right in front of the operating system.
- Next you will need to turn off the USB controller.
- After this, the flash drive must be moved to the first place in the list of devices that require storage.
- Save your money.
Launch from a flash drive in Award Bios
This program version is clicked with the button DEL or use the same keys Ctrl+Alt+Esc(In older versions).
Go to tab "Integrated Peripherals", to press down the USB controller. I'll write more "USB Controller"і "USB Controller 2.0" set values "Enable". For this, use the vikorist button Enter. Turn one step back, pressing Esc.
Now we need to quickly adjust the storage from the flash drive in the bios. For whom go to the tab "Advanced BIOS Features". Select section "Hard Disk Boot Priority". Here, in the first row, the name of the memory card is indicated. The hard disk occupies this position in the promotional industry. Vikorist key «+» , move the required row to the first place. Turn to the front menu.
Get your respect back on track "First Boot Device". Whose name can I write? "USB-HDD" What does it mean to use a flash drive or an external hard drive? During the installation process, you may Which option should you select to show your external floppy disk drive? "USB FDD".
If I write Second Boot Device it will say Hard Disk.
After making changes, you can exit the BIOS and save the changes. Press Esc to exit to the main menu. Then press "Save & Exit Setup".
Installing a flash drive in AMI Bios
The “AMI BIOS” exit appears when you press the key DEL or else F2.

USB controller settings can be found in the tab "Advanced", in the section "USB Configuration". Pokaznik "Enable" guilty buti bilya "USB Function"і "USB 2.0 Controller".
Return to the front menu (Esc) and go to the tab "Boot", divided Hard Disk Drives. The name of the flash drive may come first. Press "Enter" On the first row and in the new window, select the required item.
Go to the front menu "Boot Device Priority". There may be a flash card nearby.
After this, you can return to the main menu and exit the BIOS, saving settings.
Vistaviti is interested in flash drives from Phoenix-Award Bios
Having pressed F1 or else F2 You can open the BIOS version of “Phoenix-Award” .

The USB controller section can be found in the tab "Peripherals". Pokaznik "USB-HDD" need to be displayed in a row "First Boot Device", tab "Advanced". Don't forget to save your adjustments.
Customize the settings for flash drives in Bios UEFI
New laptops released no earlier than 2013 have a special BIOS version. One of these features is the presence of protection when installing operations from any media other than the license disk. To install data from a flash drive in this version of bios, you must first turn on this security and set the mode to compatible with other operating systems.
Once you have upgraded to BIOS, go to the tab "Security", divided "Secure Boot" and set the values there "Disabled".

In separate "Boot", in a row "Boot Mode" Slide insert values "Legacy Support". In a row "Boot Priority" may stand "Legacy First".
Log into the Bios again, go to the Boot section and raise the row "USB-HDD" first place. After whom, save the change. Windows will be more accessible from flash drives.