How to create a gallery in WordPress? Basic instructions for beginners Basic gallery styles. Plugin Gallery Carousel Without JetPack
In this lesson we will look at the process of creating an adaptive thumbnail gallery. Let's look at how to achieve the highest goals and avoid problems that may arise in the context of a great project.
Enter
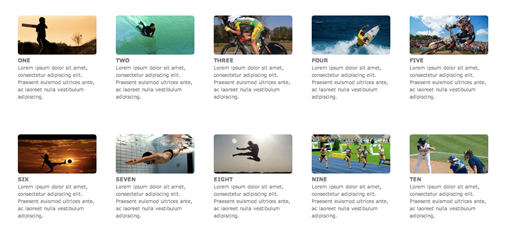
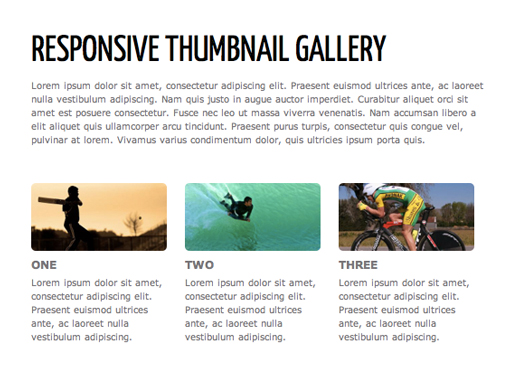
First of all, let’s take a look at what we take away as a result of the process. Before the demo page is shown, we need to change the width of the browser window to improve the response of our code.
A complete plugin with unlimited options for creating and managing galleries. Includes templates and access to the library is expanded if you need to increase the functionality of this plugin. Apart from these screens, you can add videos and images to your library. This also means that the plugin is lightweight and can be used by users without major problems. You can sort thumbnails in columns or on a grid basis.
You can also choose one of three themes: cleaning, compact, and home. Just display your projects and show them on the linked page, vikoryst templates that are provided by the plugin, shortcodes and tags. You can quickly publish and categorize your projects, as well as include additional information, tags, client details, mailings and covers. To expand functionality, you can use widgets and short codes, and also train them for additional templates and filters.
Container style
Let's now create our CSS code by setting the width of the container and centering it on the side. In this way, we have a clear, wide space for work with a gallery:
Container ( width: 80%; margin: 30px auto; overflow: hidden; )
Please note that the width is set in the hundreds. This is how we eliminate the distortion of every available space and flexible template. We need the design to look not just at the right points, but to adapt until we look at it again.
With your new interface, you can easily manage galleries, audio and video files. To the skin element that you add to your portfolio, you can add a title, certificate, cover image and post to the client's website. The plugin automatically creates a template for the skin category that is suitable for your projects.
You can also sort the elements of your portfolio, add filters and split into pages, change the size of the image for the skin project in your portfolio and much more. You can create a page with sketches that are automatically generated. The online demonstration, created with the help of your assistant, can be found here.
Main gallery styles
Now let's move on to assigning styles for the class galleryItem. You can set the color of the text, the size of the font and the shiftable elements to the left.
GalleryItem ( color: #797478; font: 10px/1.5 Verdana, Helvetica, sans-serif; float: left; ) .galleryItem h3 ( text-transform: uppercase; ) .galleryItem img ( max-width: 100%; -web border -radius: 5px;-moz-border-radius: 5px; border-radius: 5px;
Image styles are also set here. The power to display the max-width value is 100%, which is determined by adapting the size when the width of the viewport is changed. Also for pictures, the corners are rounded off.
Look back: Dialogue window “Division Slider”
Click the “Croc 1” button on the main navigation panel, and in the “Add Slides” dialog box you can set the gallery size.
Choose a mask and customize it
Select a transition and tune in. Lesson 4: Adjust the gallery settings. If they are rich, then they can be rude. We are going to teach you how to earn money. First, what you need to do is create a note, in which we will insert a gallery of images. After creating, you need to take photos for the vikoristan. Let’s try to depict how one would normally swallow one’s throat.Working with columns
This is the most important part of our lesson. You will need to know how to set the width and margin for the skin element in the gallery. Since all the elements are mixed in a container, it is necessary to vary the dimensions in order to adapt to changes in the view.
We will have five columns in the demo page design. I'll figure out mathematics before cultivating fields. Between the columns there will be a margin of 4%. Multiplied by 5, it’s possible that 20% of the width goes to the margins. In the morning you lose over 80%. So, the skin column will be 16% wide.
In this case we have 6 photographs. In the same area where we want photographs, we click “Create a gallery” and then click on the image we want to display in the middle. For example, we will vikorize six, but you can vikorist everything you want.
If you want, you can add a signature to the skin image, although it’s not obligatory. Then go to the bottom right corner of the screen and click “Create a new gallery.” Similarly, we will need to adjust our gallery by selecting a number of columns in order to display the number of images that will be shown in the thumbnails. The message will appear as you see it on the screen, but if you want, you can choose an option by selecting this option. You can set it up so that the skin image is linked to the side of the insert.
![]()
Now we can insert these CSS code values. Leather class galleryItem represents one column, so the width will be 16% and the margin will be 2% of the skin side, so the total will be 4%.
GalleryItem ( color: #797478; font: 10px/1.5 Verdana, Helvetica, sans-serif; float: left; width: 16%; margin: 2% 2% 50px 2%; )
This set of styles creates a neat five-column template that looks good on screens 13 inches and larger.
Visual appearance is often important for the success of web pages, both in blogs and online stores. Disorganized texts appear before viewers even before they read their text. Our graphics and images are therefore a fundamental part of the website and are used to illustrate or clarify the content, to achieve a special emotional level or to visualize the transfer of products, like. The image gallery includes popular tools for easy integration of images into web pages.
De template vygladatime sloppy?
Unfortunately, this template will not work if the page size is changed. With a width of less than 500px, it becomes completely unreadable and lumpy.

For best results, we will use media queries to reassign the appropriate column size.
However, such integration is even simpler, since the content management system is used. When you click on the image I'll look back in advance, great image appears on a darkened web page like a trellis. A scenario of such characteristics can be easily integrated into a web site and implemented for additional other functions. The main thing for this is the availability of a streaming version of the program, as well as the presentation of the content in thumbnails, if you want to integrate it with the web site.
In addition, the following lines are inserted into the header of the web page. The front row can be inserted into the remaining row in front of the mark. The skin image you want to visualize using Lightbox will require a suitable attribute for the new output code to supply the required information to the script.
Determination of critical points
The key is to identify the critical points that lead to the development of the design. Refill market various outbuildings h different sizes screen, and it’s very difficult to select all possible options.
To simplify things, let’s think about which screen size is the most popular, and let our template itself identify the critical points. Once we analyze the points where the pattern breaks, we can capture these areas and create our pattern so that it adapts to any device.
Butt slide with many images
Now Lightbox is already integrated into the web page. Don't forget that there are other options for customizing your slides or displaying your Lightbox.
Summary of the most important options
Using the choice of tools is even simple and intuitive, and in most cases the drag editor is used.When creating their own web pages, many companies and freelancers make decisions about the content management system, which can be a big advantage. However, with such a complete modular structure, these systems can be implemented and adapted to individual needs. As a result, in advance, there will be great effort for a wide range of systems and the development of numerical extensions and plugins.
How to identify critical points?
Samy shortest method- open the browser page and change the window size. Technically, our template is not broken at all, because the scale changes. However, if the window size is close to 940px, the text column will become too narrow for harmonious placement of the text:

Of course, newcomers need an adaptation phase in order to learn how to master all their functions. Once this phase is complete, users can use not only the basic functions, but also practical functions such as enabling watermarks or changing plugs. Its developments and developments are under the control of a wide partnership. Among its most important features is the turbo mode, which allows you to capture images and galleries of great images without troublesome charging periods and without any negative impact on productivity.
To correct the situation at this point, it is necessary to create several columns instead of five. By changing the column width to 21%, we seem to have lost it. Since the resentment of the power of “max-width” and “max-device-width” is taken into account, the design will change when changing the browser window and on devices with a screen size smaller than the established values.
@media only screen and (max-width: 940px), only screen and (max-device-width: 940px)( .galleryItem (width: 21%;) )
Several additional functions, such as entering parameters, a watermark function, viewing the list and classifying smart servers - but only a small part of the unlimited list of extensions to which you can deny access. Its main advantage is that the expansion is gradually developing and, therefore, promoting high standards.
When you create your own website, you sometimes face various difficulties trying to present your photographs and images as clearly as possible. Sometimes your template gallery is not functional enough. In this case, you can use different gallery plugins, specially created to solve this problem.
Adding to this style is a mystery. Our five-column design works well on screens wider than 940px, and can be translated into any column template for those of you.
Repeat the operation
Now we repeat the descriptions of the greater process again and again. The size of the window changes and it becomes surprising if the design stops functioning. The attack point appears at 720px. You'll need to change the column width to 29.33% to create a three-column pattern:
With your help, you can display photographs, images, illustrations, videos or any other content. The main purpose of meta galleries is to add a professional approach to any website. The gallery not only brightens up the design of your site, but also lightens the content with images.
The plugins in this collection offer a number of functions: animation effects, branding capabilities, inclusion of sub-galleries and much more. The portfolio plugin allows you to create a page with information about your projects. Portfolio Gallery is a custom plugin for adding a specialized portfolio or gallery to your website. There are a number of options for displaying images.
@media only screen and (max-width: 720px), only screen and (max-device-width: 720px)( .galleryItem (width: 29.33333%;) )
Continue the process until one column is removed (the size of the window is approximately the same as the size of iPhone screen). The axis is a new set of media requests.
/* MEDIA POWER*/ @media only screen and (max-width: 940px), only screen and (max-device-width: 940px)( .galleryItem (width: 21%;) ) @media only screen and (max- width: 720px), only screen and (max-device-width: 720px)( .galleryItem (width: 29.33333%;) ) @media only screen and (max-width: 530px), only screen and (max-device: 530px )( .galleryItem (width: 46%;) ) @media only screen and (max-width: 320px), only screen and (max-device-width: 320px)( .galleryItem (width: 96%;) . galleryItem img (width: 96%;) .galleryItem h3 (font-size: 18px;).galleryItem p, (font-size: 18px;) )
These plugins allow you to create an extensive grid list, add additional images and details to present your portfolio. The plugin allows you to quickly and easily display your website. It also allows you to select a number of filters and categories to sort your content.
New portfolio for creative people! One of the elements of the web site is the image gallery. This gallery is extremely simple, but if we look at it without difficulty, it will help us even more. Subscription before photo Write Subscription to signature.
Visnovok
Now we have a miracle responsive gallery miniature, which looks wonderful on any device or browser window.
Instead of developing a template for specific most popular media queries, we analyzed the functioning of our design when the browser window changed and made changes at critical points to update the new look.
And after the tag we can enter the text that will be under the great photo. As you can see, the image gallery example is completely simple and easy to implement. You can revise this code again, just change the names, images and texts.
If you have any doubts, find it here. The gallery can be archived in broad strokes: images, audio, video and documents. The first option that you will find in the middle of the media gallery is the multimedia library. There you will find all the files that you have in your installation, saved in singing hour; And you can choose how to view them by selecting the appropriate icon above the images.
Creating a new gallery is so easy. Let's explore more of the “live” and powerful power of CSS3! Before that, don’t stagnate with the new JS and JQeury.
In this case, I will show you how to create a truly original gallery that is free of HTML and CSS3 power.
The main feature of this gallery is the images, which will enlarge when you click on them.
It’s really easy to earn money, you only need one HTML attribute that one CSS pseudo-class.
This screen also allows you to display other song files by simply selecting required option from the menu that you can see. In addition, if you know the name of the file or the word you want to add, you can search for words by searching for how the right-hander appears on your screen.
Vikoristan of the "Add new" button on the media library screen

Pressing this button will give you the opportunity to attract new file, having pulled yogo or vibrated yogo z hard drive computer, for which you have to press “Select files”.
Z “Add a new entry”
If you write new entry in your web blog or blog, and you will need to include images that you do not have in your media gallery, you can also do this at the same time by clicking the “Add object” button that appears above you in the field, where you write the text.HTML
So, to make it appear larger when you click on an image, you need to add a tabindex attribute, which can be an integer number, starting from zero. In addition, when you press the Tab button, the image will automatically increase in size.
Before you start, design the tag itself . Here you can immediately add clarity, smoothness, shade, as well as the following:
After selecting, click the “Insert into entry” button at the bottom right corner, and the file you select will be inserted in the middle of the entered entry. 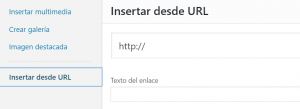
On this screen you can create a gallery to insert in the middle of your message. The gallery allows you to select the images that will appear in the rows and columns as you configure it.

When you select the “Create Gallery” option, you must select the images you have in your library and want them to appear in your post. After making your selection, click on the button in the lower right corner, where you will put “Create a new gallery”, and it will be automatically inserted into your contact.
Gallery a img( /* rounded start */ -webkit-border-radius: 25px; -moz-border-radius: 25px; border-radius: 25px; /* rounded end */ /* transition start */ -webkit-transition :All 1s ease;-moz-transition:All 1s ease;-o-transition:All 1s ease;transition: all 1.0s ease; 2px 4px 1px #DFDFDF;-moz-box-shadow: 0px 2px 4px 1px #DFDFDF; box-shadow: 0px 2px 4px 1px #DFDFDF;/* Shadow end */ /-* Visibility start */ -mo opacity: 0.70; -ms-filter:"progid:DXImageTransform.Microsoft.Alpha"(Opacity=70); Internal connections*/ display:inline-block; /* image */ height:150px; /* Height */ )
Now you can get the effect of clarity when pointing, and not when pressing:
Gallery a img:hover( -moz-opacity: 1; opacity: 1; -ms-filter:"progid:DXImageTransform.Microsoft.Alpha"(Opacity=100); )
There was no more work, so that when pressed, the image became larger. For whom vikoristovvatimemo pseudoclass. Ale yaki? :hover , :active , :link is clearly not suitable here... For this purpose, the pseudo-class :focus is suitable, because it is useful just when clicking on an object and knows when another click is expected.
Gallery a:focus img( position: relative; /* Position */ height:300px; /* Height */ cursor: pointer; /* Cursor view */ /* transition start */ -webkit-transition:All 1s ease; - moz-transition:All 1s ease;-o-transition:All 1s ease;transition:all 1.0s ease;/* transition end */ /* Shadow start */ -moz-box-shadow: 0px 4px 4px 1px #DFDFDF; box-shadow: 0px 4px 4px 1px #DFDFDF; /* Shadow at the end */
Mayzhe is ready. But now, when you click on the image, the yellow line appears, for example, Google browsers Chrome. This can be easily corrected by adding authorities with circles with zero values:
Gallery a(outline:0; border:0; )