Self-propelled doorbell Installing a doorbell in an apartment A simple do-it-yourself battery-powered buzzer
Robimo do-it-yourself dartless doorbell
The author decides to share the evidence of creating a system for the drone-free doorbell alarm with his own hands using additional modules from Master Kit. After moving to a new apartment, we want to install a buzzer first. Already the place had become unforgivable. On the right is that the forgetter installed the buzzer button only for the entrance doors, but there was no button for the entrance doors of the vestibule. Since the old call was electromechanical and switched on behind the circuit through a button, the new one required the installation of an additional dart. However, the attempt to lay wires at the vestibule ended in failure. The walls of the vestibule were crushed from mortar concrete, and the initial drill using the hammer drill function simply came out of the wall. In order not to waste pennies on purchasing an expensive professional tool, it was decided to buy a simple Chinese dartless crank. Plus the number of darts on the eyes. It also turned out to be difficult. Inexpensive calls have a poor sound quality and a banal set of melodies, like after the first month of operation. As a result, we were about to lose our good old electromechanical buzzer. Where would it all end, except for the defection of the outer door button, signs were periodically given to the vestibule. We wanted to create a drone-free activation of the call.
https://site/blog/articles/staryj-drug-luchshe-novykh-dvukh
Statti
Robimo do-it-yourself dartless doorbell
After moving to a new apartment, we want to install a buzzer first. Already the place had become unforgivable. On the right is that the forgetter installed the buzzer button only for the entrance doors, but there was no button for the entrance doors of the vestibule. Since the old call was electromechanical and switched on behind the circuit through a button, the new one required the installation of an additional dart. However, the attempt to lay wires at the vestibule ended in failure. The walls of the vestibule were crushed from mortar concrete, and the initial drill using the hammer drill function simply came out of the wall. In order not to waste pennies on purchasing an expensive professional tool, it was decided to buy a simple Chinese dartless crank. Plus the number of darts on the eyes. It also turned out to be difficult. Inexpensive calls have a poor sound quality and a banal set of melodies, like after the first month of operation. I'm sorry, I managed to find a ringing signal with a louder sound. It’s not surprising, but it was electromechanical, only because of the built-in dartless module. Everything is miraculous, but I was disappointed by the virtuosity of this tinkle, and it cost 9,000 rubles.
As a result, they decided to immediately deprive their old electromechanical buzzer. Where would it all end, except for the defection of the outer door button, signs were periodically given to the vestibule. We wanted to create a drone-free activation of the call.
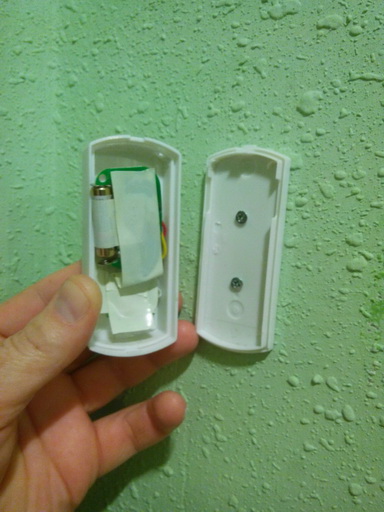
To implement the project, a number of devices were selected from the assortment of drone-free modules from Master Kit that operate in the 433 MHz range: , and .

I think, because of the power supply, the MP220V sensor is now needed. It’s all very simple, the developer of this sensor, based on its additional capabilities, and with the help of simple manipulation with a soldering iron, the sensor is converted to a compact battery that will be created, with a voltage of up to 80 mA and a voltage of 5V or 12V on the selector . For installation, the module is configured for 5V voltage. Since the space in the alarm housing is limited, there is little room for the MP324M receiver.
However, the skin is good for a short time, however, there is a lack of galvanic isolation at the edge. Therefore, when setting up, it is necessary to follow the electrical safety rules. And the installation of circuits only works in an uncontrolled state. To switch this module to the life-saving mode, you need to use a soldering iron to move the jumpers –V, RL and +V, RL to positions 1-2. In principle, it doesn’t matter at all whether you need to use a board for the 5V adapter of your mobile phone, whatever the location allows.
For compactness, the changeable resistor of the MP246 power module can be removed. By installing a replacement jumper from the original mounting hole or to the terminal of the DIP resistor that was split.
To assemble the circuit, you need one DIP resistor with a nominal value of 10-15 kOhm and an electrolytic capacitor with a nominal value of 47 uF with a voltage not lower than 6V. In principle, the capacitor can be turned off in the circuit. However, the disturbance of the pulse at the output of the MP324M receiver was less than great, so this lanyard was installed. By changing or increasing the capacitance of the capacitor, the strength of the pulse can be adjusted. So, different rings have different structures, which may be necessary when adjusting the sound. A resistor is installed in parallel with the lance, which discharges the electrolytic capacitor, for the possibility of re-setting the ring.
Connection diagram:

After folding the ringer circuit, connect the structure to the limit and register the connection. To register, briefly press the button on the receiver, then press the buttons on the transmitter, after a few seconds a pair will appear. Now, when you press the first button on the transmission, a buzzer may sound. In this manner, we add and check another remote control.
Photo of the layout of the modules in the door:

After checking, the bell housing is closed and installed in place:

You will learn how we can live with our collected devices. Even on the line connecting the call, the voltage appears less when you press the button. In reality, everything is simple, the live buzzer is guaranteed as soon as the button is modified.
For the cob, it is necessary to remove the lantsug plot, so we will work on the modification. We remove the button from the box and two standard parts are connected to each other with insulating tape. So it’s time to give us a permanent 220V food supply. The flow rate in the cleaning mode reaches tens of microamps. Therefore, permanent inclusion does not contribute to the payment of electricity.

Now we can understand that the transmissions are connected parallel to the first buttons, two darts. The output that came out is cleared and connected to the contacts of the removed button. For greater reliability of transmission, you can wrap it with one ball of insulating tape.
Connection diagram of transmitters to call buttons:

Now we install the button on the site and check the operation of the call.
So we simply select another button and fix its body on the tambour door, for example, with double-sided tape. However, I finally managed to drill the wall to a small depth and secure it with two small screws.
Well, that’s all, you can get out of it quickly.
If after a couple of minutes one of the buttons stops working, don’t panic, it’s just time to replace the life elements. The transmissions are powered by a 12V voltage using a 27A element, which can be found in any supermarket. I think there will definitely be no problems with this. The elements of this scheme are already working. The ringing is not carried out often, so I think that at least a few more rocks are processed in this mode.
You can watch the work of the device on video.
The dartless lock operates on batteries or an accumulator, so in the case of the model, it is necessary to periodically replace the battery. If you add devices, but have already collected and completed the purchase, you will only be able to connect, otherwise the distributors will deprive you of this purchase. Knowing that it is possible to create the technology of a drone-free call from existing materials without the need to waste money. The principle of connecting such a call is straightforward: most often the task lies in opening the opening for fastening and installing the call in operating mode.
How to get a dartless doorbell using the circuit diagram? How can I make a buzzer on the door?
Applied science does not stand at home. This is why our life becomes comfortable and carefree. So, new devices and gadgets appear and old ones are improved.
The smells become compact, universal and wires are quickly reduced. The same goes for doorbells. Now you no longer ring a bell with a soulless melody, with a garish sound or with the humanity of a voice.
And the dartless radio call axis is a new product on the market. Prote's popularity is increasing every day. This is due, first of all, to the fact that it is easy to install and you won’t have to lay holes or drill the walls. This is important if there are installations on vestibule doors or on the back of a private booth.
So what is the secret of such a unique device? As it seems, everything is ingenious - simple. All you have to do is look under your building to see what you can do.
Dzvinka schemes without a dart based on the principle of action.
Radio calls are divided into one type by a set of functions, range of action or life style. The smells are similar in one way - they are used to transmit a signal. This is how the button appears, and how to receive the device with a music chip, antenna and speaker. Let's take a look at the report, which shows the important diagram of a dartless doorbell.
A unique type of transmission microcircuits: it consists of a high-frequency generator, a converter booster, three transistors and a life-saving device. As a result, a 12 volt battery is used.
The transmission frequency of the receiver signal is set to 433 MHz. There is no such antenna here. There are two circuits that are connected in parallel. Thus, a simple microcircuit allows you to transmit a signal over 50 or more meters.
The cool look of the receiver's microcircuits. The device is simple to use. Its base has one transistor. The signal is transmitted to the detector.
Vin accepts it and goes directly to the doctor. Then the signal goes to the sound chip. On this chip the future signal is formed, which is sensed by people. Also, we always change the melodies and choose the loudness of the sound. After the signal has been lost on the chip, you must go to the sound booster and further speaker.
This principle is used to control most microcircuits for transmitting and receiving signals from the Chinese industry.
For clarity, let’s take a look at the diagrams of Chinese dart units. The main difference is the presence of antennas and the method of transmitting the signal from transmission to reception.
Self-propelled jingle of the dartless principle
Let's take a look at one of the self-designed microcircuits of the drone-free analogue of such a device. Basically, the principles of operation are similar, but the actions are similar. The main frequency is the frequency at which the signal is transmitted from transmission to the device - 87.9 MHz. The device itself consists of the following main modules:
- Keruvanya schemes,
- sound chip,
- Peredachach,
- Dzherela tavern.
Let's take a look at the skin element of the report diagram.

Scheme of a self-powered radio doorbell. The ceramic bath is located behind the additional button S1. Essentially, it starts the music chip and the transmission timer. If you are in a pressed position on lines 6 and 13, there is tension.
There is also a microcircuit with resistor R2 and two diodes VD1 and VD2. There is a limit to the upper voltage value on lines 6 and 13. It is necessary that the fragments of the USM and K561 microcircuits are divided into a logical level. The device itself is based on the D1 microcircuit. It plays the role of a timer, which turns on the transmission for a few seconds after pressing the S1 button.
For additional help elements D1. 1 ta D1. 2 single positive impulses are generated.
Their duration is closely related to the steady time in the lancus C1-R4 (looking at the values indicated on the diagram, we can say that the duration of the pulses is close to twenty seconds). The pulse changes polarity, consuming inverter D1. 3, and then there is the VT1 key. Dzherelo life is of a transformerless type, and the installation of capacitor C5 extinguishes the above-world voltage.
Important! In this circuit, the polar capacitors are of the electrolytic type, C11 and C12 are ceramic, or whatever. It is necessary that all capacitors have a voltage of at least 16V, and C5 - at least 300V. Coils L1 and L2 are wrapped with thin dart: on the first - 6 turns, on the other - two. The smell is frameless, and the internal diameter is seven millimeters.
For the sound chip, the UMS8-08 microcircuit is selected.
Vaughn creates 8 different sounds that are stored in it. The selection of melodies is performed by the larynx with the help of S1.
Yak antenna vikoristovuyut shmatok dart. A little more than a meter will be enough. With such an antenna, the device transmits a signal from a distance of up to one hundred meters to reception.
Now you need to configure the device. We need to check the food beforehand. Next, check the correct operation of the sound chip. If everything works, then move on to adjust the transmission. At every hour, VT1 and the emitter are short-circuited. The receiver itself is installed at the designated higher frequency.
For additional adjustment of C11 and C12, it is necessary to select the maximum range. Using resistor R8, modulation can be set for a better sound of the receiver. Then the jumper is selected and the timer on D1 is adjusted. To do this, briefly press the S1 button. When this happens, the transmitter switches on for a few seconds. Since this hour interval is too small or, on the other hand, too long, it can be changed by additional selection of R4 and C1.
Thus, with minimal knowledge and having purchased everything you need from your nearest radio store, you can make a reliable call with your own hands.
Ringing from unnecessary devices
If you have an old phone or a broken computer mouse and their repairs are incomplete, then the stench will become worse if you expect to create a heavy, bezdrotovy chime on the door. Let’s take a look at an option for preparing such a device with a mouse:
- All fillings and contact buttons are visible from the body.
- On the board, two keys are connected to a chime device, and parts that are missing are tidied up.
- The piece is cut in half and one part is glued back.
- On the remote control board, a twisted pair is soldered to the sound button. There you will find a button with the keys of the bear.
- We solder the ends to the key contacts - one to the extreme, the other to any two that are missing.
- The remaining contact of the three is connected by a dart from the proto-bed. In this manner, handle offended buttons.
The original jingle is ready.
Dzherelo: http://mezhdveri.ru/17964-besprovodnoy-zvonok-sheme.html
What is a dartless jingle, its varieties, how it works and where it stagnates
A bright, dart-free bell on the entrance door of an apartment or a booth does not sacrifice anything to its dart counterpart, and the ease of installation and dismantling outweighs it.
The signal transmission unit can be miniaturized so that the current drone-free models of calls are in no way different from the standard ones. They are equipped with a video glasses connected to a hand sensor, a backlight, an anti-vandal cover and other accessories to improve the comfort of the vehicle.
Main features of dartless dzvinki models
Whenever you choose to speak, we must first assess how far we fit into the minds in which we are exploited. To understand exactly why you should install a drone-free alarm in your home, you need to evaluate its features in more detail:
- There is no need to press the button from the button to the speaker. This is the main concern that most often comes to mind when choosing a device for a private booth, in which the door can be reached far from the door and a good-natured dog runs between them.
- Autonomous tavern. The fragments of the drone-free alarm operate on batteries, so when the light is turned on, the guests will not have the opportunity to call the ruler from the street for a long time. This is also the primary solution for summer cottages that do not have electrical installations. The life of the batteries immediately creates problems of inoperability associated with their periodic replacement, and then you have to choose what is more important.
- The dartless buzzer cannot be installed directly. It is necessary to pay attention to the range from reception to transmission and the presence of errors between them that interfere with the transmitted radio signal.
- If the booth has more than one door (or a door), but a series of doors, you can add an electric bell using two buttons. This significantly reduces the costs of their installation, which is equal to that of wired models.
- Easy installation, dismantling and moving buttons. This feature is rarely required, except if you need to put the screw in, change the side of the opening, or install the postal screen itself there, where the button is removed, the work will be much simpler. Since with a standard jingle you will inevitably have to switch the wiring, a non-dart one is simply unsafe.
Scheme and principle of robots without darts
For the average player, the principle of operation of gunless buzzers is very simple - the transmit button is pressed, the radio signal goes through it to the receiver, the electric lance is activated there, which supplies voltage to the speakers and the melody plays.
Regardless of the fact that the design of the device is rarely used by the transmitter, many radio operators have adopted the remote method of connecting the device, making with their own hands not only calls, but also other devices to control - without dart vimikach light or remote lifter for garage doors.
The circuits of these devices are simple to prepare and unbreakable in operation. The first two circuit boards are for the button and the receiver, and the third circuit does not require any adjustment - as there is a special supergenerator and behind the inputs of the correspondents, everything is due to the high stability of the robot.
Video glasses for dartless calls
An innovative scheme for installing a bell on the doors can allow you to remotely monitor the entrance or street. If there is a video glass with a camera installed on the entrance doors or in the gates, then in the middle of the alarm you can immediately see who to call.
Depending on the device model, the image that is transmitted by the video glasses is displayed on a peripheral display or transmitted to the original computer monitor. The brightness of the picture is determined by the camera installed in the video glasses.
If you choose such a scheme for the device, you need to make sure that the video glass with the camera draws more than ground life. The main solutions to this problem are:
- Select a suitable set with minimal energy consumption (if you need to record continuously).
- A diagram showing how the camera only transmits calls after pressing the call button (the video window only records those who have called).
- The video from the camera is powered directly from the video. It would seem that there would be a dartless call, but this scheme also tends to work out often.
- The connection circuit must be equipped with a motion sensor (the video window with the camera begins to work if you want to walk up and down, as there are people with an inappropriate sense of humor in the area).
Also, since you are planning to install a video camera with a camera, you select a separate part of the rest - which part of the picture you are taking. Also, you need to ensure that the Great One has allowed, more data will be transmitted by the camera over the radio channel in one hour, and thus this scheme can be brought to life.
Nuances when choosing a dartless call
Like the original models, drone-free doorbells for entrance doors must be selected according to the following rules, especially since the purchase of such a device is required first, and does not preclude the operation of such devices.
Vidstan
In a head for a dartless call, the brightness is the radius and strength of the signal that is transmitted from the button to the speaker.
If there are 5-10 meters between them, then it’s unlikely that you’ll get the hang of it, and if you want to use the device at a distance of 50-150 meters, then it’s better to try it before buying and contact the seller for an exchange for turning as needed Still, this electrical signal will not work. This is entirely possible – even if you can’t see it clearly, you don’t cross the road signal.
life
The number of batteries required for the operation of the device depends on the different types of batteries used and how often they need to be changed. In the end, the truth is unlikely to be true, but if the seller praises the unprecedented economy, then it’s time to think about it. Please pay special attention to the type of batteries, as they can be greatly increased.
Equipment
Everything is simple here - you just need to check your passport so that everything is in order. It is especially important to enter the dialer equipped with a video camera, a number of buttons and other additional functions. If you find out at home that some parts are missing, you will sooner or later have to go back, and in the worst case you will be told that it was a shortage at the factory, and not a waste of spare parts because of the buyer’s fault.
Overpayment
It is possible to add a simpler model. Yakshcho VID Dzvinka Tretrno, Schob Vin, just jerking, then tagged, yang, yanging pydlychate to the comp'yuters, Scho to write in his trifle jerks of the dzvinka I overpayvati for the cinema of the airborne cushion - Shvidsha for the whole sensation.
Kriplennya
The Velcro can be removed from the surface of the glue if you move the button, and the screw has to be tightened on the wall or entrance door. The Velcro can fall off, but the screw can only be screwed in once. What’s more simple is to choose the need according to the situation.
Guarantee from the manufacturer
There is nothing special to fix in simple doors, and taking it out for repairs can be more expensive than buying a new device, but it is necessary to clarify the supply. If you are buying a model with a camera, an internal screen and a roc sensor, then the guarantee requires not only a return, but also complete completion of all documents.
Zagalne vrazhennya
In addition, in order for something to be beautiful, you need to marvel at the softness of the materials from which it is made. If you buy a street bell, it is better to select the button behind the anti-vandal housing.
Next - listen to the melody that you happen to hear day by day, and choose a device for the vibrator. The last important point is to determine the many characteristics of the device and the availability of its warranty service.
Installation of a buzzer
Depending on the size of the button and the functionality of the device itself, a place for their installation is selected. There is not a lot of choice here - it is necessary that the button be clearly visible, and if there is a way out, then it is clear which door to go to.
- Wall of doors. This place for fastening is most often used - like a button with Velcro, so that the fastening is placed after the wall has been plastered or whitened. In the first case, the surface needs to be carefully degreased, and in the other case, it is better to have a screw.
- Lishtva or door leaf. It’s all very simple - first of all it’s self-tapping.
- Have a private booth. Here you need to think more not about where and how to screw the button, but how to remove it from direct changes in the sun, and other atmospheric phenomena.
When the speakers are installed in the middle of the alarm, there are two options - since it’s just a ringing sound, it’s easier to install it, otherwise you can turn it off or change the melody, for which you still need very free access.
Dzherelo: https://golddveri.ru/vxodnye-dveri/besprovodnoj-zvonok.html
Selecting and installing shotgun and shotgun-free doorbells, various types of alarms, doorbell repair
We first need to decide which doorbell to choose on the entrance doors - shotgun or shotgunless. To maintain proper nutrition, it is necessary to equalize the benefits of some of these and other adjustments. Let's finish with radio calls.
Droneless devices with batteries
The peculiarity of such connections lies in the fact that the role of the cable that transmits the signal is played by radio waves. Essentially, the notification button is transmitted, and the block located near the apartment is received.
The idea has been broadened that all such links operate as autonomous units of life. Mechanisms with combined components - such as batteries and 220 Volt circuits - are often used. In addition, there are various types of these alarms without batteries, if the electricity is generated by the units themselves.
It’s hard to think that the shortest dartless jingle might be even more booming. Є low other parameters that need to be respected.
For example, divination calls without a battery are durable, but the battery, at its worst, requires replacement over time. The solution to this problem could be the battery. Well, first of all, it costs more for batteries, but in another way, batteries also go bad after a plethora of charge-discharge cycles.
In order to correctly select a dartless device, it is necessary to evaluate in what minds it will be operated. For example, if there is a possibility of power outages, the best option would be to run autonomous devices on batteries.
Differences between indoor and outdoor models
First of all, if you want to purchase a wireless alarm, you will need to contact the models that are intended for installation on the apartment or the entrance door of a private booth.
There are such signs of the importance of a street alarm as compared to an apartment one:
- The presence on the street door of an anti-corrosion coating and a visor to protect against falls. If you need to place a drone-free call to a private alarm, it is important to consider the extent to which devices will be stolen due to unpleasant meteorological surges.
- The presence on street models of additional protection of internal components and pressing buttons. Before the device, which is on the street, the shifts are visible to the pilot, moisture resistance, frost resistance. This device contains a foldable electronic filling. When purchasing, you must carefully read the documentation for the device, including the parameters of your moisture protection and operating temperature range. Most models that maintain performance from +40°C to -40°C are suitable for Russian minds.
- The device of the dartless street call is made of a metal body, and the button is made of metal. This is necessary to protect the mechanism from the attacks of vandals. Ale, as you know, the tightest zakhist, the model is dear to us.
Advantages and disadvantages
The advantages of dartless weapons are as follows:
- The number of wires eliminates the need to spend a long time searching for breaks in case of malfunction. It is important to note that the wired calls are rated at 220 Volts, and the system will then be under stress that is unsafe for life. If the insulation is damaged, especially if there is damage to the installations on the metal surface, it can lead to serious damage. Therefore, a dart-less call, which is basically autonomous (not to mention the button itself), is a safe device.
- The simplicity of installation is due to the number of wires. The mechanism can be secured with a number of strands without changing the folding circuits. It’s also easy to pick up and reset the call in another place, if such a need arises.
- The jingle is immediate and immediate. The devices are complemented by design and are produced in a wide range of colors from a variety of materials. As a rule, it is possible to select and customize the melody of the signal from dozens of inserted musical fragments. And in advanced models there are options that allow you to download melodies from a flash card or transfer them from mobile devices.
- System scalability. The addition of additional accessories allows you to install a number of buttons and speakers in different locations. Additional equipment kits can be tuned to any tune.
Disadvantages of dartless shooters:
- The fastening on the door is bad. Of particular concern in this sense is the Velcro model. Criminals can easily access and insert the call button attached in this way. In addition, during long-term use or through unclear materials, the button on the “Velcro” can be removed inadvertently. If it falls or hits a hard surface, both the housing and the electronic filling are damaged, until the device becomes completely unusable until further use.
- As practice shows, most mechanisms on batteries experience a lot of tension. As a result, batteries quickly become useless and require frequent replacement.
- Severe frost or sinter, exposure to moisture or the saw can cause malfunctions, which are reflected in fleeting signals without pressing the button or without clinking when pressed.
- Out of tune with electronic components. Perhaps the mother of numerical inheritances – knowledge of the signal, creation and creation of sound.
- In fact, if the button is attached to the speaker with metal or concrete cross-codes, radio devices can function without faults or not work at all due to a weakened signal.
In order to reduce the residue of possible defects to a minimum, it is necessary to add a variety of varieties. It will be a great advantage if the manufacturer provides a valid warranty on the operation of the device. It is also worthwhile to read on the Internet resources about specific models.
Dart clink
Electric chimes are represented by a great variety of models. There are devices here that operate in combination with a 220 V alternating power supply, battery-powered buzzers with a wired button and devices with combined electrical supplies.
The chimes can be adjusted to adjust the volume, which allows you to listen and set the required volume of sound. Shotgun models, as well as non-shotgun models, allow you to listen to silent musical themes and select a signal to suit your taste.
Advantages and disadvantages
The advantages of wired calls are as follows:
- The wired circuit allows the alarm device to operate effectively where the button is attached to the speaker through a large number of metal and concrete crossings;
- mechanical button, located above, highly resistant to the influx of climate changers, lower electronic;
- The dart system button was stolen from vandals and minor mountings.
A few of these adaptations include:
- breakdowns due to unclear components;
- foldability of installation;
- great unsafety of devices that operate under the alternation of the alternating stream.
Dodatkove obladnannya
Alarm systems can be equipped with additional equipment. So, the doorbell is connected to a video camera. Just as the device notifies about the arrival of a guest, the camera shows the Lord who has arrived.
To ensure that video recording is not carried out in continuous mode, the system is additionally equipped with a hand sensor, which starts video recording at the necessary moment. This type requires significantly less memory capacity to save files without interruption. Another reasonable technology allows you to transmit the ringing signal not to the speaker of the receiving unit, but to the owner’s phone in the form of an SMS message. This expansion of capabilities will also increase the performance of systems.
Installation of a dartless link
Before connecting the device, it is necessary to test, watch, and listen.
You can check:
- number of installed melodies;
- foldability of adjustment;
- ability to regulate thickness.
The procedure for installing a droneless call with your own hands is simple - you need to select a clear system, then secure the button and the main unit on the wall.
In this case, it is necessary to adhere to the following rules:
- Be careful not to use Velcro fasteners, as this method is less useful. Better yet, drill a hole in the wall, insert a dowel and place a button on it.
- The procedure has been expanded to attach the doorbell button to more than one door that is not correct. On the right, if any large object is brought into the apartment, there is a danger of breaking the button. Therefore, from the outside, the door must be secured so that there is minimal risk of troubleshooting.
- The alarm unit, which is installed in the middle of the room, must be installed in such a place so that it is available for maintenance - battery replacement and adjustment. The unit, which operates at 220 Volts, must ensure proper connection to the power supply.
Installation of a dart attachment
The connection diagram for the dart link is much more complicated. In particular, we need to talk about installing an annex rated for 220 V.
The connection of the bell operates in the same way as the lighting jumper:
- Installation of the device begins with the fastening of the button. A phase wire (not zero!) is connected to it.
- Then two darts are laid - the entrance and exit of the phase. The first one is from the button to the signal block, which is installed near the apartment. The other is from the button to the distribution box. There, a zero wire is connected to the signal block.
The laying of wires can be done in cable ducts. The connections in the separate box are sealed tightly when the electricity is turned on.
In order to provide manual access to the apartment, follow the diagram of the door chime. Today there are literally no models of such devices, but in this case the fundamental principle of their operation is lost to the practical ones. Let's take a look at how to correctly set the dials when necessary.
Depending on the type of doorbell, the connection method may vary greatly
I will build it in a special way
To create a comfortable mind, a whole range of additional devices are installed at the entrance to the skin. One of them is the bell on the door. Its direct purpose is to notify people who are near the apartment that guests have arrived before them.
With the device of the jingle the surface of the skin is known. A call button is attached to the outer side of the housing; a speaker is installed in the middle of the apartment, which picks up the signal from the button and transmits it in the form of a sound alert. This is how the simplest models are resolved. In modern devices, the functions are significantly expanded to transmitting video images online to mobile phones. Depending on the special needs available to the budget, the rulers can choose how to install a doorbell: in the simplest way, there is an additional option, or with many additional possibilities.
Even if homeowners often plan to install a doorbell with their own hands, it is important to understand the diagram of your installation and connection method. For this purpose, let’s first take a look at the main models that are emerging on the current market.

Today's doorbell with video window ensures a safe cabin
Types of calls
Today, the range of products of this group is large and continues to expand. With the development of technology, both the current characteristics of the switches and their functional capabilities will improve.
The installation of a doorbell is now a matter of treating the problem, and the manufacturers have since transferred the ease of use to the device and the strength of its vicor.
There are the following types of doorbells:
- Conducted This scheme is already alive. All elements are connected to each other by cable, which simplifies the connection process. The instructions may include a diagram to assist with installation.
- Bezdrotovi. The replacement of the cord determines the transmission of the radio signal and its reception through the antenna. With a single dart you can connect the cable to the life block.
- Sound. The signal is a sound notification: bell, melody, musical composition, voice recording.
- Video calls. Connecting a doorbell with a video camera allows you to monitor those who are at the door. Some models are activated only when you press a button, others can be turned on by focusing on the handheld sensor or continuously broadcasting a picture.
- Intercom. Allows you to transmit voice messages both in the middle of the alarm and outside the phone. Can be accessed from the video system.

Varieties of door hinges depend on the operating principle
Connection rules
Connection to the device is carried out in a number of stages, but before you install the call, you need to carefully think about its deployment. Please note that the sound of the signal must be heard well in all places, this is especially true for private booths. All models can be equipped with a number of speakers, which can be added to different parts of the booth. And for the visibility of many inputs, you can add an additional click button.
Now, how to connect the doorbell:
- Bezdrotovi. The diagram for connecting such a doorbell with your own hands is the simplest. To start, set the call button to your manual location. Then decide where to hang the speaker, depending on the radius of the device and how the signal can be recoded. The elements are attached with bolts or sticky stitches.
- Conducted Here you need to turn back, as soon as you hear the doorbell. Just in case you have to pull a wire that will harm the device, think about the best way ahead. It is best to camouflage it in the wall, under a hanging frame or baseboard. The button goes to the speaker, and the button goes to the outlet or directly to the electrical circuit. For safety, please turn on the power in the electrical panel. The very principle of connection is the same: to connect the device (phase and zero), the live wire is inserted into the speaker housing and secured to the terminals. The other part is displayed before the call button, until the bell rings and the robot is checked.
- Video calls. The main feature is the additional placement of the camera above the door and screen for receiving images.

Connection diagrams for different types of doorbells
Repair
If you experience problems with the doorbell after installation or during use, you need to know how to fix the doorbell yourself. The most common cause of failures is contact failure. To solve this problem, you need to look at the location of the key connections. This can be either a button or a speaker in the middle of the alarm. Once again, it is enough to jiggle the wiring and the call will function normally again. Much worse, if the cable appears we will break. Then you need to replace it or solder it.

If you use the doorbell poorly, problems with the contacts may occur.
There may also be problems with food. Then you need to check and check the life block and input plugs with your own hands. For dartless models, do not forget to regularly change the battery and keep the battery close.
The power supply is especially relevant for outdoor installations in areas with a cold climate and sharp temperature changes.
Once you understand the device, there are no problems with installing it yourself. Moreover, in the event of any malfunctions, you can easily repair it without obtaining outside help.
The doorbell is a very handy device. All apartments and cabins have it for a very rare price. When choosing this device, you need to know what types of connections are available and how to properly accept them.
See the types of buildings
Depending on the connection method, doorbells are divided into two types:
The shotguns on the door operate both as an electric device and as an autonomous life source. The button and sound panel of such devices need to be connected to each other using additional darts. Bezdrotov do not require physical connection of elements.
Depending on the type of mechanism, the clinks are:
- hammer;
- buzzer;
- jingle.

The stench differs among themselves due to the internal structure and operating principle. It can also be used both as a barrier and as a battery.
Why do you need to increase your respect?
By selecting the doorbell, it is better to give priority to the device in which the tension can be adjusted. Another useful function is the activation of the button in the dark. This can be achieved with the help of a small LED or materials that glow. There is no difference between the external appearance of the body and the sound quality, and the presentation of the options here is impersonal. Everything depends only on your likeness and likeness.

Vibіr elektricheskogo vyrobu lie in the apartment or in the booth you put it in. The stench can be two or four strong. The 2-wire button is supplied with a voltage of 220V, and the 4-wire button is supplied with 5V. The offense can be installed near the apartment. And in the booth, where the button and wire are subject to the influx of weather conditions (rain, snow, high humidity), install only 4-wire devices.
The electric dart buzzer operates at the limit. This is one thing plus and minus. There is no need to constantly walk on one side to charge the batteries, like with dartless devices. Otherwise, the device does not function as there is no light. Another minus is that it is not safe, so when installed, be extremely careful.
Tools for connection
Connecting a doorbell yourself is not at all difficult. You also need to know how to make all the necessary tools.

- drill, dowels;
- everyday life;
- spin-indicator;
- Self-tapping.
Conducted connection diagram
The operation of an electric buzzer is impossible without electricians. Therefore, it is up to the place where the device is attached, the wiring must be installed. As a rule, wired generators operate by connecting the alternating line with a voltage of 220V. You can choose one double-core cable or two single-core ones. The size of the dart can be 0.5 square millimeters or more. However, the tension of the darts is not heavy, and the tension associated with the darts is small. The only thing that needs to be preserved is this material. He is guilty of being the same as the one who was victorious for spending time in every booth and apartment.
Connection diagram for different types of viruses. As a rule, all new buildings have wiring installed for a standard door fitting at the hour of their waking hours. If you are busy with everyday life yourself or the connection of a wired electrical signal is not transferred for any reason, you can choose from any possible connection scheme, laying out the wiring before it.

The standard circuit for connecting a doorbell exactly copies the circuit of the emergency switch, and it is, apparently, the simplest among all the obvious electrical circuits. Instead of a light bulb, the sound mechanism is activated, and instead of a button, a button is activated. Zero is connected to the sound panel, and phase is connected to the button. In this case, the offense elements are also connected to each other. When you press the button, the phase freezes and the sound signal sounds.
Installation of sound mechanism
Since all the doors in the apartment have already been installed, it will take a lot of time to install a doorbell. The device operates electrically, therefore it is necessary to follow the safety rules when working with electrical devices. The electrical connection will be made only after the entire apartment has been switched off.

Connecting the doorbell to the doorbell is done by connecting the contacts to the apartment's wiring. If the stench is long-lasting, it needs to be dried and cleaned with a sharp knife. Electricians recommend that already connected parts be crushed with pliers so that the connection is more reliable and the contact is shorter. We isolate and verify that everything is working. If several wire mechanisms are connected to the bi-wire wiring, then phase and zero are indicated, which takes their part from the connected one. Other fractions unite with each other and are completely isolated.
Once the dart ring is working successfully, it’s time to begin fixing it to the wall.
The installation location is usually located in the corridor or waiting room. When within a radius of one meter from the device, there is no need for radiators or other burning devices. At the installation site in the wall, drill to open and attach the sound mechanism panel using dowels and self-tapping screws. When the openings for fastening are installed, all accessories are supplied. A hole is drilled in the door frame to connect the wires of the sound panel and buttons.
Installation of buttons
The call button consists of two contacts, one with springs. When someone presses on it, the lance locks and the mechanism rings. When released, the contacts will be disconnected.

To install a button, you will need to enter two numbers, which requires connecting up to two contacts. It is best to wrap it with electrical tape or securely fasten it with clamps in the same position as supplied to your device. And the button itself is attached to the wall with a wooden panel.
Dart clink with two buttons
The situation often gets lost when you need to connect two buttons to one call. This is necessary, for example, if there is one vestibule for several apartments. In this case, place one at the vestibule, and the other on the square in front of the door. The connection diagram for the device consists of two parallel buttons. When pressed against them, the lance will close and the mechanism will start.

It is entirely possible to connect the doorbell yourself. The entire loan procedure takes no more than a minute to complete.

Diagram of a jingle with the sound of Big Ben |
This sound effect can be created circuit-wise using two additional timer microcircuits.

The first generator is tuned at a frequency of 1 Hz, and the other is modulated by a signal that changes with the output of the first. The frequency of the skin generator can be changed using supports R1 and R2. Resistor R1 can be used to regulate the speed of mixing from one tone to another, and support R2 controls the tone of the sound signal. Dynamics of expenses based on all ohms.
Suse at the sale of Nariznomanishіshі -free bunches of Zv'yazka, accessible without re -vertics - like yak ukkh -kishenkovi radiostani, radio -instructed, and unlocked Z'yavavilovavili I signaling. Vzagali, the radio-amator design is already stuck in the sense of the latitude of stagnation. It consists of two blocks - the remote control button and the alarm unit.
A relay is connected to the anode of the thyratron, for example PEM6), the power contacts of which are connected in parallel to the contacts to operate the emergency doorbell. To protect the sensor from softening the sensor and igniting the thyratron, a parametric stabilizer is installed on the zener diode VD1 and the ballast support R3.

The fracture sensor with aluminum rivets, the R1 support and the thyratron are housed in a small housing. To indicate the functioning of the sensor, there is a hole in the housing opposite the thyratron. When the “rivet” is torn, the thyratron is cleared. Regulation of the circuits of the sensor device lies in the installation with a changeable support R5 of voltage 170 on the oxide capacitor with a minimum voltage, such voltage can be supplied via a vicorist autotransformer. The design is dated No. 6, 1990.
The design consists of a generator that controls, on elements D1.1-D1.3, a digital IC K155LAZ, which vibrates control pulses, the frequency of which is determined by the nominal capacity of C1 and support R1

For the specified nominal values, the alternator frequency is 0.7...0.8 Hz. The impulses from this go to the tone generators and then connect them to the ULF collected on the transistor. The first generator of impulses on elements D1.4, D2.2, D2.3 generates pulses with a frequency of 600 Hz, the other generator consists of D2.1, D2.4, D2.3 and operates with a frequency of 1000 Hz, which is regulated by selecting the SZ , R3. The volume of the sound is regulated by R5.
The design is simple, foldable and adjustable. It is based on three generators that set a saw-like voltage, and the skin operates from them at its own frequency.

F=1/(2C1R2ln(1+2R3/R1))
de C1 – in farads, R1, R2, R3 – in ohms. The signals from the output of all three generators are mixed and go to the booster, which is driven by eight wavelengths.
The first design replaces the door switch, and is used when the doors are closed, responding to a minor change in its position, and in the other, the power supply connected to its connections is supplied.
Time for the tinkling tinkle |
As soon as you notice the stench, turn on the door button and continue until the button is pressed. If the button is briefly short-circuited, which happens when it is made from low-grade plastic, or it is specially shorted, for example, with the help of a siren, then the buzzer operates continuously. The bell does not accommodate this operating mode. At worst it is possible to burn, and at worst it is possible to burn.

If the one who is calling keeps the button pressed for a long time, then the long ringing gets on his nerves, he should limit the time between ringing to 5-7 seconds. The time-sharing system that allows you to earn money is described below.
The scheme works like this. When the SB1 button (behind the doors) is pressed, voltage is supplied through the normally closed contacts K1.1 to the doorbell. The sound begins to sound. At the same time, voltage is supplied to the clamp R1, VD1, K1, C1. In cob moment C1 represents the short circuit of the strum, surrounded by resistor R1. Capacitor C1 begins to charge through R1, VD1. In just a few seconds, C1 is charged to the voltage required by relay K1. The relay is activated, contacts K1.1 are opened and the call is switched on. When the SB1 button is released, capacitor C1 is discharged through the relay coil K1. If the voltage on C1 is less than the output voltage of relay K1, you will turn to the output voltage, contacts K1.1 will close and you can ring again. By selecting R1 and C1 you can adjust the hour the signal sounds.
Scheme of one chime for two doors |
If the apartment has two booths, two entrances, it’s not too late, the stars are calling. This design will save us from our shortcomings. When the S2 button is pressed, the relay is self-blocking. The other indicator lamp lights up at the same time. The bell will ring until the C1 capacity is charged to the same voltage level. If it is necessary to re-apply the signal, S2 is released and C1 is discharged through the winding. Lamp H2 stays lit until S3 is disconnected.

When guests press the S1 button, the buzzer will sound in parallel with the H1 indicator lamp turning on. The duration of the sound is one second, the pause is 2 seconds.