The fan noise on a laptop or computer is noticeable. Ways to reduce the noise of axial fans You can’t coat the fan
Hello everyone on this wonderful Saturday of the remaining month of summer! I’m already completely drunk and immediately decided to write a new post... so hot. Just the mood is hot. Last week, we figured out how to check the speed of our Internet, and today I’m talking about coolers, then. Fans installed in computers often make noise. Fortunately, it’s a miracle program for caravan coolers.

In this article, I will explain how to regulate fan speed using a special program, and finally I will show you the whole process in a video report.
Why do fans make noise and what are the ways to fix it?
Due to special fanless modifications, each computer has two or more fans installed: on the main unit, on the processor, on the video card, on the case, and others. And the skin has its own galas, and it’s a nasty new thing. Many people simply called up to the noise of their system unit and respected that it may be so. Maybe buti may, but it’s not necessary! In 99% of cases, the noise from the computer can be changed by 10%-90%, which is a good news.
So, to change the wrapping of the cooler, you can choose one of the options:
- Program for washing cooler wrappers
- "Intelligent" speed control system is built into the BIOS
- Vikorystuvati special device - reobass
- Individually reduce the fan voltage
Those who work normally with the BIOS may not be able to read further. However, the BIOS often overly regulates the speed, not reducing it to noiseless or rather pleasant values. Let's choose the most optimal - the first method.
This is a richly functional and completely cost-free program. I’m going to laugh a little when they say that this program does not work on all laptops, but you can try it, and the speed of these fans is not adjustable, which a motherboard with a BIOS cannot handle. For example, with this BIOS you can enable the SmartFan cooler function for the central processor. If you want to marvel at more precise revolutions, you can do two more.
Please note: before using any programs, please enable coolers from the BIOS!
Otherwise, this situation could have happened. When using SpeedFan programs, exact revolutions are read and taken as maximum. Apparently, if the BIOS does not spin up the fan to maximum speed, the program will not be able to run. I once had the problem that at the moment the program was engaged, the cooler on the processor was spinning at a speed of 1100 rpm, and SpeedFan could not set a higher value. As a result, the processor heated up to 86 degrees! And I noticed it’s a shame if, at the moment of great excitement, I didn’t notice the noise from the fan. Fortunately, nothing burned, and the computer may no longer be turned on.
Launch and external view of programs
When starting for the first time, be sure to ask for help with program functions. You can check the box so that she doesn’t show up again and close it. Next, SpeedFan takes into account the parameters of the microcircuits on the motherboard and the values of the sensors. A sign of a successful design will be a list of exact values of fan speeds and component temperatures. Immediately go to Configure -> Options and change the language to Russian.

(picture clickable)
As a matter of fact, it also shows the intensity of the processor and information from the voltage sensors.
Block “1” displays a list of detections of cooler wrapping fluidity sensors with the names Fan1, Fan2..., and their number may be greater, but lower in reality (as in the picture). We pay attention to the values, for example, Fan2 and the other Fan1 show real indicators of 2837 and 3358 RPM (revolutions per wheel), and are calculated according to zero or even smtt (in the picture 12 RPM per smtt). We'll take your requests later.
Block “2” displays temperature sensors. GPU is a single graphics chipset, HD0 is a hard disk, CPU is a central processor (replacement of the CPU in the picture Temp3), and the temperature is smudge (it can’t be 17 or 127 degrees). We don't have many programs that need to be figured out (otherwise we change the sensors as needed). True, the site can be used depending on the configuration, but the procedure is not simple and complicated by the English language.
If it is not clear what parameter is indicated, then you can check the values in some other program, for example AIDA64, and compare them with those calculated by the SpeedFan program in order to know exactly what the speed and temperature are indicated (on I’ll show you everything in the video below the article). And in this article I will report on how to determine the parameters of the computer and sensors.
And in block “3” we have adjustment of the speed01, Speed02..., with the help of which you can set the speed of wrapping in the frames (can be shown as Pwm1, Pwm2..., see in the video). For now, we need to determine which Speed01-06 is connected to FanX. For this, the value of the skin is changed from 100% to 80-50% and the fluidity of any Fan has changed. It remembers which Speed is stored on which Fan.
I repeat, not all fans are adjustable, but only those that can be controlled by the motherboard from the BIOS.
Setting up SpeedFan
From i have stopped adjusting. We press the “Configuration” button and first name all the sensors with reasonable names. On my application I have a software controlled processor cooler.
In the “Temperature” tab, find the processor temperature sensor on the front side (less than Temp3) and press it once, and then a second later again - now you can enter any name, for example “CPU Temp”. In settings, a lower temperature is required, which allows the program to maintain the minimum speed of the cooler wrap, and an alarm temperature, which triggers the maximum speed.
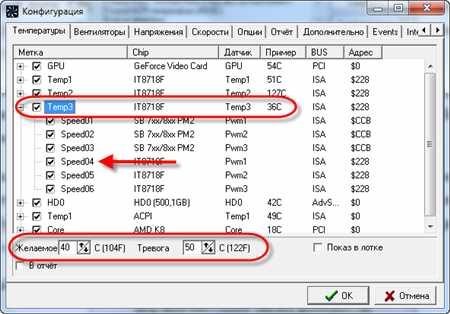
I set 55 and 65 degrees accordingly, but for each individual, experiment. At very low temperatures, the fans will always spin at maximum speed.
Next, we turn on the light and uncheck all the checkboxes, except Speed0X, which regulates the FanX of the processor (which was already indicated earlier). My application has Speed04. We also uncheck the temperatures that we do not want to display in the main window of the program.
On the fan tab, you simply find the required fans, we call them, and turn on the unnecessary ones.

Let's go to the Shvidkosti tab. Install on the Speed0X that corresponds to the required cooler, change it (for example, for CPU Speed) and set the parameters: Minimum - the minimum number of maximum speeds that the program can install, Maximum - This is the maximum height. The least amount is 55%, and the maximum is 80%. It’s okay that the cooling program for the cooler cannot set the values to 100%, and even in the “Temperature” tab we set alarm limits, at which point there will be 100% of the revolutions. Also, for automatic adjustment, do not forget to check the “Auto change” checkbox.

In principle, that’s all. Now go to the SpeedFan window and check the box “Automatic fan speed” and set up automatic adjustment of fan speed. Optimally adjust for yourself not the first time, experiment and fill in the other parameters, but that's wrong!
Additional parameters
The SpeedFan program for cooling coolers has a bunch of other functions and parameters, but I don’t get bogged down in them, because... This is the topic of this article. Let's put a few required checkboxes on the “Configuration -> Options” tab
Running lighted- so that SpeedFan starts immediately in front of your eyes. If you don’t install it, then when Windows starts, the program will be visible on the desktop. If the program does not start simultaneously with Windows, just add its shortcut to AutoLog.
Static icon- by choice, set it so that the system tray replaces the numbers with just a program icon
Throat at the hour of closing- set it so that when clicked on the “cross” the program does not close, but disappears into the system tray (more than a year)
Full fan speed when exiting- if you don’t install it, then after exiting the programs the cooler rotation will be lost in the state in which it was at the time of shutdown. If there is no one else to manage them, then the computer may overheat.
Well, did everything go well? Does the program work? Are the wraps automatically adjusted? Maybe you use other methods to vicorize?
Have a good evening everyone. A damn article is coming. Today's topic is the physical side of the computer, and the noise of the fan itself. Practicing in technical support, we have noticed that a lot of business owners are struggling with efforts to change the noise from their computers. Let us now understand the reason for this increased noise. It is possible that the computer has not been cleaned or oiled for a long time. There is also another option for this reason - the BIOS settings were lost/changed/reset. As for the first part, there is nothing easy to take a saw and a gancher and collect all the wood and saw. In addition, you will need to get started with orientation in the BIOS. I’ll let you know about this right away.
We reduce computer noise through BIOS.
Well, we checked that the computer is clean and the fans are working properly. Now we turn on the computer and press a special key, going to the BIOS setup menu. You can find out how to press the button using the starting picture, or by brute-force method. The most common buttons are: Del, F2 and F10.
My ASUS motherboard has failed and its BIOS entry button is Del.

We immediately go to the Main tab, there is nothing valuable for us here, so use the left arrow to move to Power.

Having settled on this tab, we begin to go through the items and select “Hardware Monitor”.

A page will open where there will be a whole list of various things to do. It is possible that the CPU Q-Fan Control item will be marked Disabled, but you can change it by moving the arrow down to the next one and pressing Enter.

Well, obviously, now a new list of possible adjustments will be revealed. Here you can see both settings for the processor fan and case fans, which are designated by the word chassis.
Among all the presentations, a very important point for us is the CPU Fan Profile. The same profile with adjustments that determines the maximum number of fan wraps in the fabric.

I know again, if you click on any item and a list will appear (in my drop-down) with three items. For cleaning, choose Optimal.
In short, then:
Optimal- this is an intermediate mode between productive and quiet;
Silent- Find the best mode;
Performance- This is a productive mode,
We are changing our choice to Silent. Then we press the F10 button and the BIOS tells us to save the changes, and hopefully the computer will restart itself.

Even when turned on, the fans start to burn strongly, and then reduce the speed to operate in quiet mode. If the noise disappears as before, there are two reasons:
- There are two types of fan connectors on the motherboard. Some signatures are “CHA_FAN” and “CPU_FAN”, others are simply “PWR_FAN”. So from the first ones to the ceramic ones, the other type is easy to live;
- Connections for primary fans (with two or three rods), such fans are not ceramic. Kerovans are made from 4 legs.
Visnovok.
Having completed all the instructions, we will set the computer to silent mode. Now you are calm and your colleagues won’t worry. Good luck!
Provision of ventilation ensures comfortable air exchange. It’s a pity that the noise is such that people prefer not to bother with ventilation in their rooms, not to turn them on, and instead of worsening the situation becomes worse, air exchange is lost in the shortest time I hate it, but I spent a pittance on ventilation.
Often the ventilation noise is the main one, depending on the interaction: any background noise in the area or due to the waterfall can be strong, the ventilation noise is superimposed on it. If the ventilation noise is much weaker than the background, then there are no problems, if it is louder than the background, it can cause discomfort, even to the point of impossibility of working for a long time in such conditions.
I’ll guess how the rural hospital’s staff does not turn on the quiet ventilation through the noise, which is objectively even small. The doctor's shop stood on the outskirts of the village, and in windless weather the background noise was almost daily. Of course, for them the ventilation will be poor.
On the other side, on one object, which is located on the third Moscow ring, the background noise is consistently 40-45 dBA with the windows closed, in such sinks there is quiet ventilation and there is no noise.
Surviving the noise
Noise is measured in units of sound volume, dB (decibel), based on human hearing correction, which better perceives mid-frequencies. Corriging noise is measured at dBA.
In my house, the background noise is 30-40 dBA, if I listen to background music, then 60-70 dBA, if I listen to music specifically, then I have to remember the music, but it’s loud, 90-100 dBA - and that’s why I need to take care of the noise!
Having read here, the trouble of living in absolutely silent cells is harmful for people and leads to discord. It’s easy to believe that since the noise is less than 20 dBA, the whole thing is turbocharged. Fortunately, this happens very rarely. In the calm air, mosquitoes are buzzing and birds are singing.
Noise inevitably accompanies the ventilation operation. You can still fight for silence. For what purpose is it necessary for the nobility to make noise and make the roads wider.
Dzherela and warehouse parts due to ventilation noise
There is loud noise from the fan and its working wheel and engine.
Robot wheel
The right working wheel generates noise through the principle of its operation - it creates changes in the pressure in the air, some of these pressures fall into the range that is perceived by the ear, creating noise.
In the spectrum of noise that comes out of the fan, you can see the rotation frequency that comes out when you multiply the rotation frequency of the motor (rpm) by the number of blades. Typical fans have 300-1200 Hz, that is. the very same frequencies that people are very sensitive to in nature.
To the honor of good fans, it must be said that it is important to see the reverse frequency of the inode; generators fight against this “viper”; good fans have an equal noise spectrum.
The noise of the impeller widens in the air duct, fades away when turning, and those that do not immediately cease, widen further.
As soon as you get into practice, a phenomenon like a sound channel becomes sharper.
The current situation was as follows - the fan had one turn of 90 degrees, galvanized, then a long piece of corrugated pipe duct with two smooth pipes, 8-10 meters.
Regardless of the long-term operation, the noise at the outlet of the circuit was not much weaker, lower than that of the fan, it was similar to those where the pulsations of the reverse frequency spread in the channel, like in a hvylevod, possibly interacting with the wind duct on Yakihos frequencies.
Fan motor noise
In case of ventilation, the noise of the motor is not critical, but it is affected by the unacceptable high-frequency noise (whistle) of the electromagnetic movement during the operation of electronic devices to regulate the rotation frequency of the motor.
The noise of the engine is mechanical in nature and is generated by the operation of the bearings and the blower fan. A movement noise indicates a malfunction of the engine. Noise and vibration diagnostics have started – it’s a lot of fun.
Aerodynamic ventilation noise
The wind collapses at the wind ducts, flows around the crossing points (gates, valves), and swirls at the inlets and tri-pieces. At high speeds, new aerodynamic noise arises, adding to the noise of the fan, which is transmitted to the air duct.
It is easy to understand the low fluidity of the market. When the speed is less than 2 m/s, there is simply not enough energy to generate noise. It is possible, however, that if an unclear gate is installed nearby in the fence, noise may begin. With easy access, such noises can be easily identified and eliminated.
Recommended for daily ventilation at a speed of 6-8 m/s. Be it any kind of hemstone fittings, these distributors will make a noticeable noise on such devices, and on some plots the hemstones will muffle the noise of the fan.
Structural noise during ventilation operation
A running fan creates vibration in the building structures, and when vibration occurs in the sound range, noise is generated. In case of ventilation, structural noise always indicates damage; a properly installed fan does not transmit vibration to the structure.
Noise and vibration have been eliminated - that’s why the twin brothers, not without reason, practicing fachists, are directly called vibroacoustics engineers.
Ways rose up with the noise of the fan
As a fan, the noise increases at the inlet and outlet air ducts, and at the outlet, then. dovkola fan.
Information from the distributor
Floor noise is especially important for ventilation, and in catalogues, the noise section is often the highest. All three paths are indicated as wide, and for them the frequency response and the hidden value are indicated.
The frequency response is required for selecting a noise suppressor, and if a specialist is in charge, then for developing a noise suppression system.
Sometimes only the noise at the output is indicated (into the channel that is pumped), for household fans, only one digit is indicated, the fussing noise is indicated.
It is customary for catalogs to indicate the noise level of the device, which drops rapidly when the device is removed, so there is no need to be afraid of numbers of 80-90 dB.
For a non-fahivist, the reporting characteristic is not really needed, but if it is, it can be analyzed to equalize the choice. The lower the level of noise, the better, since two fans have the same level of noise, then there is a greater equal spectrum of noise, the absence of peaks at frequencies.
I want, as soon as they are lost by those, details begin to appear. For example, if a fan has a flat and low noise spectrum with one peak at one frequency, say 1000 Hz, then when developing a noise reduction system it will be necessary to dampen one frequency. A fan with a flatter or higher spectrum will have to dampen the entire spectrum in order to achieve the desired result.
Dovira to the data of the virobnik
It’s especially hard for those who eat meat to relax.
For coal-fired fans, typical characteristics are taken, and for low-growth cultures, the stench varies greatly from the actual ones. The winds for recently new fans can take the noise characteristics of the prototype created by the completely different minds of Germany.
Europeans are closely watched by competitors, so the actual characteristics are similar to those in the catalogue.
How to reduce ventilation noise
Fighting fan noise
In addition to prudent selection of the least important fan characteristics, such a clear installation must remember that the noise is minimal within the narrow range of high efficiency factor.
Precisely placing the fan in the zone of high CCD depends on careful design, installation and optimization. To ensure efficient operation of the fan, careful operation and periodic instrumental monitoring will be required.
Another main factor I consider is to stand up to the fan. When imported equipment became available, special low-noise duct fans struck the old-fashioned designers and began to be installed in their places.
No matter how low-noise a fan is, when installed behind a false ceiling in a serviced area, such as a control room, it will not create unpleasant noise and vibration.
The fan noise may be loud in a bathroom or smoker. We can be tolerant in the corridor, where there are no permanent workers. Ale is not in an office-type place that needs to be serviced.
Change in productivity
With a reduced frequency of the fan impeller, the noise changes slightly. Reshta of all displays the same. If you install a large fan and operate at a reduced fan frequency, you can get a quieter solution, and also a cheaper one.
In addition, the noise spectrum is limited to low frequencies, which are more important to dampen.
Evidence of operation, for example, with five-position regulators, shows that the fans make little noise, and only a little dim at the position of the regulator “3”, which is recommended for design. In this mode, in mode “5” you can briefly ventilate the area, and then switch to low noise mode.
Combating increased noise through a barrier
Fan noise intermittently (on output)
For exhaust fans, the edge is located on the side of the outlet, so for the sake of simplicity, let’s remember that we have a suction fan, the edge is on the side of the discharge.
Silencers
Installation of the first sound attenuator should be located right behind the fan, otherwise straight-through wind ducts around the fan may begin to resonate and become an additional source of noise.
Two noise suppressors in a row work better than one, but not twice. In the frequency jamming parameters, take 3 dB, if you install three jammers, then take 6 dB. It is logical that if the noise passes through one muffler, it will probably pass through another and a third.
If possible, choose the best mufflers.
The muffler is an additional support, so if you create all the space around the outside of the muffler, you will have to increase the pressure of the fan, which means the noise will increase.
In addition, noise suppressors, as a result of their equipment, generate loud noise.
Noise at the edge (at the entrance)
A power line that is released into the atmosphere will also require noise attenuation. The noise now expands and moves into the living room through the windows.
Fighting fan noise (to extreme extent)
Yes, of course, if the fan is installed far from the room that is being serviced, in the vicinity of the ventilation chamber, which is located in the technical part without permanent work place i. If this is so, then the noise of the fan “to the point” does not bother you at all.
It is important to ensure that the fan is correctly selected, installed and maintained correctly.
Ale, let's say, it's not too bad. If the fan is installed on the balcony, then if installed correctly, the noise can be reduced by installing an additional damper.
Vibroacoustics determine the parameters of such ukritts, you can work on your own, based on the fact that the body of the ukrittya is obviously massive, and therefore requires sound insulation based on special slabs or basic mineral wool ones.
A typical method is the preparation of something resonant at a given frequency.
Shumomiri
Professional noise levelers - complex and expensive devices, and their warehouses - a microphone and the ability to analyze the signal in any smartphone.
It’s funny to say, but sometimes I use my phone to quickly assess the level of noise. Calibration with professional tools shows a significant improvement in the range of microphone capabilities for voice.
Smart Tools Program Of course, it would be better to use more dBA, otherwise hidden manifestations can be dismissed like this.
Another screen of the same program shows the significant level of noise.

Frequency analysis is more complicated. The reliable range of phones is not very large, although hidden phenomena can be ignored.

RTA Pro. This screen is similar to those found on professional devices, indicating the reference frequency. The adjustments have separate divisions up to 1/6 octave. Theoretically, this allows for noise diagnostics!
Checking with an additional piano gives a satisfactory result, the frequency of the note is clearly visible.

Spectrum Analyzer
Garneau, but how to get rid of the bark - it didn’t understand. The reference frequencies are not specified. In settings, I set the value from 1 Hz to 20000 Hz.
While using smartphones, you can’t forget that the simplest specialized devices have microphone and signal detector parameters that are useful, but not so.
In addition, it is not good to trust steel phones in the region below 30 and above 90 dB.
Noise diagnostics
If the food is about noise reduction, then the problem is clearly there. At the time of production, measurements are carried out and complied with the standards, if there is an excess, then the problem is recognized.
If you are embarrassed, then you have to figure it out, since formally the noise standards have not been exceeded.
Before speaking, if we are talking about standards, this automatically means that we follow the standard GOST methodology with similar devices, which is clearly not our fault. Let's think about what we can earn ourselves.
First of all, it is necessary to determine the background level of noise, it is necessary to select a number of background noise levels at a time that are characteristic of skunks. If it happens in the middle of the room, all internal noise sources - computers, refrigerators, dryers - need to be turned off.
Then repeat the tests with normal ventilation. The results show that ventilation is noisy. It can be reliably shown that switching on increased the noise, requiring ventilation. It appears that the underground noise has increased, and some frequencies have increased.
If the fault is ventilation, we first need to take care of the ventilation. It is necessary to check gross damage that can easily be removed. It is possible that the fan is not installed clearly, and the supply may not be properly adjusted, causing noise.
Since everything is so good, what will you lose? It is possible that the fan noise exceeds the catalog noise, but you won’t be able to handle it with a smartphone.
It is possible to be a self-destructive jammer and not jam anything. You can still try to change it, you will need to frequently dismantle the barrier and measure the noise from the muffler and in front of the muffler, and compare it with the characteristics.
Installing a clear muffler instead of a plastic screen may help. To control such changes, noise must be reduced at the entrance to the areas where the grill has been removed.
Noise suppression is a job for the hard worker, which requires attention to the rich details and complexity of the rich processes - and at the same time it is not always effective, because Few changeable roads take control and shift boundaries for the sake of many decibels.
As if it were an engineer, the achieved result gives little or no satisfaction from being able to know and manage the conditions.
If the computer is wary of third-party and sometimes loud sounds, it is necessary to immediately assign a value to it, it is incredibly make noise cooler, the hard drive starts to chatter, or the BIOS sends beeping signals about hardware failures. If you are careful about noise in the cooler, then the situation can almost always be corrected or resolved without serious financial expenses.
Why is the cooler making noise?
A cooler is a plastic fan that is installed on the radiator of elements that heat up the microprocessor. This means that the robot can easily remove heat and the processor can work normally, which is not possible when the cooler malfunctions. If the cooler is making a lot of noise, you need to immediately identify the cause, and then proceed to the root of the problem that has arisen.
So you can see a number of reasons for noise:
- Obstruction. The most widespread problem, and its characteristic symptom lies in noise, such as clicking without any handing from the computer. In this case, the speaker will not guess what is causing the noise, since everything was in order before. When a large amount of power has accumulated, the saw blade on the wine cooler gradually loses its original characteristics and begins to make noise, leaking out from between the body. The problem is that the shovels will be damaged: cracked, unevenly worn, which will lead to the device becoming unbalanced. In other cases, the constant mechanical action overrides the normal operation of the cooler, and it begins to overheat, causing the power supply unit, processor, and video card to overheat;

- Zmashchennya. The cooler, as well as all parts that rub with oil, have a silicone type. Add oil periodically, otherwise it will dry out too early. Another problem is when a person excessively often adds oil to the fan and as a result it starts to laugh. In some cases, you will need to use WD-40, which is absolutely not suitable for this purpose (although many people say that you will have to abrade the skin 1-4 times), then buy a special silicone oil;

- High cooler speed. In a normal situation, the computer independently determines how fast the fan is spinning. When operators set parameters, when the number of wraps is at a maximum, noise is likely to occur, as well as unproductive waste of energy. You can simply reduce the amount of wraps or turn on automatic regulation;
- Incorrectly fastened to the body. The cooler is installed on the case of the system unit or laptop, as well as the processor radiator. If the fastenings are not strong, degeneration will become noticeable, and therefore there will be problems with the efficiency of the fan and the heat transfer rate;
- Great number of coolers. New computers are increasingly equipped with coolers due to high productivity and high heating. If you have a building with 5 or more active cooling systems, then you won’t be able to reduce noise levels, but you’d better check if the situation can be improved a little.
Please note that the noise increases with strong pressure on the PC, for example, launching games, powerful add-ons, and normal computer behavior.
Cleansing from contaminants and grease
Why bother if the cooler makes noise? The problem is that we do not know whether the cooler on the processor, in the life block, the video adapter is noisy, etc. First, before starting the cleaning procedure, it is necessary to determine which cooler itself is producing the unacceptable noise.
With a laptop, every detail is simpler, a large number of fans are not transferred to anything, so the noise comes out, almost immediately, from a visible device located behind the gates, from the bottom or from the sides of the PC. Then it’s more important to clean the laptop.
For a stationary computer, all parts are more foldable, so there will almost always be at least 3 active cooling systems. To identify the cause of the abnormal sound, it is enough to touch the skin cooler with your hand and check the presence of the noise. Let's start with the fan on the central processor, then the video adapter and, finally, on the life block.
Now, to eliminate noise, clean and lubricate the device, let’s look at the example of a desktop PC:
- Turn on the computer and turn on life in the system unit;
- Know the bad one, call the one that is angry;

- There are a number of options here:
- If there is noise from the central processor, you need to unscrew the 4 bolts on the edges of the case with the fan and remove it, but first connect the cable from the motherboard (you may or may not turn it on). There is a sticker on one side that needs to be carefully applied. To avoid hassle, you can simply pour a drop of silicone oil into the opening. It is necessary to clean the shovels using a pencil or brush, and remove any obstructions from the radiator body itself;
- If noise comes from the video card, it is necessary to clean it. It is immediately clear that the cooler is rarely seen, and the remainder is most often found at the bottom of the payment, although not always. First, turn on the video adapter by unscrewing the bolt that secures one side to the frame. It may be necessary to remove the dry casing from the device. Often the cooler fastening is located under it, you will have to take a small screw and insert it between the blades, twisting the bolts. Get the connection cable and stick the sticker. Clean the well and drip in the oil;

- Noise and walking around the block of life is the main reason for pain. The main thing is foldability - it is necessary to disassemble the body of the block. First of all, unscrew the 4 bolts to hold the life block together with the body (do not confuse the cooler fasteners). Then carefully remove it and unscrew 4 more bolts to connect the 2 parts together. Now turn on the fan itself. Clean it with a pencil and lubricate it.

- Carefully clean the system unit in other places, otherwise the cooler will soon become dirty again;
- Now take and connect everything back;
- You can start your computer and enjoy a quiet operation.
There is a nuance here that in the middle of the cooler itself a lot of processed oil can accumulate, which has thickened and blocked its free flow. Then you will have to unscrew and clean the fan by removing the small latch in the opening under the sticker.

On the laptop, everything is ambiguous, since the skin model may have characteristic methods of analysis. In order to ensure the cooler stays in good condition, follow the instructions for disassembling it, and cleaning and grease is done the same way as on a PC.
How to reduce the cost at the cooler?
If the cooler on a laptop or desktop computer is noisy, you may benefit from simply lowering the wraps.
The simplest way is to go into the BIOS and set the Q-Fan Mode value to standard. You can also use reobass, programs, or the SpeedFan app. Stagnation of the reobas is rarely correct, otherwise it will be necessary to drag it steadily, then you can adjust the fluidity whenever possible. The program can be configured directly from Windows.
Tell us about the computer, and you will work for a long time and clearly!
If you are running out of questions on the topic “Why is the cooler making noise and what is working in this situation?”, then you can ask them in the comments
Along with the remaining two developments, we anticipate a technological breakthrough in the production of radiators for processor coolers: extrusion radiators with a coefficient of console 18 and higher have become widespread ii vacuum soldering, bonded/fabricated finsі folded fins, They were previously considered as exotic. However, the basic principle on which the functioning of coolers is based is lost by itself - wind cooling based on forced convection. And in part of this heavy-duty convection, nothing fundamentally new has appeared for a long time: growers walk along a thinned path of increasing geometric sizes of fans, the number of shovels and the fluidity of the krill wrapping chatki. As a result, a cooler equipped with a powerful fan of size 60x60x25 mm with a speed of more than 6000 RPM becomes the most important source of noise in a computer, drowning out other “loud-voiced” devices, be it fans in blocks no, valve body. Of course, such a test easily requires us to carry out not only detailed temperature tests, but also an objective analysis of the noise characteristics of coolers.
In recent Thermaltake products, we have already briefly touched upon these topics and presented the results of our experiments, without, however, going into methodological details. Now we will take a closer look at all the main points that stand between the acoustic power of coolers, and give an overview of three sacramental foods:
- How to die?
- How to die?
- How to get a reliable result?
Well, let's get started!
Weekend changes of mind
And perhaps, for some reason, the noise is to blame. bad sound) with functioning fans installed in computer systems (in a warehouse of processor coolers or installed in a computer case). There are only two main mechanisms responsible for fan noise, and apparently this noise is usually divided into two categories:
- aerodynamic noise
- mechanical noise
Aerodynamic noise. Since the main cause of aerodynamic noise is, let’s say, trivial (the fan impeller wrapping), then the physics of this phenomenon is complex. So I won’t go into too much detail, but will just point out that there is a lot of noise in this episode. whirlwinds in a turbulent cordon ball, which hangs on the surface of the blade of the bellfish. The intensity of the noise lies below Kuta attack and the fluidity of the impeller wrapping (the larger the attack path and the greater the fluidity of the wrapping, the greater the intensity of aerodynamic noise). The spectrum of aerodynamic noise from fans is continuous (broadband noise) and, as a rule, has maximum intensity at the frequency:
F max = K * (V b / d * cosα),
where K is the coefficient, which is determined by the fan configuration; V b – linear speed of the shovel (m/s); d – maximum shovel thickness; α – cut of attack.
An additional source of aerodynamic noise is disturbances at the inlet and especially at the outlet of the fan. Ok, this kind of “malfunction” is the cooler’s radiator. The main reason for the noise in this situation is the same eddies in the turbulent border ball, only now the border ball is created on the surface of the radiator fins. The intensity of the noise lies here due to the speed of the wind flow and the configuration of the transmission.
Mechanical noise. As the name implies, the source of this noise is the fan bearings. Among the experts there is a clear idea that mechanical noise arises only from wear or design defects of the bearings and is caused by the presence of standard fans. In real life, everything is different: ideal bearings, of course, do not exist! :)
If you take a look at a standard forged bearing, there are microscopic cracks and shells on both the surface of the shaft and the inner surface of the bushing. Obviously, when paired with a shaft-bushing, friction occurs, and noise cannot be avoided. A lot of noise is introduced by the locking washers, which are wrapped (more precisely, rotated) simultaneously from the shaft.
Apart from structural defects of the bearing, stench can seriously aggravate the situation and significantly increase the intensity of noise. The most significant of these in forged bearings is the imbalance of the rotor (impeller), which can lead to the so-called ellipse of the bushing (in cross-section, the inner surface of the bushing takes the shape of an ellipse instead of a stake). This defect causes clearly pronounced tones to appear in the low mid-frequency region of the bearing noise spectrum. The intensity of the noise increases, and subjectively, it becomes even more annoying. It is also very unpleasant to have an impact on the acoustic power of the fan on the bearing, the forging of some oil (or its lack) and the large gap between the shaft and the bushing.
Since the bearings are now hardened, the structure itself becomes noisy. There is also a whole complex of parts that need to rub: the inner and outer rings (rings), the hardening bodies (balls), the separator. Moreover, the bearings are forged, in addition to forged bearings, and are resistant to modern mechanical impacts (impacts, falls, etc.). And, as a result, there is a rich “bouquet” of defects, which can lead to greater noise intensity. Therefore, there is nothing surprising in the fact that fans on bearings are usually 2-3 dBA noisier than their “twins” on forged bearings.
Now let’s take a look at our first sacramental diet and what kind of extinction we can learn from our previous practice.
Yogo Majesty Noise World
International standards that define the methods and methods of noise reduction appeared quite recently - like the 60s. These stinks were the result of the painstaking labor of the rich and rich descendants, who laid their heads (in a figurative sense, especially) for the glory of the purity of science. Adje popracyuvati bulo nad chim!
The main problem on the way to obtaining correct quantitative assessments has become, so to speak, the human factor, even noise (that sound is burning) - a phenomenon that is more psychophysiological than purely physical. Therefore, for a thorough assessment of noise, it was necessary to take into account not only the physical power of the phenomenon itself, but also its absorption by humans and flow into the body. Effectively, the human ear, in electronic terms, nonlinearly transforms sound sounds and plays the role of a folding dark filter (as a whole complex of filters): the density of low-frequency, mid-frequency and high-frequency tonal sounds with the same level of sound pressure in subjective perception there will be a difference (tone louder low and high frequency tones). It’s completely natural that the diet has the same nutrition as psychophysics the noise in this series of assessments could have been overridden.
In the early 1930s, a group of American scientists carried out the most important practical investigation of the subjective intensity of sound at its frequency. The result of these studies was a family of curves that show the importance of equal sound intensity for pure tones that sound louder. These curves were removed from the name thickness contours (another name is Fletcher-Manson curves).
Rice. 1. Contours of the new thickness
Based on the contours of the current density (more precisely, the contours that correspond to the levels of 40, 70 and 100 dB), it was proposed to introduce into previous practice three methods of frequency adjustment of the levels of the sound pressure to achieve the characteristics of the sound the sound of people and the simple single-number characteristics instead of full frequency analysis of noise (in octave or one-third octave frequency ranges) or additionally. Today these three methods are called frequency characteristics of correction (important) A, B and C .

Rice. 2. Frequency characteristics of control circuits A, B and C
It should be noted that characteristic A has become the de facto standard, and the results of the comparison of sound equals, scaled by this very characteristic, appear in the majority of regulatory and technical documents. Despite the characteristics of B and C, the first one has sunk into oblivion, but the other one is still stuck in the middle of nowhere (except for the noise of jet engines and military technology).
So, first of all, it is clear to our sound level meter: it is obvious that someone would like a corrective circuit A. Well, there won’t be any problems with this, since such a “lotion” is practically available on all sound level meters (it’s difficult to implement it in the “hall”). Then, what will we do with the equal sound L A, scaled by the characteristic A, and be able to conduct a frequency analysis of the noise? Zagalom, enough, whatever we want orientally confirm (or simply) the compliance of a particular cooler with the established hygienic standards (which means we have the right, in most cases, to “substitute” the noise of the entire system as a whole with the noise of one cooler, I recognize m a little later). Ale, our meta is not less important. Belsh is important for us for us є є є є є є є іnizhnikh kuleriv, і in the tsomu vipad without a frequency anal vip (in the octaves of third-oxide marshmallows of frequencies) about the same paves, she is not possible. Therefore, frequency analysis may simply be an invisible part of our experiment.
Well, another thing becomes clear that can be used by a noise meter: for our purposes, it is obligatory to have new technical techniques for frequency analysis of noise. On the first axis, great problems can arise here (mainly in financial terms):
- The most accurate way to conduct a frequency analysis of noise is to use specialized spectrum analyzers, which are usually expensive (the price of software for processing experimental results can run into thousands of “evergreens”).
- In practice, you need to analyze noise in octave ranges of frequencies; most of today's precision noise level meters are equipped with octave range filters that allow such analysis. Noise meters with built-in octave filters are significantly cheaper than spectrum analyzers. However, their price lies in the range of 5-10 thousand, which, as you know, is not lying around.
- In some cases, it may be necessary to analyze noise in the third-octave range of frequencies. Not all sound level meters have filters that allow such an analysis, and most often they are an option that is supplied at the end of the process. It’s true that this “option” can cost the deputy a pretty penny, and in even “neglected” situations it can be no less than 70-100% of the value of the sound level meter itself!
Well, let’s face it, there’s one more thing, the third one that can be used before our victorious acquisition: it may be accurate and therefore has good stability of the parameters. There may also be problems here, since not all (to be fair) noise meters are equipped with high-sensitivity microphones and have a truly low level of moisture noise to be introduced by the damping tract.
Yes, there are a lot of problems. All of them had only one requirement: to be correct. I will say without any modesty: we were able to earn a lot of money, and without any special expenses, either way;-)
We did not pursue advanced virtual technology, but opted for the “old” Bruel&Kjaer Type 2203, which is a reliable analog device that has successfully “outlived” almost twenty years of work experience without any respect.
Why the Bruel&Kjaer Type 2203 sound level meter? To what this fits:
- having touched our hands on the most agreeable minds ;-)
- confirms the 1st class of accuracy according to GOST 17187-71 and is included in the State Register of Dimming Products
- allows for quick calibration using an internal reference voltage socket
- For the vibrating tract, the most current sound level meters from Bruel&Kjaer and Larson Davis do not give up much
And one more very important moment, which plays a primary role in the choice of equipment: our noise level is part of the VIP set. And having arrived to us in our warehouse, which includes, in addition to the sound level meter itself, additional sets of octave and third-octave filters – Type 1613 and Type 1616, of course.
As a result, from the results of the precision sound level meter Bruel&Kjaer Type 2203, all three indicators that hung before our final acquisition were practically completely satisfied.
Naturally, only vimirvania (not to mention the most modern and high-precision) will be a simple game without a well-tested method of vimirvania, in other words, without a well-thought-out and clearly staged experiment. And, as you correctly understand, I can tell you that the time has come to look at our method of reducing noise and sound on another sacramental diet:)
Setting up the experiment
The procedure for correct noise attenuation is complicated by the fact that their implementation requires a strictly clear acoustic environment (mind attenuation), whether this is a method for determining the level of sound intensity in relation to the noise. free sound field or else, inadvertently, in diffuse sound field . The only method that does not remain in the minds of many people during the time of extinction is a significant level of sound intensity based on sound intensity . However, for its implementation you will need a special sound level meter equipped with a dual-microphone intensity probe. There is simply no such noise meter in our system.
Therefore, based on the capabilities of our possessiveness (and our powerful capabilities, which are far from always running after our dreams), when choosing an experimental technique, we focused on methods for calculating the noise characteristics of noise in a free sound field above a sound-damping surface(GOST 12.1.026-80). Why was this method chosen? Reasons for the sprat:
First of all, this method is not very powerful for the minds of the world. The experiment can be carried out both in silent chambers and in open spaces.
In other words, the microphone of our sound level meter has an optimal (linear) frequency response for the entire sound field.
Thirdly, this method allows frequency analysis of noise in octave ranges of frequencies instead of analysis in third-octave ranges. For our purposes, in most cases, frequency analysis in third-octave bands will be unjustified both in the time spent and in the quality of the result.
Well, we’ll decide, fourthly, we can access the completely silent camera.
Now briefly about the procedure of vimirs itself (all details of carrying out such vimirs can be found in the text of GOST). The experiment is carried out in a silent chamber (the chamber with a sound-damping background is muffled) with geometric dimensions of 5x5x4 m. Before calibrating the level of cooler noise, the level of background noise is assessed (measured in the center along the perimeter at placement at several points on a distance of 1 m from the walls, take the results). Then the coolers are fixed at the center of the room at a height of 0.35 m on a spring suspension mounted on a low tripod. As the surface of the vimir there is a puffsphere with a radius of 1.2 m, and the number of vibrating points and their distribution on the surface of the puffsphere comply with GOST. The sound of L A at the skin point is performed on the kidney. Based on the averaged result, a decision is made about the possibility of carrying out further adjustments or the need to make corrections Δ to adjust the sound levels (sound pressure) according to the minds of Table 1.
Table 1
If the difference ΔL is more than 6 dBA, then at the skin point a series of adjustments of sound levels is carried out in octave ranges of frequencies and equal to the sound L A; skin vimir is 3 hvilini and the average value of the device is recorded. The working results at all points are subject to further mathematical processing (analyzed and averaged) to determine the final result of the investigation - the adjusted and averaged levels of sound pressure in octave ranges of frequencies or levels of sound L A. Significant leveling of sound intensity is not carried out, but if necessary, this procedure can be easily carried out based on the final results of the follow-up.
Now, it seems, the time has come to look at the methodology for processing the results of extinction and recovery on the third sacramental diet.
Initially, the array of results is analyzed, and necessary adjustments are made in Table 1 to reduce background noise. Then the results are averaged using the formula:

De L m – the average level of the sound pressure of an octave smoothie (or the level of the sound L A); L i - the i-th level of sound in an octave smoothie (or the level of the sound L A); n – number of vimir points; K – constant, which ensures the influx of the beaten sound (experimentally, the song value becomes constant 0.9 dB, with variations it is rounded up to 1 dB).
The national GOST limits the presented result to be determined only as L m. However, the foreign standard (ISO 3744) contradicts this result in another form:
L d = L m + 1.645 * σ r,
de L d - Protocol result (final result); σ r – standard deviation of the results of extinctions.
The addition to the level of Lm actually injures the destruction of vimiryuvan (I think the multiplier of 1.645 is well known to metrologists). For our simulation method, the value of the parameter r, as defined by the ISO 3744 standard, is 1.5 dB. We have discovered that it is possible to increase the value of this parameter a little (the suppression of oxidation sometimes increases the value of a little more than a little). As a result of the experiment, which is used to determine the result of calibration, it looks quite simple:
L d = L m +3.
The values of L d are removed and rounded to the nearest whole number. A tool for processing the results is a diagram that is published in the reviews.
Additional analysis
“It’s good,” you can say to the most critical and critical reader, “everything is good. But on any stand you see the noise of one cooler, besides the computer system as a whole, and after that you’ll agree Retrieve the results from the remote control, which is Hygiene standards for the most noise-free computer, and what about other components?!"
I don’t exclude that such critical attitudes in our readers might not have arisen; the support for the legitimacy of “substituting” the noise of the entire system as a whole with the noise of just the cooler is extremely important and important to look at. Well, let's get to the bottom of this!
Of course, for the final cooler it would be a big deal, what would be the noise in a particular system when a particular cooler is installed. It is impossible to provide such information (even if it is objective and accurate). Let's dig a little into the price lists of companies selling components. And what do we need there? At least a thousand different types of motherboards, hard drives, video cards, ATX cases will be found! Even all these components inevitably contribute to the extreme level of system noise, and when replacing, say, a hard drive or a case power supply, the level of noise can change significantly. It is simply unrealistic to explore the entire spectrum of possible configurations - to conduct such experiments without daring to evoke Sisyphus! ;-)
And, first of all, the methodological principle of the best option: we select in advance the most suitable computer system and carry out the process on its basis. In this case, the result shows the highest level of noise from all possible and can be used as an objective point of reference for further assessments of the noise of more “quiet” systems. How to choose this most painful (in acoustic sense) option from a wide variety of changes? There is no evidence for such a power supply, as the noise of the system lies not only in the system itself, but also in the cooler installed in it. Go here about structural vibration , from the beginning of the article on the right, is that the cooler is not only a source of noise, but also a source of vibration. Vibration vibrations (usually in the range of 10 to 500 Hz) are transmitted to the case through rigid joints (cooler mount, motherboard mount) and cause additional noise with frequencies up to 4 kHz more importantly, it depends on the design of the body (afterwards , so bi move, harmonious reproduction Kolivan). It is entirely possible that a quiet system can be seriously pumped into the acoustic sense when any other cooler is installed with a higher level of vibration.
The situation is obviously not simple. Ale exit from it was found! We did not harp on methodological principles, but carried out additional research, examining a number of systems from four different cases (two branded and two cooperative Chinese) and two apparently “vibration-active” coolers – GlobalWin FOP38 and Thermaltake Mini Copper Orb .
The results of the investigation were clear:
- The sound of the L A system without a cooler (instead of the new Thermalright SK-6 copper radiator) did not exceed 43-45 dBA (as compared to the Asustek FK600 case).
- When installing the Thermaltake Mini Copper Orb cooler, the sound level of the entire system becomes 49-52 dBA (inclusive of the case), then. The cooler noise has increased by 1-4 dBA.
- When installing the GlobalWin FOP38 cooler, the sound level becomes 54-56 dBA, then. The cooler noise has changed by 1-3 dBA!
Based on the results of an additional frequency analysis of noise carried out for skin lesions, we found the following findings:
- Although most computer users are aware that computer cases have a kind of resonators that increase noise, such a system is not effective in all types: for coolers with extremely high noise levels (more than 55 dBA ) beware of this weakening!
- Housings are more likely to exhibit the power of a dark filter (or rather, a low-pass filter) – equal to the sound pressure in third-octave filters with geometric average frequencies of 5000 Hz or higher (and for “high-thickness” branded housings – 3150 Hz) were found to be the lowest for the same level for “simple” at least 1-2 dB.
- Levels in lower frequencies, however, appeared to be “pushed up” by a maximum of 5-6 dB. This effect has significantly manifested itself in branded cases.
- At mid-frequencies, the situation was ambiguous: Chinese enclosures raised the sound pressure level by approximately 3-6 dB, branded enclosures eliminated them practically without change (advancement within 1 dB) or lowered them.
Well, what do we expect from the result?
First of all, the sound level of L A of computer systems equipped with coolers with high-performance fans is practically not comparable to the sound level of L A of these coolers themselves (between the differences indicated in the section Processing and analysis of results Van)! Therefore, we have the right to compare our results with hygienic noise standards (although the comparison is only orients ).
Otherwise, when coolers are installed in the case, the spectral distribution of noise changes: beware of its concentration in the low-frequency and mid-frequency regions.
In the third place, “thick-walled” branded enclosures are, subjectively speaking, shorter than cooperative Chinese ones: in systems with “lighter” enclosures, the noise is displaced and amplified in the mid-frequency region of the acoustic spectrum, the bottom seems more drastic, the low-frequency is more important the noise of systems in branded cases, unimportantly in the world, however, in some cases it is equal to the sound of LA.
Well, the evidence for the three sacramental foods, formulated in the beginning of the article, is given. You can work on the remaining improvements with less peace of mind;-)
Visnovki
Our method practically fully complies with the requirements of GOST 12.1.026-80. Therefore, we have obtained reliable and reliable noise reduction results, which allow us to conduct an objective, consistent analysis of coolers based on their noise characteristics. Moreover, based on our results, it is possible to give rough estimates of the noise of the entire computer system as a whole for different coolers equipped with high-performance fans. As far as constructive criticism of our methodology is concerned, then there will be no more hope! ;-)
When preparing the article, materials from the book “”/Ed. Barry Truax, Second Edition, Cambridge Street Publishing, 1999