Original recovery to update the factory version. The update of Android will become “targeted”: reporting instructions. Installing recovery via fastboot
What should you do if the device’s streaming firmware has failed, and you can’t turn on the phone?
There are two modes, the main one being renewal. Through this you will be prompted to install the operating system. How can I get rid of someone and how can I get help with android recovery?
For different versions of Android firmware, both official and unofficial, there are different instructions, but they are relevant for practically all devices. The process of launching Recovery Android mode is necessary if the user wants to change the firmware, completely clean the phone of any information, generate system update points, or return to them.
By using such functions, your computer will ensure that you achieve maximum productivity from your device. To carry out these actions, we must have full access to any manipulation of the Android system (root rights), and, in addition, to the establishment of control over the image of the “recovery”. As a rule, there are two types of vicors: CWM and TWRP. It is necessary to understand that there are actually a lot of modifications to be made, but our recommendations are narrowed down to the establishment of the most options, as long as they are the most reliable, which have been verified over time.
We return your attention to one important detail: from the moment you gain new access to the functions of your device, the guarantees that come with it will expire automatically. What will happen is that all factory settings will be removed, and in order to restore them, you will need to install the remaining official version of the firmware.
Instructions on how to update recovery android with root (unlocked) access

This method of starting the recovery mode can be used by others easily after changing the key combination. The essence of this problem comes down to downloading and installing a song program. What robiti (pokrokovo):
- Google Play has a Quick Boot program.
- Download the file and install it on your device.
- Let's launch.
- Then you need to go to the “menu” of the installed program, and select “Recovery” from the options.
- After this, the process of restarting and starting will begin, and then in the update mode.
Locking an Android device: how to install recovery
- We need: a cord to connect the gadget from the PC, the work computer itself, and a smartphone.
- Enables the USB enhancement function on Android.
- We install the Android SDK program on the PC.
- You can connect your phone (tablet) to your computer.
- Open the Fastboot folder on your computer.
- We are ready to launch the command window.
- In the field that appears, enter: “adb reboot recovery”.
- After manipulation, your device may be automatically restarted in recovery mode.
How to update files using additional programs 7-Data Android Recovery
An excellent program that updates data from the internal memory of Android, or from the micro SD memory card inserted into the device. Otje:
- We download the program from the official website (free): http://7datarecovery.com/android-data-recovery/
- You can install it simply by clicking “Next”, and everything is fine, so you can’t install anything else;
- Enables “USB connectivity” for the device;
- Connect Android to PC using an additional USB cable;
- To start the setup (Android versions 4.2 and 4.3), go to “Options”, then “About tablet” / “About phone”;
- Several times we are stamped with “Stock number” until the message “You have become a retailer” appears;
- Let's turn to the main settings, go to the "For Buyers" section, and turn on the USB setup.
To enable USB connectivity on Android 4.0 - 4.1, go to the parameters, select the “Designer settings” item, go to “USB connectivity”.
For versions 2.3 and lower, go to "Customization", then - "Add-ons", then - "Development", turn on customization.
After completing the actions, connect Android to the PC on which Android Recovery is running, click “Next”, from the list of storage devices that appear, select the required device, select “Next”.
When the search is completed, we select those that need to be updated, and press the “Save” button. Important: it is not possible to save the very nose for which the data was received.
Let us be glad that our statue was cinnamon.
The easiest way to update Android is to reset it to factory settings. This way you can end up with more problems due to device freezes and various glitches. If the gadget gets stuck and becomes active on its own, the easiest way to clear the system completely and delete all user data is through the setup menu.
Carrying out a Hard Reset from the working system
This ability is already included in the interface of any device on Android, so there are no third-party utilities to completely reset the device that is turned on, without the need:
- Go to the device settings, where the folder is called “Settings”;
- Here go to the section for archiving data and distributing data;
- Make sure that the data archiving and auto-updating items are ticked, then you can easily update the exact settings of the gadget after you have configured the skin;
- At the “Special Data” there is a row of given data.
After this, you will no longer have to read the system’s latest information about the fact that all installed programs and cloud records of the user will be deleted from the device’s memory. Confirm your intention, after which the gadget will be re-engaged and you will have a completely clean smartphone or Android tablet in your hands. You will be cleared of all special information and free extras.
You can turn back the factory settings of the Android device using an additional computer, Vikorist or the company's gadget generator program. You just need to connect it to your PC, find the “Update” item and start the process, completing the program inserts.
Login to the Recovery menu
Just because it is possible to carry out the procedure of dumping data in any system, the Recovery console can be installed in any Android device, but it does not turn on. A single account for gadgets of different manufacturers – the procedure for entering this mode has been changed. We will present a simple algorithm for entering Recovery Mode, and also describe how you can restore the system.
For Samsung devices:
- press the pressure change and Power buttons immediately;
- After the logo appears, release the recovery button, still pressing Volume Down, until the list of Recovery Mode commands appears on the display.
Since the algorithm does not require any descriptions, simply press and hold three buttons at once - Power, Volume Up and Home until you enter the reset mode.
Please note that the USB connection and device charging require connections, so it is best to charge your device before performing the hard reset procedure.
- press the Power buttons and the grinder in the middle for a few seconds;
- given once - on Volume Down or Volume Up.
To avoid this, press Power until the device vibrates, then press Volume Up several times.
For Nexus, ASUS and other devices. Call the method of pressing the Power and Volume Down keys for an hour.
Possibility of Recovery mode
It gives you a lot of possibilities, as the tablet does not stick. The most accessible thing for any accountant is the ability to externally set up and view all files of the accountant. Thus, you can experience problems with the unstable operation of the gadget, for example, as a result of a virus:
- For additional information, see the menu item wipe data/factory reset;
- Activate this function by pressing Power;
- After the download is completed, which will take no more than a few seconds, activate the Reboot System Now command in the same way.
The device will be re-engineered and functionality will be restored. True, corrupt programs, files and adjustments will be deleted. If you want to clean your device, make a backup.
Robimo backup from console update
After discarding the device, you can restore its functionality without having to create a new backup for the device. VIN is turned on before the Recovery console:
- Using the strength indicator and the Power button, select and activate the Backup and Restore row.
- In the menu that has opened, open the Backup item in the same way.
The process of creating an archive takes 10 minutes. To update the system with the created archive, select Restore in the Backup and Restore section. Please be assured that a new backup of the system can be created in this way without having Root rights.
Android update without Root access
Few basic homeowners want to deal with problems with gaining Root access to their device. Let's look at the Safe Backup program, which helps you back up all your data when your smartphone/tablet is turned on - contacts, alarms, calendars, bookmarks, photos, videos, installation archives, etc.
Backup on Android is created in this way.
Today we are encouraged to talk about this tsikava and immediately folded river (recovery for Android). Most consumers who have switched to smartphones running the Android operating system will not realize how richly functional it is. An essential part of the value of the OS is the recovery.
In a sing-song tone, you started joking about what’s going on after all the filth that has been messing with your smartphone (doesn’t respond to the pressure of buttons, the black screen hangs, etc.). Am I right? You've come to the right place! Our materials provide maximum information about what is needed and why.
Recovery for Android (Stock) - what is it?
This, so to speak, thing is present in every Android smartphone called Mode. It is switched to “Update mode”, presented in the adjacent menu, which includes the selection of software. In this regime you can:
- update your device after any malfunction or infection with viruses;
- update (flashing) the system;
- install new patches;
- reset the device to factory settings;
- create a backup copy;
- create and montuvati divided;
- otrimati ROOT-rights (superkoristuvach rights).
You know, there’s no shortage of possibilities. Virologists are trying to incorporate more functions into this mode so that users can independently perform various activities with their smartphone without any special skills.
You won’t find the Recovery menu on your desktop or on your smartphone. The recovery is “secured” deeper in the system, and access to it can be denied by pressing the same combination of buttons when the device is turned on (your smartphone may be damaged).
The stock menu can be folded for mastering the koristuvach through those presented in English. In addition, the cervical bath in the update mode operates using physical buttons - the touch cervical bath does not work.
Stock recovery – what is it?
For those who are interested in dealing with this, it is immediately clear that there are two types of update mode:
- Stock (Stilny, rіdny rekaveri) – is used for the harvesting of the virobniks;
- Custom (custom, custom recovery) – a version modified by the developers, which includes more functions and capabilities (aboutCustom a little lower).
Also, recovery is an update mode that is installed by the driver of your smartphone or tablet. It is fully functional, allowing you to work with all those who have spoiled the little bits of it, but without any precautions.
Stock does not transfer the installation of third-party firmware to the control system - only the official version of the manufacturer.
Some of the official firmware is installed (usually, owners of popular smartphones, which without a fresh update are not deprived for a long time), for others (owners of models from small Chinese companies, who forget about their child after one update) – the story doesn’t even come up yet.
There are thousands of firmwares available for custom covers, which are developed by the developers themselves. So, on a smartphone that has long been forgotten by the vendors, using Custom, you can install the latest, even non-official, firmware. Let's talk a little bit about customization.
For completeness, watch the video that talks about the cover mode on Android:

How to go to the menu on Android?

It is much simpler to become familiar with what and why it is so much simpler, but not to be absorbed in something new. On the right, most smartphones have a different set of physical buttons: one smartphone has three, another has even more. As a result, combinations are differentiated.
As a rule, the life button and the adjustment dial are activated. It is necessary to wait until the menu appears.
Below are the simplest ways to enter update mode for the most popular Android smartphones.
How to get to Recovery Mode on Samsung

- We connect the smartphone via additional USB to the PC;
- launch the program (via “Run with administrator rights”);
- Look, you're going to get attracted;

- A list of possible actions and presentations in English will appear before us;

We need the item "Reboot Devices", which is represented by the number "4";
enter "4" from the keyboard and stamp "Enter";
appears soon;
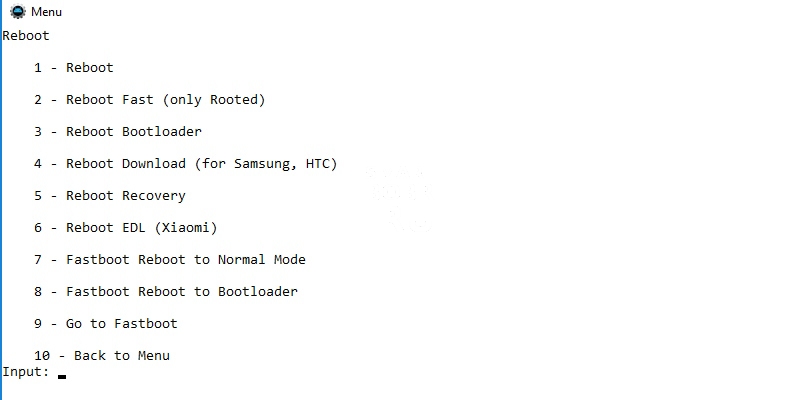
Now we select “Reboot” (reset to update mode), the item is listed under the number “5”, then we type it on the keyboard, stamp “Enter”;
Your smartphone will now be restored to Recovery Mode.
Method 2 - command "adb reboot recovery"
If for some reason the first method did not work (although it is unlikely), there is one more. Let's start the Adb Run program again, where:
- enter the number “7” (go to the “Manual Command and Unlock Bootloader” window) and confirm with “Enter”;
- In the next window, enter the number “1” to deny access to the Adb command line;

Here we enter the command “adb reboot” and confirm by pressing “Enter”;

Wait for a few seconds to re-engage your smartphone.
Method 3 – commands for singing models
It’s rare that things get messed up in such a way that two over-the-top methods don’t help (most often with LG smartphones). For this type, it is recommended to vikorize other teams. What is timid:
- We also go to the Adb Run command line (read more);
- enter one of the commands: adb shell, reboot recovery or adb reboot -bnr_recovery;
- In just a few seconds, the smartphone will be re-engaged.
Custom recovery – what is it, what is it?

Custom, as indicated, is an update mode for third-party vendors. Its main advantage over Stock is the ability to install different firmware, and not just official ones.
Modified recovery (Custom) is the simplest and most manual way to install third-party firmware.
The most widely expanded are two types of custom recovery:
- TeamWin R ecovery (TWRP);
- ClockworkMod Recovery (CWM) .
TWRP
TeamWin R ecovery - unofficial modified recovery, this version is practical for all devices running the Android operating system. You can boast of significantly greater capabilities, lower Recovery. TWRP is often installed on phones after installation, and can also be installed in parallel.
In the current TWRP update menu, there is not only expanded functionality with the ability to install any firmware, but also the presence of touch sensors. You can also download data, create backup copies, and share installations. You can customize TeamWin R ecovery without any costs, with only a few details about installing custom covers.
CWM
ClockworkMod is a popular analogue of TeamWin, which also offers expanded functionality and capabilities. You can find a version for your smartphone, just like the latest models.
There are a lot of modern devices to tune CWM for washing.
Like the analogue, the main task is to assist the customer in installing third-party firmware on the device. In addition, CWM is ready to help you revoke ROOT rights in order to become rich for everyone. The controls in this recovery can be varied, however, most of the time the buttons increase/change the volume and the life key are used. Also, in the vastness of Merezha, it is not important to know the version of CWM touch, which allows you to select the required functions on an additional screen.
Installation of custom recovery TWRP and CWM
You can install Custom in a number of ways, which significantly differ from one type to another, and may also be suitable for one device, but not suitable for another.
Installing recovery via fastboot
F astboot is a section of the update menu, so this method is often called the first one.
In order to install Custom in this way on your device, you will need to undergo a rigorous recovery, which will result in one of the methods that we talked about earlier. Also, you will need files for installation.
Cover files must be downloaded for a specific model! If you try to download and install covers that are not for your smartphone model or TV set-top box, you are guaranteed to miss the target!
In addition, to install recovery via fastboot, you must first unlock Bootloader.
Unlocking is used in order to get the device “without repairing it” if you decide to install a custom recovery or remove ROOT rights. There are enough ways to unlock the Bootloader, but for skin problems it is important to vikorist the song. Read the report on unlocking in topics specific to your smartphone.
Instructions
Also, the instructions for installing Custom via fastboot look like this:
- check to see what recovery is on your smartphone;
- unblock your device (look for information on thematic forums on your device);
- download the Android SDK package, which includes a set of various programs and files;
- We are searching for a new version of the Recovery.img file specifically for your device (we are back on thematic forums);
- download file is renamed to "recovery.img";
- Move the file to the “platform-tools” folder;
- We connect the device to a PC that has set the FastBoot mode in Android SDK Tools;
- launches the command row on the PC (“Viconati” – cmd);
- here we write: “cd (space)” the next path to the platform-tools folder”;
now enter the command : "fastboot flash recovery recovery.img";
Check while the installation is in progress.
Installing recovery via RomManager

This method, although one of the simplest, is not recommended because it carries few nuances.
- First of all, it is necessary to have ROOT rights;
- Otherwise, it is necessary to determine that your device is useless (otherwise there is a great risk of eliminating the “entire” (an unnecessary device, which can only be identified (not again) in the service center).
So, if you decided to install recovery in this way, then:
- ROOT rights are revoked;
- download the RomManager program (on the Play Market or other devices);
- we launch yogo, granting the rights to the superkoristuvach;
- embossed on the “Install” item;
- check for completion;
- To get to the recovery menu, select “restart to recovery”.
Other ways to install custom recoveries

We have told you about the two most popular methods, and we recommend that you follow them first. True, in some situations this may not be enough, so the developers have found many ways to install Custom. Those smartphone manufacturers are not particularly up to speed with their expansion.
The current option, if the first two methods were not used, is to flash the device’s firmware using special software. For example, the Odin software is developed specifically for Samsung devices, and the SP Flash Tool is specially designed for smartphones on SoC MediaTek, and for Motorola smartphones – RSD Lite.
We recommend that you choose the right method for a specific device model, so that problems do not arise due to confusion. Find information on thematic resources on topics dedicated to your device. For greater reliability, do not hesitate to ask questions of other traders on the forums.
How to flash an Android device through recovery?
As a rule, users search for information about when there is a need to flash the device, and through the update menu this process can be made as quick and simple as possible.
If you are planning to install the official version of the firmware, you must install a custom recovery, otherwise you will end up with a problem.
You can try to find the official firmware for your smartphone on the manufacturer’s website, but it doesn’t always have access to it in order to protect the code from being tampered with by hackers. Also, a copy of the official firmware is often shared by users of similar devices on various forums. Make jokes.
However, the firmware process actually takes a lot of effort, as there are a lot of special features to consider:
- download the firmware file (you know it for your smartphone model);
- As a third-party firmware, a custom recovery can be installed (see instructions below);
- After downloading, the file is moved to an external memory card;
- Install your smartphone in update mode (see instructions below);
- Look for the item “Apply update from external storage” and indicate the path to the firmware file;
- we confirm this;
- we check for the completion of the renovation of the building;
- We won’t tell you to clear the traces of the previous software (see the Wipe data/factory reset item);
- To complete the firmware of the new device, the “Reboot system now” stamp is stamped.
Ready! Your smartphone can successfully become addicted, presenting itself in a new look.
It is clear that the Android firmware will be successfully completed through recovery. Often, smartphones are encouraged to be flashed using stock photos, often to flash the required additional information, as well as connect to a PC. However, the official firmware of the big one installs without problems.
Pouch
Well, today we told you everything about Recovery as clearly as possible. We tried to convey the material as clearly as possible, so that our readers do not write without a video.
At one point, you can effectively restore your device by discarding settings or creating a backup copy, and custom recovery will help you install the firmware that you need, with updates. We hope that you will now be able to figure out the update menu without the help of a clerk.
Recovery is also called Update Mode for Android. It uses a special mode, through which Android is instantly installed and updates the system or updates it.
The recovery starts when you press a song key combination. There is a difference for the skin. For example, for Samsung it is “Home” + “Power” + “Volume Up”, and for Nexus it is “Volume Down” + “Power”. You can find out the exact combination of your Android via the Internet.
Vida and Possibility Recovery
The fragments of this program are unsafe, it stinks to be written. Depending on the creator, recovery is divided into two types:
1. Stock Recovery - created by the “original” source for the device.
2. Custom Recovery is an alternative version that is created by other programs. There are more possibilities, even though it’s official.
The "basic" capabilities of this mode are now:
1) re-enable android;
2) install the update on Android;
3) flash the phone to reset the data to factory settings;
4) copy and update the system;
5) delete the cache from the device;
6) install archives from the memory card;
7) turn on the USB-MS data transfer mode to SD.
Custom Recovery, in addition to the treated components, also has a non-invasive function. For example, you can flash Android or Vibirkovo, saving the required files.
The same goes for Photo Data Recovery – a program we’ll talk about below.
Navigation and menu Custom Recovery
You can change to Custom mode using additional keys:
VolDOWN – down, VolUP – up, POWER – back, CAMERA – select an item.
The main menu items are listed below to make it easier for you to understand the English language:
2) formatting of the internal partition – wipe data/factory reset;
3) install the firmware from the memory card - install zip from sdcard;
4) saving and updating - backup and restore;
5) advanced update mode - Advanced Restore;
6) formatting the “zavantazhenya” partition - format boot;
7) formatting of the “system” section - format system;
8) formatting of the “date” section - format data;
9) format the “cache” section - format cache;
10) memory card format - format sdcard;
11) format the Linux partition - format sd-ext;
12) connection to a computer using a flash drive - mount USB storage;

Recovery installation
Installing covers on your Android is easy. Follow the step by step instructions:
Procedure 1. Through the Market you need to install "Rom Manager 4.2" or "Rom Manager 4.0".
Croc 2. Launch the program and give root rights.
Step 3. Click on Install clockworkmod recovery, which is the first item.
Term 4. You will be notified that the installation has been successfully completed.
A little about Photo Data Recovery
Photo Data Recovery is a program for updating deleted files on Android.
The main functions and features of Photo Data are:
1) easy and manual interface;
2) quick installation and a small task for the installer;
3) filter to search for the required remote file;
4) the ability to select the time interval through which the Android memory is cleared;
5) residual removal of unnecessary files.
Photo Data Recovery is a must have for those who like to save important information on their phone. You can install this program as quickly as possible.
At the end
Recovery is used in case of problems with your smartphone: the operating system has stopped working, the operating system has crashed, and the Android has become glitchy. Through this mode, you can manually use your device and “liquidate” it.
You want to entice and install it absolutely cost-free, so that you can be the ruler of your own structure, and not on the spur of the moment.
Recovering Partition Data Step by Step
Saving a dangerous party or changing the rolls may be a matter of a few minutes – or completely impossible, depending on the type of damage and tools you use. With this material, I can provide Magic Partition Recovery and can help you recover partition data step by step.
Restoring Corrupted Partitions:
The Full Thing
Your disk can easily become corrupted if it has a deep bit of corruption. As soon as a few bytes are generated per recording, the disk is pushed to completion.
Master Boot Record (MBR) and partition tables contain size and partition information available on the hard drive, their exact location, size, and other essential information. If this information is short or corrupted, the disk will become completely accessible and appear “broken”. Fortunately, this issue is fairly easy to deal with if you're using the right tools.
We’ll be using Magic Partition Recovery to fix damaged MBR and partition tables. Download, install and launch Magic Partition Recovery to begin.
Content-Aware Partition Recovery
Magic Partition Recovery works in manner that's pretty different from how others, simpler recovery tools operate. The difference between Magic Partition Recovery and other tools is the creation of Magic Partition Recovery before the end of content-aware analysis and recovery. Content-aware recovery does not just fix obvious damage in existing systems of structures, as it recovers deleted partitions. Instead, it scans the entire hard drive gather information on what was originally available, and reconstructing essential system structures from scratch.
This method will ensure the greatest possible efficiency, updating all legal structures and re-accessing files and reports that were orientated to be located on your disk.
Step 1: Select a hard drive to recover partitions from
Specify hard drive you're about recover partitions from. To update important systems of the structure with information about other party robots that may not be available at this point, you will need to select a physical hard drive and not a drive letter.
Step 2: Updating the batch with Full Analysis and Fast Scan modes
On the next step, you will be directed to select either Full Analysis or Fast Scan. Make sure to choose Full Analysis for complete partition recovery.
Full Analysis has a detailed investigation of the disk, reading every sector of the selected disk. In Full Analysis mode, tools that display all available information about a logical part that exists on the disk, and restore the original disk structures, including Name files, folders and other materials.
The Fast Scan mode restores files just recently deleted from existing partition. This mode does not work for partition recovery.
Step 3: Look up missing partitions
All you want to do is click “Next” again, and Magic Partition Recovery will scan your disk to identify missing partitions. Depending on the size of the disk, it can be at that time (30-40 units for 320 GB hard drive typical; longer for larger disks).
Step 4: Locate missing files
At the hour of updated analytics, Magic Partition Recovery locates all files and folders stored on disk including those located on missing partitions. After analysis finishes, you have the option to restore all files discovered before recovering partitions.
You’ll see a list of folders and files found on the disk. In addition to other files and spacers, you will also write the lists of the resulting files flagged with red. You can find the file name by selecting it using the “Find File” option in Wikorystany, or certain file types using the “Filter” option in the “View” menu. You can view all files or filters from downloaded or other files. Select files and folders and you will be victorious.