How to install Windows XP from a disk. Reinstalling Windows Xp for dummies Installing Windows XP
Hello, dear reader! Today I would like to look at the “fundamental” area of computer knowledge, and explain how to install Windows XP on a computer from a disk.
In everyday life, it is common to realize that those who work at all definitely want to know a little about computers. I don’t dare to truly judge the extent of this assertion, but I have no doubt that this material could be rich in brown.
Respect! If you need an original installation disk for Windows XP or any other version, then write to me by email [email protected]. Tim yourself creates an image that is virus-free and 100% bug-free.
Today we will learn to re-install the Windows XP operating system, or as it is more often called “re-install Windows”. I appreciate that with this article, you can not only reinstall the OS, but also install it on a new hard drive and a clean partition.
For example, you can watch the video tutorial.
There is a lot of power in the installed system depending on the distribution you know. I do not recommend vikorizing various compilations on the Zver DVD installation and similar ones.
The right choice would be a distribution that makes a minimum of changes. Ideally, it would be better to download the official version. Depending on which distribution you have chosen, during the installation process you may have to do a number of things by following the steps below. This does not in any way affect the efficiency of the system; its quantity is reduced specifically in order to simplify and speed up the installation process.
You can create an installation disk yourself, select the driver installation (integrated), and also adjust all the parameters so as not to specify them during the installation of Windows. I will definitely talk about how to deal with it in one of the upcoming articles.
After installing this version of Windows, you can install whatever! If you don’t believe me, you can read articles about installing Windows of other versions on the blog:
Actions before installing Windows XP
First of all, I’ll begin to tell you how to install Windows XP on your computer from a disk, to get started you will need to download what you have There is a license key that goes to the required disk. This name can be found on the surface of the disk, on the box, on the system unit (if you bought the computer with Windows installed) or in a text file called “serial.txt” or “s/n” on the disk itself.
Otherwise, you need to start the disk before reinstalling the OS and copy the key onto a piece of paper. Another possible option is that the license key may be there if you have captured the disk image.
Before starting the installation, copy all data from the system drive “C:/” to another partition, for example, “D:/”, a portable hard drive or flash drive.
Preparation
Before starting the installation, you need to reboot your computer and go not to the hard drive, but to the optical drive (before you already inserted the Windows XP installation disc).
This can be done in two ways: the first one will open the computer to the optical disc drive once when installed, the other one will do it so that the computer will first check whether the disc is in the drive.
To implement the first method, you need to go to the Boot menu and select “ ”. To do this, after turning on the computer, press the “F8” or “F12” button. You must not just press the button, but repeat the press.
To implement another method, you need to go to the “BIOS” setup - “BIOS Setup”. To access your computer at any time, press the F2, F10 or Del keys.

The BIOS needs to know the setting, which indicates the order of priority of devices, it will be called something like this: “Boot device priority”.
This can be presented in several categories: First boot device, Second boot device, Third Boot device, etc.

To find out which button you need to press to enter the BIOS, you need to carefully look at the screen - there will be prompts at the bottom. The button for the first method will be labeled Boot menu, and for the other, Setup, BIOS or BIOS Setup.

The first way is more suitable for beginners, so it won’t lead to anything bad. When taking over from someone else, you may be able to make adjustments when the BIOS is adjusted. In addition, after successful installation of the OS, configured in another way, it is necessary to turn it to the exit position, which is not necessary with the first method.
Launch and installation of Windows XP
If the action described above is installed and after the computer is turned on, the computer is booted from the disk, and the installation disk is inserted into the drive, you can continue with the installation.
In principle, I have already learned about the nuances of how to install Windows XP on a computer from a disk. To ensure that the process is complete, we will complete the Windows installation.
After restarting or shutting down your computer, you will be asked to press “ Press any key to boot from CD…", which means "Press any key to engage the disk." Apparently, having received the notification, we press the button. Whenever I say “Probil” (it’s important to miss).

If everything is assembled correctly, then you will immediately see the screen showing the indications on the next little one, which means that the installed program has started preparing the procedure.

If the installation is saved to a hard drive that already contains an installed version of Windows XP, you will be prompted to update it using the “Update Console”. Once we decided to reinstall the system, we pressed “Enter”.
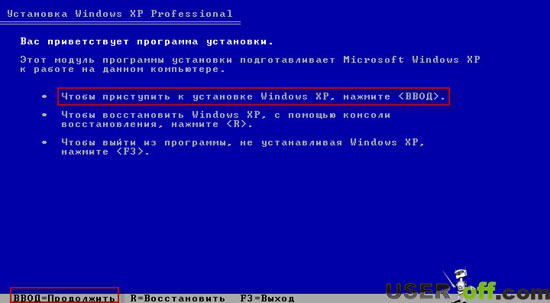
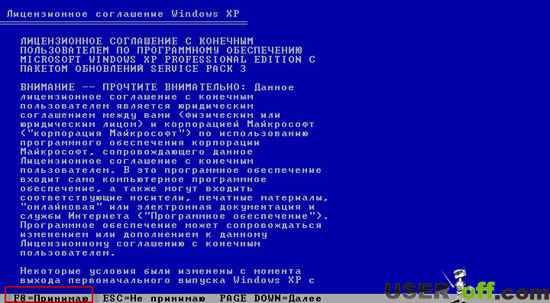
Coming soon there will be a demonstration of the licensed content of Windows XP. Behind him, of course, for the time being, we will have “F8” stamped on him.
If Windows is already installed on your computer, you will be prompted to update the system from the designated installation location. Apparently, it is embossed “Esc”.
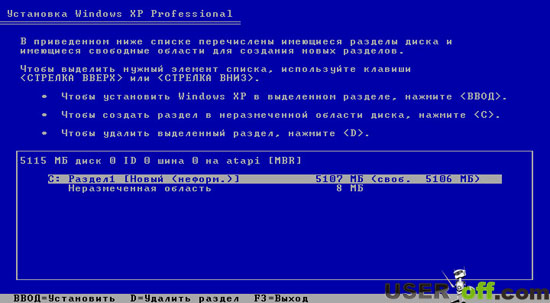
 In the near future you will choose a place to install a new system. Here the installation program will show a list of your hard drives and the partitions on them.

If you are reinstalling the OS, you need to select the partition with the letter “C:” (it will be transferred that the old OS is installed there) and press “Enter”.
In this case, if the installation is performed on a blank hard drive, instead of the list of partitions it will be written “(some) MB”. For this type, you will first need to create a section for the system, for which the “C” key will be printed.

On the screen you need to indicate the size of the created partition in megabytes. Currently, for comfortable operation, the system partition needs to be 30-50 GB in size, so you can enter a figure from 30,000 to 50,000 at your discretion. If you play online games on your computer, you will need to create a partition of 50,000 to 100,000 MB.
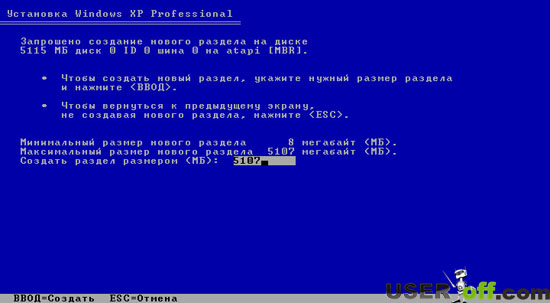
After turning to the front screen, the created section will be assigned the letter “C:”. Select and continue by pressing “Enter”.
As soon as the reinstallation ends, you install the system in the partition with the installed OS, then the program suspects that you intend to install two copies of Windows in one partition, be aware that it is not recommended to work this way. Emboss “C” to last.

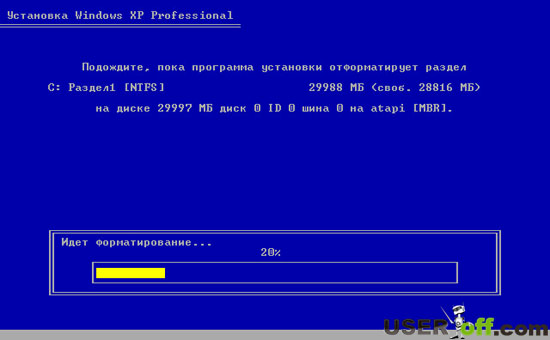
Let us know that during the formatting process all data on the selected section will be lost. We were ready, and before reinstalling, we copied all the valuable data from the “C:” drive (they also copied it, right?). Select “Format partition using NTFS system (Schvidke)” and press “Enter”.

The “F” button is embossed on the power supply of the system.

There are two screens in front of us, so we don’t need to be handed a card. The first is the progress of the formatting procedure, the other is the process of copying files to the hard drive.
Copy of data.

After completing these activities, the computer will restart. In 15 seconds, you can press the “Enter” button again.

Important moment! After re-installation, you do not need to download the disk, the installation procedure will then continue with the selected files copied to the hard drive. Then you ignore the proposition “Press any key to boot from CD...” (as it appears). You just don’t push anything. The disc is lost from the drive.
Further, the new look has a more attractive and basic graphical interface. Sometimes dialog boxes will appear. This means that an hour before the installation is completed, the indications below are very different from the truth and have the greatest impact on the productivity of the computer, the speed of the hard drive is also important.

The first dialogue topic will be “Mova and regional standards”. There is no need to change this, but if you want, you can press one or the other “Adjust...” button and select the required parameters at your discretion.
We select the edge in which we press “Far”.

In the coming week, you are encouraged to introduce yourself. You can kindly write your name here.

The next step is to enter the license key. This needs to be prepared in advance, as it was planned for the future.

This is especially necessary if the computer operates in a local network (for example, at home with 2-3 PCs). If you have a protracted illness, you don’t have to worry about it. It is recommended to set and write down the administrator password in a safe place for safety reasons. However, if you have any doubts due to your forgetfulness, you can leave the field empty.

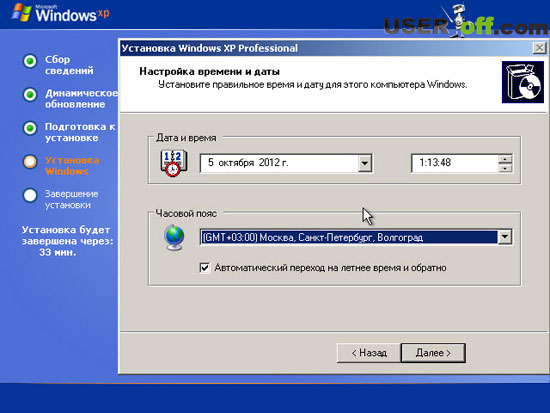
Select the exact date, hour and time zone.
At the next window, delete the options for processing, and press “Next”.


If you need to reinstall your computer again, you can remove the disk from the drive, leaving any pieces of Windows XP already installed on your computer.
At the displayed “Display settings” press “OK”.

When you are notified, check the functionality of the screen and press “OK” when you are informed.

After the “Greetings” screen appears, press “Next”.


When you are about to check your Internet connection, click the “Skip” button.

Select “No, just like another time”, embossed “Far”.

After which you will be asked to indicate the employees who will work on your computer. For the skin, a wide-ranging record will be created. If you only need to, enter your name and click “Next”.

On the remaining screen you will be notified that the installation is complete and say “Thank you” without having to press the “Done” button.

If all the steps described in the article were completed correctly and the process was completed successfully, we can greet you, now you know how to install Windows XP on your computer from the disk.
Soon you will install drivers for your devices. To find out how to proceed, read the article: “”. And about the security software that will be available after reinstalling the OS, you can read the article: “”.
See you soon!
PS: By recording a video tutorial, you will learn how to install WIndows XP on your computer from the disc.
Reinstalling the operating system allows you to correct errors that have accumulated, reformat hard drives, and completely clean the registry. It is recommended to reinstall Windows XP once every time.
Krok 1. If the computer is turned off, go to the BIOS and install your disk drive as the first priority storage device.

Note! You can get hold of the drive in another way: under the hour of the procedure “POST" go to the acquisition menu and select as your first deviceCD-ROM orDVD-ROM.
Croc 2 During installation, you will be required to install specific drivers for SCSI or RAID devices. These drivers are available for server systems, so for a home computer you can skip this point.
Croc 3 Get to know the license agreement of the European Union (EULA). To confirm yes, press the F8 key. At the same time (ESC) the installation will be interrupted.

Note! There are a number of points to please, for which few people lose respect. For example, with the specified document, you have the right to copy the installation disk no more than twice per paid license. In this way, you can avoid various ship calls associated with victorious unlicensed copies of distributions!
Krok 4. Get to know the duties of your hard drive. To add sections to your selections, press the “Enter” key and go to 7. If you want to change the number of volumes, go to 5.

Krok 5. Create the required number of logical partitions (volumes) of the hard drive by pressing the “C” key. Indicate the size of the new volume.

Krok 6 Select the logical drive where you want to install XP.

Krok 7. Select the required option to format your hard drive.

Important! It is better to choose an external format rather than a Swedish one, since in this case you will need to check for bad sectors. Recall that when installedXP selections for installation are completely cleared!
Krok 8 Wait for the partition formatting process to complete.

Krok 9 Wait for the process of copying system files to complete.

Krok 10 To continue the need to re-enable, as a rule, it is carried out in automatic mode.

Krok 11 After installation, the process of installing the system begins immediately.

Krok 12 After using the installer program, configure the required regional parameters.

The layout behind your clothes should indicate the one you most often adore. You can change it after the system has already been installed.

Krok 13 Adjustment of the program is required for further display in Windows XP of the copyright holder of the licensed copy.

Krok 14 When prompted by the installer, enter the key. As a rule, stickers with license keys are placed on the computer case or on the original boxes for installation disks.

Krok 15 Think of and enter the computer name (the obligatory language parameter), as well as the password for the account account "Administrator" (the non-language parameter, or, more simply, enter).
Note! If your computer is not part of a work group or domain, you can specify the name as you wish. Otherwise, be sure to use names in Latin, and be careful not to go wrong with the first one, otherwise you may experience problems when connecting to a domain controller or another computer.

Krok 16 Indicate the date and time settings.
Note! With older versions installedXP may have a problem with time zones. At this time, the winter and summer hours have been cut off, and the system has lost transitions. To remove them without installing additional updates, enter your time zone for another country (for example, instead of Moscow, enter Istanbul).

Krok 17 Merezhevy parameters are installed in the following way: if the computer has a static IP, select the “Special parameters” option. Once you select “Default Settings” the appropriate address of your computer, the gateway and DNS servers will be assigned automatically.

Krok 18 Specify the domain or intermediate group to which your computer belongs. For the Promo people – Workgroup.
Important! If you need to connect to a domain, then it is better to specify the window when installed - this will allow you to quickly skip all operating system updates, security settings and standard setup of the workstation.

Krok 19 Check that the installation is complete.

Krok 20 When powering up the computer, allow the system to automatically adjust the screen settings.

Krok 21. Please indicate the required option from the master for setting up a separate part of the screen.

Krok 22. It is good to follow the instructions to carry out the remaining setup of the operating system.

Krok 23. Select the required system update option.
Important! Technical supportWindowsXP was introduced in 2014, most likely at this time of daily updates, with the exception of especially important ones, for example, protection from encryption viruses.

Krok 24 Please register your copy of Windows with Microsoft. Essentially, this functionality allows access to all system updates.

Krok 25 Indicate your computer's owner.
Note! You will need to inform your accountants if your machine is on a domain, so the data record will only be shared at a specific work location.

Krok 26 Complete the installation wizard.

Krok 27. After completing the Windows installation, you must update the drivers on all devices.

Visnovok
We have looked at the main points of OS installation, but do not forget about the difference between installation on a “stand-alone” machine and station in the domain. Make sure to update your system drivers as often as possible to maintain stable operation.
Video - Installing Windows XP
The only option if you have Windows XP installed on the device is to use a special flash drive. The WinToFlash program will help you here. If it starts first, you need to wait for the convenience of the customer and press OK. Then you can see the headache of the program, which is what it looks like.
Since the program has been completely transferred to the Russian language, the process of working with it will be completely easy. To create a powerful flash drive, you need to become a vikor master. He provides support at all stages of the process. There is a different approach until the task is completed. To do this, you need to open the “Extensions Mode” tab and click on “Transfer the Windows XP installation program to a storage device.” Select a secondary drive if there are no tasks. After this the “Create” button is pressed.

Now you need to install the Windows XP files. There are different options here - they can be installed on a hard disk, CD or image. The remaining point deserves a closer look. For the presence of the ISO image, open it as an archiver with immediate unpacking. 
The next stage lies in the fact that the flash drive itself can become attractive. Be sure to be aware of the fact that this will cause the deletion of all data without the possibility of updating it further. It is recommended to save important information on your hard drive later. The conversion process itself takes up to an hour and you just need to register.
As you can see from the written guide, creating a fancy Windows XP flash drive with WinToFlash will not pose any problems. The supplement will provide for two main regimes of the victorious administration. The master guides the correspondent with a classic approach. Extension mode allows you to set song parameters. For example, here you can enter the choice of a variety of sellers, set the correction of certain restrictions, etc. There is no need to tell you anything, but there is no need to use the extension mode.
You can download the program on the official website of the retailer //wintoflash.com/home/ua/
Creating a fancy flash drive for help - WinSetupFromUSB
To achieve great popularity during the creation of innovative flash drives, the WinSetupFromUSB program is being used. Vaughn is a costless PZ and demonstrates the simple process of conquering a given task. This addition conveys the ability to target a wide range of goals. 
The following is a more detailed look at the process:
- The flash drive must be inserted into the USB port of the device and you can launch the program.
- You need to enter the route to the flash drive. Since it is a single connection of accumulated information, it will already be asked for processing. When retouching is indicated, Bootice pressing is performed.
- A special Bootice window will appear, where you need to click “Perform format”. There will be a number of points to choose from, among which you will need to enter USB-HDD mode (Single Partition). You will be notified about formatting and confirming your trace. As before, it is recommended to save all important information beforehand.
- When formatting is completed, you need to click “Process MBR”, then select the “GRub for DOS” item and click the “Install / Config” button. Once the process is complete, Bootice can be closed.
- Now you need to specify that the files of the Windows XP operating system will be downloaded. Like the previous method, there are many approaches, and the principle of action is lost by itself. If rescheduling is indicated, press the Go button and scroll to the end of the selected task.
The main advantage of WinSetupFromUSB is its reduced approach, which allows you to use great functionality. The program is ideally suited for current clients.
Preparing the hard drive before installing Windows XP
Before you begin the process of installing Windows XP on your computer's hard drive, you need to prepare it. It is clear that installing several operating systems on one logical drive is impossible, and the fragments of each of the systems cannot be processed correctly. Therefore, before starting the installation, it is necessary to format the partition of the HDD on which we will perform the installation.
Launched from a previously created flash drive, 
After this, the message “Installing Windows XP Professional” will appear on the monitor. At this time, the process of obtaining drivers, necessary software and OS installation programs is underway. 
After this, a window will appear asking you to choose one of several options for continuing your work. We need to start installing Windows XP, so press the Enter key and go with the first point.

We read the licensed content from Microsoft and follow it by pressing the F8 key. 
After this, we need to see where we can update to the latest version of Windows. This information will only serve you if you already have one version of Windows XP installed on your computer. In any case, we recommend that you do not quit the updated system, but proceed before installing a new version, since only this option will solve all problems and ensure stable and reliable operation of the computer. To do this, press the Esc key. 
Now the installation program shows us a list of logical partitions on the hard drive. It is recommended to terminate the installation of the new version of Windows XP on the same partition in which the old version was previously installed, usually drive C. Select this partition and press the Enter key. 
We can now select the type of file system that will be created on the logical drive after formatting. For current computers, the NTFS file system is most suitable for most computers, so select the item “Format partition using the NTFS system” and press the Enter key. 
After this installation program, you will see a warning that all information from this partition of the hard drive will be deleted at the time of formatting. If you have transferred all the important information to other sections, feel free to press the F key.
The formatting process begins, which can take up to an hour, depending on the logical drive. 
Once the formatting is complete, the installation program will automatically copy the Windows XP files to your computer. 
After this, the computer will be automatically restarted. The system will now be connected to the computer's hard drive and the Windows XP installation process will begin in graphical mode.
The Windows XP installation process - the main stage
Which section will be provided with the latest power supply “How to install Windows XP”. This information is absolutely identical to both the process of installing Windows XP from a CD and the process of installing Windows XP from a flash drive onto a laptop. The stages “Collecting data”, “Dynamic update” and “Preparation before installation” are completed without our participation. After which we are reminded that we have adjusted the language and regional standards for displaying numbers and penny units. For this purpose, we will emboss it on the “Adjust” button in the “Miscology” section. From the menu, select your edge and stamp OK. After this, press the “Adjust” button again, again in the “Mova” section. From the first menu that drops down, we can select a language to help you get started when you have a computer. Below you can add your input by clicking the “Add” button (two languages are available, Russian and English). Once you press the “Keyboard Options” button, you will be taken to a menu where you can set a key to enable Caps Lock mode, as well as change the assigned key for switching the keyboard. After completing all the adjustments, we will stamp “Next” and move on to the next window. 
Here we are reminded to inform the authorities of the name and name of the organization. Enter any data and stamp “Dali”. 
Now you need to enter the 25-character license key for your copy of Windows. This key is located on the box if you purchase a licensed copy. The blame for pirated products lies in the text file. Enter this key, check the correctness of the entry and press the “Next” button.

After this, a window will appear to set the computer name and password for a user with administrator rights. When you work on a home computer, you independently select the names that will be assigned to your PC at home. If you are working on a corporate computer, check with the network administrator. Remember or write down the administrator password that you set in this window, as long as it is necessary to start Windows every time. 
In the coming window we hope to be able to adjust the date and time. We select the adjustment needs and stamp “Further”.

After this we go to the window “Adjusting the parameters of the measurement”. It is best to skip setting up the local network at this stage and configuring it later after the installation is complete. For this, select the “Equivalent parameters” item and press the “Next” button. 
We delete the work group without changing "WORKGROUP" and leave it. 
After this, the copying of system files to the computer’s hard drive begins. Wait until the installation process is complete and you will be able to start Windows XP for the first time. If the monitor adjustment starts automatically at this time, wait for it to finish and click OK. 
In whose window press the left mouse button to “OK” 
After which we preferably have an animated Windows XP window. 
After this, a window will appear asking you to update the Windows automatic update system. In addition, the robots should note that it is better to automatically update without viknenim. І update the system manually.

Then we will be prompted to set up an Internet connection and activate a copy of the OS. You can skip this step for now. 
Are you ready to register with Microsoft? At this point the food says “No, like next time” and further on.

You will now be prompted to enter the name of your account account, as well as the names of other clients who also work on your computer. Please note that cloud records with the names Administrator and Guest were created during the OS installation process. 
Once the installation of Windows XP is complete, click the “Finish” button and install a clean operating system.

Many koristuvachs respect that installing operating systems on a computer is the prerogative of fakhivts. Is it really true? You will need to install and reinstall Windows XP on your own.
It's no secret that the connection between a person and a computer depends on the operating system installed on your PC. This is the main software component, without which it is impossible to see a modern computer. Unfortunately, as with any other program, the operating system is underdeveloped, and from now on almost any user will suffer from damage to its normal functionality. This can be reflected in the significant increase in the number of hours of use of the computer and the availability of add-ons that freeze during the hour of work, the guilt of various products in the hour of the death of singing actions, and the increased use of the product. and systems. Such consequences can be caused both by the incorrect actions of the customer himself and by the influx of various wasteful programs that are in excess of the global Internet.
According to the statistics, as long as you have carefully exploited your OS and reliably protected it from virus infection, after 3-4 years, 80% of users have valid reasons for restoring the system. And since you still dared to work on your own, without relying on all kinds of paid technical services, this article is for you. We will not just look at the re-installation of the Windows XPSP3 operating system, but we will try to understand all the main nuances that arise in the installation process. This approach allows you to easily install a new OS at the reinstallation stage, and avoid possible waste of important data.
Naturally, before installation you need the installation disk from the system. Moreover, this disk is guilty of being obsessed with it, while the computer is guilty of its ability to become obsessed with it. As a rule, all original disks from the system or their images are subject to proper processing. However, the installation of WindowsXP can be started in two ways - directly from the already installed system or through disk storage. Another method is shorter, but if you don’t have an old system installed or you are installing it on a new computer, then it’s also possible.
In order for the computer to start downloading from the installation disk, you may need to make some complicated adjustments in the BIOS. On the right is that your optical drive is to be at the top of the list of fancy devices, which is not always the case. To check, you need to insert the Windows CD into the drive and restart your computer. If, at the time of activation, you write: “Press any key to activate,” then you can proceed with everything until installation. Otherwise, you need to go to the BIOS setup.
SETTING UP YOUR COMPUTER TO LOOK AT THE COMPACT DISC
When the computer is turned off, a short message will usually appear indicating that there is a key that will allow you to enter the BIOS setup menu. Be respectful, the fragments of this writing can be very fast on the screen, especially on laptops. If it didn’t work the first time, immediately reset the computer to the Reset button and try again. When you first start watching, large graphic images may appear on the screen that obscure the writing on the screen. To clean it up, press the Esc key.
List of the most frequently used keys:
- Desktop computers - Del (almost always), F1
- Laptops – F1, F2, F3, Del, Ctrl + Alt + Esc. On laptops, the keys may be even more varied, depending on the model. You can find this information either via the Internet or by calling the technical support service.
Once you have identified the key that indicates clicking the BIOS setup menu, reboot the computer once again and at the very beginning you will want to press it several times (once is enough, otherwise you will definitely miss the required moment, you will press don't bother me). If everything is assembled correctly, then the adjustment window will open.
As a rule, there are two types of BIOS most often:

If your window is similar to this, you need to select a section Advanced BIOS Features, and at a new point First Boot Device assign values to CDROM. Then press the F10 key and select Yes in the dialog box.
American Megatrends BIOS

Or if your window has a gray background, as in your screenshot, select the appropriate section Boot and at the darling BootDevicePriority at the point 1stBootDevice Set the name of the optical drive. Then press the F10 key and select Yes in the dialog box.
On mobile devices (laptops), BIOS programs can be very disrupted, and it is impossible to list all possible options within the framework of this article. In any case, you should find the item in the parameters window, the name of which is related to the drive (Boot) and in this place set the optical drive (CDROM) as the first device.
COB INSTALLATION
After turning on/restarting your computer, if any Windows operating system is already installed on your computer, then after an hour you will see the message “Press any key to boot from CD” on the screen. to get a CD) what should you do?

Be careful, because you will have only 5 seconds to enter the system installation. As soon as the streaming operating system has begun to become disabled, this means that the opportunity to print the installation has been wasted and you will have to restart the computer again for the next test.
Then the Windows XP basic software installation screen will appear, which is especially important if you plan to install the system on a hard drive array (RAID) or a high-grade SCSI drive.

Here you will need to press the button for installing additional drivers for these devices, shown in the bottom row of the screen. In most cases, such a request is not necessary and you just need to check the privacy screen.

On the welcome screen you will be prompted:
- Install Windows XP. Select next by pressing the ENTER key for a new installation or an update to a previous copy of Windows, vikoryst and graphical interface.
- Windows update for additional console update. Next, select the system updater for additional DOS commands launched from the command line. Allows you to install other components of the system without going through a new installation procedure. The most commonly used tool is to update the backup sector of the file system and the master backup record (MBR); point copying, renaming or deleting folders and files of the operating system; Creation and formatting of partitions on disks. The update console is accessed with the R button.
- Vikhid. When you are in view of the next installation, press the F3 key.
Select the first item “Proceed before installing Windows XP” (if you are going to reinstall the system) by pressing the ENTER key, after which the license agreement window will appear, which you must accept in order to continue the installation by pressing F8 .


Once these are found, you will see a screen with a list of these systems and a menu in which:
- Renew your copy of Windows by pressing the R key. By selecting this item, you will have to go through a new system installation procedure, during which all system files from the old copy will be replaced with the new one from the CD. All data, settings and installed programs will be saved. The update helps in removing, removing or replacing infected files and Windows system files.
- Install a new copy of Windows by pressing the ESC key.
You will not need to see the list of installed systems if you are installing the system on a new computer/hard drive, or if your previous copy of Windows contains a different edition or service pack.
As soon as the installed disk space is allocated for the operating system. This very important moment is always taken into account with respect, and all matters are concluded with the utmost care.
RULES FOR ROSSING THE HARD DISK
Who would like to have a little insight and make some recommendations for hard disk hard drive resolution:
- Do not put the entire space of your hard drive under a single partition. This is respected in a vile tone and may cause you a lot of trouble in the future.
- Today's hard drives can have a large capacity for storing data, so they can be divided into a number of thematic sections.
- It is recommended that when installing the operating system and the necessary software, you create a separate section and do not fill it with your special data.
- Select the size of the system partition from the reserve, doctors, so that for the correct operation of Windows, 15% of the space in this partition may be left unavailable.
- Don't create too many divisions. This will complicate navigation and reduce the efficiency of large files and folders.
THE PURPOSE OF THE SYSTEM DEVELOPMENT
Now, let's turn to installation. From now on, during the installation you can follow two paths:
Option 1: You have a new computer and the hard drive has not been shared. This is when the upcoming plan will appear before you:
.jpg)
The size of the unmarked area is absolutely not to blame for your hard drive and to avoid being marked in the screenshot. To continue the installation, you need to create a partition on the disk (system partition) in which the OS will be installed in the future, and specify its size. As a rule, for Windows XP and related software, 40 - 60 GB is enough, but not less than 20 GB. By pressing the C key in the window, enter the required size for the section to be created.

The size must be specified in megabytes. Insure it based on the fact that 1 GB = 1024 MB. Therefore, if you want to add 60 GB to the system partition, you must enter the number 61440 in the size field.
By pressing the ENTER key, you will be taken to the hard disk partition window, where the created sections will be seen in a row with the assigned letters from the Latin alphabet (usually “C”), the file system - in our type “new (unformatted) )" ta yogo size. The row with the divided area that was lost will be expanded below, so in exactly the same way you can divide it into the number of sections you need. True, it’s not a big deal to deal with here; the remaining parts after installation can be done using Windows methods.
Having created the system partition, see it using the arrow keys on the keyboard and press the ENTER key, after which you will see the remaining dialog box in which you will be assigned to format it.

Feel free to select the flexible formatting option by pressing ENTER, as the other option will require re-verification of the physical surface of the disk, which will take up to an hour, especially since the partition is large in size.
After selecting the file system, Windows installation will begin.
Option 2 - If the system is installed on your computer. Then your hard drive has already been divided into logical areas, and you will see a mix of all the identified sections.

Respect! All further manipulations with these sections may lead to the loss of your data, so be very careful with your actions. If you don't mind partitioning your hard drive, you can delete all partitions completely or partially by pressing the D key. Select the required section using the up and down arrows. After deleting the partition, the area you occupied becomes unallocated, and all data that was on that logical drive is deleted. When you remove many sections, the stench is transformed into a single undivided area, which you can further divide as you wish. The principle of dividing an undivided section of the hard disk is described below.
After all the repartitions, or because the original structure of the hard drive is overwhelming you, you will not be able to select the appropriate partition in which you plan to install the system and press the ENTER key.

If you have already selected a partition of your hard drive with the necessary data to install the OS, you will be prompted to select a number of options to proceed further. Be careful, formatting the partition in any file system will result in losing the data that was in the new one! The FAT system is outdated and formatting may only work in NTFS (in short). Once you have made your selection, press Enter to begin formatting and copying system files.

If for any reason you still want to save the information contained in the section you have chosen, then select the option “Delete the current file system without changes.” In this case, all the data that was on the new one will not be enclosed. Moreover, if in this section the previous copy of Windows was installed (the most reliable option), then in this case the installer will tell you in advance about those whose Windows folder is already active, restarting or erasing the original copy pressing, or vibrating a new folder for installations. Here you can definitely click, because the old folder will be automatically renamed and saved by the system.
Please note that after such an installation, it is strongly recommended to manually clean your system partition, and also a large number of files that duplicate each other. On the right, the Windows installer not only saves the old copy of the system, but also all the cloud record files that were in it. With all the best for you, perhaps, be sure to select the “My Documents”, “Vibrana” and “Desktop” folders. Everything else will show up as it takes up gigabytes of space on your hard drive. It’s best to talk about saving your data in the future, and install the new system in a clean section, before formatting.
This is where the installation of the installer ends and further installation proceeds linearly. After selecting a hard disk partition for installing a new operating system, copying the main Windows system files begins.

Once the copying is complete, you will be able to restart your computer, where you don’t need to do anything, but just wait until the installer screen appears with a graphical shell.
THE FUNCTION OF COB PARAMETERS IN WINDOWS

In this window you can change the regional settings and your input. Russia and the Russian language have been established for the education of the local authorities. So there is no need to change anything without need, we press “Far”.
At the next window, you must enter the name of the employee (your name) and the organization (optional). We press “Dali”.

To continue installation of the key in the window, you must enter the Windows serial number of the license sticker.


When the time and date are set, you won’t be able to change anything at all, some of the correct data will be entered automatically, and you won’t have to press the “Next” button.

In the next two windows, you will be able to avoid the fact that the Windows XP distribution contains a driver for your memory card.

There is nothing to change here, having deselected the “Default parameters” option, however, as of now, select the name of the workgroup/domain after installation.

After pressing the “Next” button, the remaining installation phase will appear, and you will no longer have to wait until it is completed. Through a few steps, the computer will be automatically restarted after the first launch of the new operating system.
INSTALLATION COMPLETED
When you start Windows again, you will get a few more dialog windows. The first one will be “Screen Options”, where you just need to press “OK”.

After automatically setting up a separate part of the Windows screen, you will be asked to confirm what you need to do by clicking “OK”:

There is nothing on the privacy screen, it’s simply stamped “Far”:

In the near future, it will be possible to select parameters for automatically updating Windows, which is designed to regularly check through the Internet for the presence of significant system security fixes, critical updates and service packs on the official website of technical support. Increasing automatic updating is important, but at this stage it is not necessary, as long as this parameter has been fine-tuned, you can disable it after installing the caravan from the panel.

If the border card drivers are installed before installation, you will see two more windows: first, checking and setting up your Internet connection, which you can skip, and then registering the system, which is best to add for later.


The remaining parameter that you will have to enter for the remaining use of Windows will be the cloud account account under which you operate in the system.

When complete, you will see a window indicating that the installation of the operating system is complete.


A new installation of Windows XP can take 15 to 35 minutes and depend on the severity of the computer. Immediately after this is completed, install all the necessary device drivers, after which you can proceed to install the software.
This guide is for those who want to install Windows XP on their own on a computer or laptop, from a flash drive or disk. I will try to explain as clearly as possible all the nuances associated with the installation of the operating system, so that you do not lose your daily nutrition.
To install, we need some kind of decent OS: perhaps you already have a disk with a distribution kit or a Windows XP flash drive. Since there is nothing else, except for the ISO image, then in the first part of the instructions I will tell you how to create a disk or USB for installation. And after that, let’s move straight to the procedure itself.
After downloading from the installation disk or USB flash drive of Windows XP, after the simple process of preparing the installation program, you will need to install the system, as well as click “Enter” to continue.

Come on, what do you want - a licensed product of Window XP. Here press F8. Naturally, you take it for granted.

On the final screen you will be prompted to update the previous installation of Windows as it was. If not, the list will be empty. Press the Esc button.

Updating the previous installation of Windows XP
Now one of the most important steps is to select the partition on which Windows XP will be installed. There are different options here, I will describe the broadest of them:

- If your hard drive is split into two or more partitions, and you want to remove it, and if you previously had Windows XP installed, simply select the first partition from the list and press Enter.
- If the disk is damaged, you want to deprive it of such a form, if you previously installed Windows 7 or Windows 8, then first delete the “Reserved” partition with a size of 100 MB and the next partition, corresponding to the size of the drive C.P. Why see the blurred area? Press the entry for installing Windows XP.
- If your hard drive is not partitioned, and if you want to create a separate partition for Windows XP, delete all partitions on the disk. After this, use the C key to create sections that indicate their size. It is easier and more logical to carry out the installation on the first section.
- If the HDD is not partitioned, you do not want to share it, and Windows 7 (8) was previously installed, then also delete all partitions (including “Reserved” for 100 MB) and install Windows XP in one partition, which is removed.
After selecting a partition to install the operating system, you will be prompted to format it. All you need to do is select “Format partition using NTFS system (Schvidke).

Once formatting is complete, you will be able to copy the files required for installation. Then the computer will re-engage. Immediately after the first re-enablement, insert the trace intoBIOS is based on a hard drive, not a flash drive orCD-ROM.
Once the computer is re-installed, the installation of Windows XP will begin immediately, which can take a lot of time to “get in” the computer, otherwise you will end up with 39 coins.

After ten hours you will ask the proposition to enter the name and organization. The other field can be left empty, and in the first one you can enter the name, not necessarily outside that today. Press "Distance".
In the input field, enter the Windows XP license key. You can also enter this after installation.

After entering the key, you will be prompted to enter the computer name (Latin alphabet and numbers) and the administrator password, which can be reserved for others.

The offensive stage is when the time and date are set, everything is clear here. You just need to check the box next to “Automatic transition to daylight saving hour and back.” Press "Distance". The process of installing the necessary components of the operating system begins. Here you will lose your checks.

After all the necessary steps are completed, the computer will restart again and you will be prompted to enter the name of your account account (I recommend using the Latin alphabet) and the records of other account providers, as they will be victorious Xia. Click "Done".

That's all, the installation of Windows XP is complete.
What to do after installing Windows XP on your computer or laptop
The first thing to worry about immediately after installing Windows XP on your computer is to install drivers for all equipment. Due to the fact that this operating system is already more than ten years old, for immediate use, driver searches may be difficult. However, if you have an older laptop or PC, then it is entirely possible that such problems are not to blame.
Even if it wasn’t there, regardless of those, in principle I do not recommend using driver packs, such as Driver Pack Solution, for Windows XP, which is perhaps one of the best options for installing a driver. The program is generated automatically, you can download it free of charge from the official website http://drp.su/ua/
If you have a laptop (older models), the required drivers can be obtained from the official websites of the manufacturers, the addresses of which you can find on the website.
In my opinion, I’ve said that it’s a hassle to install Windows XP. If you run out of food, leave a comment.