How to find out and connect (add) a printer to a local network. How to set up a printer connection in a Windows home network. The printer does not connect to the computer through the network.
In order not to run from your computer to your computer with documents on a flash drive or to avoid losing files to each other for the last time, Microsoft gave Windows the ability to hijack a separate border printer and multiple border folders. These instructions show you how to create a border printer so that you can use it from another computer that is not directly connected to the printer.
What is a hemstone printer?
A hemlock printer is also called a hemline printer. This is a printer that can be accessed by computers that are not directly connected. The printer only connects to one computer, but other computers that are located with the “main” computer can be connected to the same computer. This is a very simple function, as it eliminates the need for users to transfer files or restore the main computer for each other.
Recently, the “Home Group” function has been popular among border printers. With Windows 10 1803, you no longer need to support yourself and are slowly getting to know the system. Fortunately, the ability to use the printer has not gone away. Customers can still set up the printer as a private one and deny access to other computers.
For finishing: Many modern printers support the function of a remote (or “server”) printer. If your printer has such capability, check it out, as it will work more efficiently and more easily (such a printer will be accessible from your computer, before any connections or shutdowns). Find out about the assistant of the koristuvach or look at the characteristics on the official website. For cheaper or older printers, you will have to use the features built into Windows 10.
How to connect and set up a edge printer
Configuring the printer via a local network begins from the computer to which the printer is connected physically, like a USB dart. Make sure all drivers are installed and the printer is enabled and running.
Important: The middle one is not applicable if the computer with physical connections is connected to the printer.
- Press Win + I and go to section. Click on your printer and then click Management. I don’t bother with the printer, that’s why the article is written on the butt of the “printer” Please send OneNote 2016. Please don’t berate me. The procedure will be the same for traditional printers.
- Press Power of the printer After this, a new window will appear on the screen.

- Go to tab Access and install the ensign of the white External access to your printer. Name your printer using names that are customary for you (you can change it to standard) and press OK.

- After this, the printer will be accessible from the edge of other computers. An icon with two icons will appear on the bathroom panel. This is the designation of sleeping devices with moderate access.
- Now you need to go to the PC settings, from which you will have remote access to the printer.
- Press Win+I then open the section Devices – Printers and scanners.
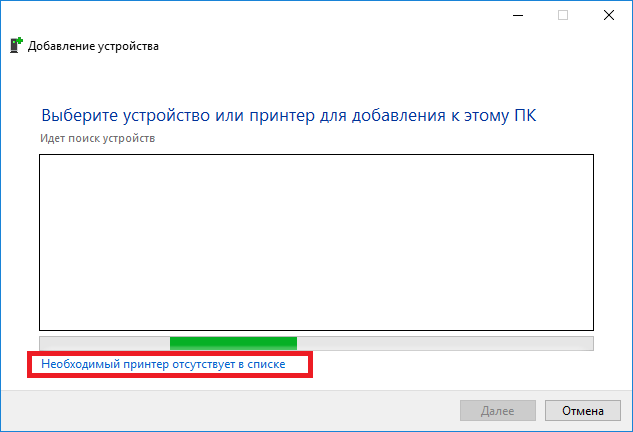
- Click on the button Add printer Check it out, the system will scan the docks more accurately. If the printer is not recognized, you will need to press .
- Please note that the edge printer, installed on Windows 10 computers, will work on the latest versions of the system. On Windows 8.1 / 7 or Windows 10 older than 1803, you need to open the Windows Panel ( Win+ R– Control). Go to section Owning sound – Devices and printers, and then press Adding a printer.

- Click on the new window The required printer is on the list.
- It’s time to show up, which one you need to choose Select a new printer for your name.

- In the field with names, enter MAIN PC\PRINTER NAME. For example, Taras-PC\Test printer. Alternatively, you can press the button Look around, select the main computer (you may need to enter the cloud account and password for your PC) and select the secondary printer.
- Press Dali. The system will connect the printer and notify you that everything is ready until the end. To check whether the current printer is working, you can send it to a different test site for a friend.

After this, your edge printer will be listed in the list of all devices and you can upload your documents from the program to it.
It is not possible to adjust the edge-mesh printer
Buvaje. If you are having difficulty setting up your printer over a local network, there are a number of people who can help you. With Zagal, the system for setting up and working with all printers is simple. Since the printer runs on the main PC, it also runs on other computers at the same time. Golovnya, so that nothing would interfere with the devices collapsing one after another at this boundary.
Resentments of computers may be kept in one private zone, and in settings they may be revealed as little as possible. On both computers, run the following procedure:

The problem can also be caused by converting the PC name to the IP address when going to the printer.

If you are using third-party firewall programs, the procedure for enabling behind-the-scenes access will be different, but the principle is the same.
A printer that can be accessed from different computers is called intermediate. The border printer is brown, either in the office or at home with a number of PCs connected to a local network, for example, to access the Internet.
The use of a border printer in this way reduces the cost of equipment and the purchase of additional devices.
The simplest way to grant access to a printer locally is to connect it to one PC.
To connect the printer you need:


Dovidka! An MFP is a richly functional device that includes a scanner, printer, fax, copier, etc.
Connecting the printer to a PC
I will attach a Samsung ML-2160 to the PC for connection.
Krok 1. Connect the printer and PC with a USB cable.

Croc 2 Connect the power plug to the device and turn it off.

Croc 3 Insert the disc from the installation software into the CD drive.

Krok 4. If the software on the disk does not “start” on its own, two people “click” the mouse button on the “Computer” shortcut in the middle.

Krok 5. Click on the CD drive.

Krok 6 Find the installation program file on the disk and run it.

Note! Launch the installation program this way if you are interested in the Internet.
Krok 7. Click on the “Install” item and press “OK”.

Krok 8 Click on the item “New printer” and press “Next”.

Krok 9 Select USB connection and click "Next".

Krok 10 After auto-assigning the printer, check the new box and click “Next”.

Krok 11 After installing the necessary drivers, the program will proceed to unzip the test side by checking the appropriate box or clicking “OK”.

Setting up access to the printer
Krok 1. Press the Win key together with R on the keyboard (Win is left-handed under Alt).

Croc 2 Open the "control printers" box and press "OK".

Croc 3 If the printer settings are not selected “For cleaning”, click on it with the right mouse button and left click “... for cleaning”. Repeat the process by selecting the “Printer Power” menu.

Krok 4. Click on the “Access” tab and select “Special access...”. Click the “Additional Drivers” button to automatically install the printer driver on the PC you are connecting to.

Krok 5. Select drivers with the required Windows architecture (you do not need to select a driver for the Itanium CPU). Press "OK".

The system prompts you to select the path to the folder containing the required files.
Krok 6 Run the installation file of the printer software (chapter Krok 6 in the section “Granting access to the printer...”).

Krok 7. Vibrate “Viluchiti” and press “OK”.

Krok 8 Select the location where the files will be downloaded, click “Create folder”, select the folder name and click “OK”. The system will remove files from this folder.

Krok 9 Press the “Look…” button (chapter 5 of this section).

Press the “Look…” button
Krok 10 Navigate to the folder containing the other files by clicking on the ".inf" file.

Krok 11 Press "OK".

Krok 12 Open the “Accessories” folder and click “Printer Power” (division 1–3 of the flow section).

Krok 13 Click on the “Security” tab and in the “All” category, check the “Allow” box in the “Druk” row. Press "Close".

Provides access to a PC with a printer
Krok 1. Right-click on the icon of the border (right-handed at the bottom) and left-click “Control Center...”.

Click with the right mouse button on the border icon (right-handed at the bottom), and with the left mouse button click on “Control Center...”
Croc 2 Click “Change access settings...”.

Select “Change access parameters...”
Croc 3 For all profiles, put icons opposite “Disable”.

Krok 4. Scroll down and in “...with password protection” click “Enable...”. Press "Save...".

Scroll down and in “...with password protection” click “Enable...”
Setting up PC access to the limit
To use the printer in a border, you must connect your PC to the border.
Krok 1. Press Win+R, select sysdm.cpl and press OK.

Croc 2 Click on the “Computer Name” tab and click “Change...”.

Click on the “Computer Name” tab and click “Change...”
Croc 3 In the work group row: enter the group name in Latin and press OK.

Krok 4. Restart your computer.
Krok 5. Repeat the steps 1-4 of the stream section on all PCs at the level that has entered the names of this group.
Setting up a border printer on a PC
In order to select remote devices along the border, you need to set up the border printer on the PC you are connecting to.
Krok 1. Press Win+R and type the command “control printers”. Click “OK”.

Croc 2 Vibrati “Adjusting the printer”.


Krok 4. Mark with a dot “Merezhevy printer...” and press “Dali”.

Indicated by the dot “Merezhevy printer...” and pressed “Next”
Krok 5. Click on “Look at Printers”. Press "Dali".

Krok 6 Consistently moving along the lines, clicking the target, find the printer, see it and press “Next”.

Note! If you do not have access to the device at the edge, enter the route manually.
Krok 7.
Krok 8 On the hemline printer, right-click on the mouse that appears, and left-click on “Vikoristovuvat for the washing.”

Dovidka! For all versions of Windows, printer installation follows a similar procedure.
How to connect a edge-multifunction printer
If you don't have a hand on the printer connected to another PC, the complicated functioning of the PC and the printer may be interrupted for a long time.
To save yourself this little bit, you can connect another device via a print server, add a border printer or a border MFP.
Note! All devices of this type are connected to the local network following the instructions below.
You can connect the MFP with the help of an assistant, either on the CD-ROM of the device, or through connecting printers and devices in Windows.
Krok 1. Connect the cable to the Ethernet port of the MFP (RJ-45 connector) and feed it to the living device.

Connect the other end of the mesh cable to the router that is located in the mesh.

Croc 2 If the device connects to the router via a Wi-Fi network, open the drone-free network menu on the MFP (see instructions on the device) and enter the data necessary for connection: the IP address of the device, the Wi-Fi network password, etc.

Change the IP address and add it
If you need to change the address of the MFP in the local network (for example, by changing the device address), you must go to its Web interface.
Krok 1. Open your Internet browser and select the MFP (this information can be found in its instructions). Press the Enter key.

Croc 2 Enter the name and password of the MFP when logging in before setting it up. Click "Login".

Croc 3 The device will be adjusted. Click "Network" and enter the required IP address. Click “Submit” to exit settings and saved changes.

Connecting a border MFP to Windows
Krok 1. Press Win+R, type "control printers" and press "OK".
Croc 2 Click on “Install Printer”.

Croc 3 Click “Add local...” and click “Distance”.

Click “Add local...” and press “Next”
Krok 4. Click “Create a new port” and select “Standard TCP/IP...” from the list. Press "Dali".

Click “Create a new port” and select from the list “Standard …”
Krok 5. Assign the IP address of the MFP (the system will supply other data itself). Be sure to uncheck the "Power up the printer..." checkbox! Press "Dali".

We remove the checkbox from “Power up the printer...” and click “Next”
Check the dock, the system will find the TCP/IP port and open further settings.
Krok 6 Click “Parameters...”.

Click “Options...”
Krok 7. Select “Protocol” - “LPR”, “I am drawing” - “lp1”, click “Permission of bytes...”. Press "OK".
Note! If the LPR protocol is not suitable for use, it can be changed to the Raw protocol using the parameters indicated in the photo.

Krok 8 Select the device you want to install, or download its driver from the CD by clicking the “Install from disk...” button. Press “Day”.

Dovidka! You may need to connect the MFP to the PC via a USB cable to ensure software security.


Krok 11 You can check whether the other MFP is working by clicking “Druk...” or clicking “Done”.

Press “Druk...” or click “Ready”
The device appears in the “Devices and Printers” folder, where you can select it for your friend.
Krok 12 Repeat Crocs 1–11 on all PCs that are mixed.
The hemstone printer is not recognized by the system
The printer is not detected by the system, the reason for which is temporary connection, setup of the printer or the presence of an appropriate driver for the device.
For the sake of installation:
- turn on the measure now;
- restart your PC, router and printer;
- check the printer settings and settings;
- reinstall the driver and attach it to another;
- install the printer driver (MFP) on all PCs;
- Immediately enable the software firewall on your PC;
- open the printer name (ask your system administrator);
- change the "cross" Ethernet cable of the MFP to a "straight" one (patch cord);
- Vikoristovat OZ no later than 2010 year, because Whose fate was to release a patch for the printers.

If you decide, you can go to the forum or, with the technical support of the generator, I will create a solution for the most difficult problems that have occurred.
Yak nalashtuvati timer vymknennya computer
If you turn off your PC, you need to turn it on behind the timer, for which there are a number of ways. One of the best ones is to use the “Zavdan Planner” Windows.
Krok 1. Press Win+R on your keyboard, type “taskschd.msc” and press “OK”.

Croc 2 In the window, use the right hand to select “Create a simple task.”

Croc 3 At the master’s window, enter the name of the place and press “Dali”.

Krok 4. Enter the frequency to start the command and press “Distance”.

Krok 5. Enter the date and time of the beginning of the history, and type “Dali”.

Krok 6 Select “Run” and click “Next”.

Krok 7. In “Program...” enter the “shutdown” command. You can also enter arguments "-s-f" in the window. Press "Dali".

In "Program..." we write the command "shutdown"
Note! The argument "-s(/s)" means the PC will end in 30 seconds, the argument "-f(/f)" means the closed extensions will be closed.
Krok 8 Press "Done".

At the appointments there is an hour for the appointment of a Wimcne computer.
Blogging on the Internet has become one of the most popular ways of self-expression, increasing information and making money.
Is a blog being created? You read it a lot. And in order for him to be read, it is necessary that he be taken into account. For this blog let’s add, decorate and color.

On the other hand, a blog on a powerhouse site gives you the opportunity to write great, thoughtful articles and share them with your audience, creating traffic (from traffic) that also flows into the content of the blog.
People create such a blog if they are wondering specifically for themselves what readers (prepayers) of the blog are. In these cases, the blog content becomes exclusive.

To attract an audience to your blog or to redirect them to an individual blog on the site, you can use your social media account account.
Krok 1. Type facebook.com in your Internet browser and press Enter or immediately go to: https://www.facebook.com/.

Croc 2 Enter the necessary data into the registration menu, including your current email address and click “Create a cloud record” at the bottom.

Croc 3 Go to your mail screen and click on the list that comes from Facebook, the button to confirm the account entry.

Registration on Facebook has been completed. After registering, members can customize their profile, search for friends, join and publish materials for the blog.
Video - How to connect a printer via a local network
Hello, dear readers! This article or instructions will provide detailed descriptions of the best way to set up and connect the printer along the way. We will also complete all system settings that are necessary to connect the printer and find out why, when you try to log in to your computer, you may receive a message about blocking access to the server (Before the PC, the printer is locally configured).
To put it simply, it will be recommended to connect two or more computers to one printer, so as to prevent constant access to each other. Of course, this option is most often practiced in various offices and enterprises. Well, it happens that the costly units, using an additional router, break down their small capacity and connect a few machines to one computer.
The instructions themselves will be divided into several parts. Let's take a quick look at the basic system settings so that you can turn it off or on so that another computer can connect in between the PC on which you are installing the printer.
You do not have permission to enter this computer
If you try to connect to a machine with a configured printer, you may receive this or similar notification, which means that, after all, you will need to correct the security settings.
Changes in the system settings, as below, I recommend turning off on all computers before installing a printer, and on all computers to which you connect before the next one. So you’ll definitely save yourself some time with the pardons associated with a few rights or something like that.
So, what do we need to connect the printer through the border?
Step 1
The first thing to do is to enable the local cloud record “Guest”, which will allow you to log in to your PC from the outside.
- By clicking on “My Computer”, with the right button, select the “Management” item.
- Dali, go to “ Local merchants" - "Koristuvachi".
- In the list of available images that have appeared, we know “Guest” and the corresponding clicks reveal it.
- Now, from the regional authorities, we are taking away the mark from the point “ Turn on the cloud record”, and “It is possible” to make changes.

If later, if you have a skin condition on your computer, you will be prompted to select a cloud account to help you log in to Windows, but it doesn’t matter, but you can turn it off by blocking the local login with the guest. Even if the guest is included in this manner, such a situation is not to blame for the turbulence of the guest.
Step 2
Another point would be to enable a barrier to enter the computer through a barrier before the guest has unblocked it.

In this manner, we will exclude the guest from the list of clients who will be barred from accessing this computer. Please note that the Windows “Home Edition” version does not have local security policies, so on such versions you will never be able to share the printer, much less connect to another computer.
Step 3
Well, the last point will be the Windows firewall. This is, of course, to complete the final point, and we recommend that you do not care about it, otherwise they influence the patient. In my opinion, I, for Windows XP users, in principle, recommend turning it on right up to the service that represents this component.
For those who use Windows 7 and above, then everything is not so categorical, and turn on the firewall only in the account section located in the control panel. However, it is not possible to re-enable the service, otherwise you will not be able to give secret access to the printer.
By the way, if in Windows 7 the need to enable or disable this component depends on the situation, I recommend that you check the possibility of connecting to the printer in both cases.
To enable the firewall in Windows 7 and above:

The firewall for Windows XP services has been changed:

I’ll repeat once again that in Windows 7 you don’t need to enable the service, otherwise you’ll have to deal with the problem when you unshare the printer, which we’ll talk about later.
Setting up the printer
Now that you have finished setting up the system, you can now go directly to the printer itself. Little by little we have opened a borderline of access right up to the computer. Well, we can log into the computer, but unfortunately we can’t install devices on anything until the printer is granted access.
In order to earn this, you need to spend a few simple money:

Ale, do not rush to close the window as it is recommended to establish safety rules so that other washers, in the event of a malfunction, would like to be able to clean their hands.

Well, now that you have installed the printer and the configured operating system, you can now safely proceed to connecting the printer.
Connect to the printer from another computer
Well, we are already at the final stage, now we are no longer able to connect all other computers to our printer with hidden access, it’s easy to try.

It’s not so simple, it happens not every time, but when you try the connection, the system can say that it does not have the necessary software for which the device will have to be created manually.

In addition to this option for connecting an edge printer, there are also a number of effective connection methods, which you learn about in recent articles, so there is only one recommendation, either subscribe to our blog updates or more beautiful
I'm flying.
I think that the advantages of a customized printer in a local environment are obvious to everyone. Simple butt:
If access to the printer is not configured, then you will need to first download the files to your PC before connecting the printer (with the help of a flash drive, disk, etc.) and then delete them (in essence, to unzip 1 file, you will need to create ten ok unnecessary" diy);
If the network and printer are set up, then on any PC in the network in any editor you can press one “Drook” button and the file will be sent to the printer!
Manually? Handy! The information about how to set up a printer for work in Windows 7, 8 will be discussed in this article.
KROK 1 - Setting up the computer before connecting the printer (or how to “share” the printer for all PCs in the region).
To be able to use the printer as a PC at the same time, it is necessary to correctly set up the computer for all connections.
To do this, go to the Windows Server panel, under the following sections: Panel Keruvannya\Merezha and Internet\Center Keruvannya with Merezha and Underground Access.
In the window you need to open three tabs one by one (Fig. 2, 3, 4). Each of them will need to tick the opposite boxes: increase shared access to files and printers, enable password protection.
Small 2. Parameters for private access – open the “private (stream profile)” tab
Small 3. The “GOST or illegally accessible” tab is opened
Small 4. The “all measures” tab is opened
Here select your printer, right-click on the new one (right mouse button) and select the “tab” Power of the printer". For authorities, go to the “Access” section and check the box next to “ External access to your printer"(div. Fig. 5).
If you have access to this printer, any user of your local network can work on a new one. The printer is inaccessible during periods of depression: if the PC is frozen, it is in hibernation mode.
Small 5. Removal of the printer for easy access to the edge.
You also need to go to the “Security” tab, then select the account group “Everyone” and allow friends (div. Fig. 6).
Small 6. Now the printer is available to everyone!
KROK 2 - How to connect the printer at the same time and on a new one
Now you can proceed to setting up computers that are located in the same local network as the PC to which the printer is connected.
First croc – launch the initial explorer. At the very bottom, left-handed, all PCs connected to your local network will be displayed (relevant for Windows 7, 8).
By clicking on the PC, before connecting the printer and any other device, the PC has been configured correctly, and you will be able to unshare the printer. Right - click on it with the right mouse button and select the connection function from the context menu. Please be aware that connection takes a little more than 30-60 seconds. (automatic connection and setup of drivers is expected).
Then select the printer connections, press the bear button on the right side and select the option “ Vikoristovvati for zamovchuvannyam«.
Small 8. Vykoristovat the printer according to the measurements
Now, no matter what editor you are using (Word, notepad, etc.) when you press the “Druk” button, the border printer will be automatically selected and you will need to confirm your friend. The setup is complete!
When connected printer as time goes by, the mercy appears
For example, there is often a problem when connecting a printer - this is the standard “Windows cannot connect to the printer. And you can see some sort of alarm code (like 0x00000002) - div. rice. 9.
It is impossible to look at all the variety of benefits in one article - but I will give one simple pleasure, which often helps me to try such benefits.
That's all. Before speaking, if the printer does not work, I recommend that you read this article:
As soon as before, for some kind of addition to the statistics! Far away robots!

It is necessary to understand what is going on
To make it easier to navigate the settings, you need to familiarize yourself with the printer’s main interfaces, what they are, what they look like, and what they are used for.
- Dart USB port. The high-speed bus allows you to connect the printer directly to the device. Behind the scenes is a computer, a laptop and a router. The interface cable is unique - on one side there is a straight-cut connector for connecting to a PC, on the other there is a trapezoidal port for connecting to a printer. You need to print all the USB devices first to create a border printer so that you can print not only from your computer, but also from other mobile devices.
- Ethernet port. This is only present in expensive devices and is used for connecting a printer to a network hub. This technology satisfies the needs of all users of such devices.
- Drotless Wi-Fi technology. Most of today's printers are equipped with such a module, so it will not be possible to ensure continued success. A company-owned security program is also necessary for everyone, who will always want to use it on smartphones and tablets.

Friendship with a router
You need to know how to use a USB printer as a shortcut. Having a USB port on the edge router without the installed Print Server module will not give positive connection results. It is recommended that you first read the instructions to get started with the basic knowledge and go over the possibility of connecting a printer, right down to the model. And since it is possible, you can safely avoid the following steps:
- Connect the printer and router to power.
- Having connected the printer to the USB connector of the router, you need to change the connection between the device and the device. For this you need to open the web interface of the monitoring device in your browser. The router's addresses, login and password can be found in the instructions, and if you set up the drone-free point with your provider, all power supply to the printer connections will go directly to those people who set up the router.
- After authorization, the Print Server section may display the name of the connected printer.

Correctly configured USB connection to the router
- On your personal computer, you need to go to the Internet panel and select the “Add printers” tab. Here's the algorithm: "Add a local printer" - "Create a new Standard TCP/IP port."
- After pressing the “Next” button, you must enter the IP address of the router (for example 192.168.1.1) and be sure to select the option opposite the “Select driver automatically” item.
- After finding the printer, you need to select the device type “Generic Network Card” and click “Next”.
- The driver is installed manually from the disk using a single-menu menu.
- Having logged in again to “Device and Printers”, you need to select “Printer Power” by pressing the alternative mouse button on the firmly installed device. Having moved to the “Ports” tab, you need to go to settings, install the LPR protocol and set the name.
Having read a simple description of how to set up a hemline printer by connecting it to the router, I have no particular difficulty in setting up all the settings on my own. Don’t hesitate to open the instructions to the router and familiarize yourself with them in detail - the printer often introduces the old algorithm for connecting a printer via USB.

The list of problems with Wi-Fi
Office equipment is often equipped with a Wi-Fi module, making it easy for a computer owner to create a border printer. Windows 8, 10, as well as newer versions of Android installed on smartphones and tablets, can no longer work correctly with the dartless printer. The problem lies in the incompatibility of software with the operating system. Even often, traders in the post-graduate expanse do not have the opportunity to fully use Wi-Fi, a module that is used in a printer.
In such situations there are two options:
- Connect the printer to the router via an additional USB, following the previously described instructions.
- Connect a WPS droneless printer. Obviously, the router is responsible for the Print Server, depending on the printer model, and the WPS connection may be linked to the other server.
The dart fence - a way out of a difficult situation
If you did not use the methods described above to connect the printer to the wireless interface through the availability of technical support, do not worry. This is a very easy way to create a basic printer using the dart interface. To connect, you need to add a device called Print Server, which can be found in any computer store at a price of 200-300 rubles per piece.
In most types of certification, the server has factory settings, as the manufacturer indicates in the instructions or on the sticker placed on the device body. It is enough to connect the USB printer to the server and then connect it to the router hub with an Ethernet cable.
The printer's network address can be found in the settings of the router or found on the PC using special software. Next comes the initial installation of another device following the instructions described above.

On the road to decision
Many traders who are asking about how to create a hemline printer from a local one do not care about the price of food, so don’t let the dartless server create itself for such purposes. You can get money only for the price, but most of the current routers have more possibilities. The payout for the miracle device will range from 4,000 to 8,000 rubles. Setting up a drone-free Print Server device is in no way different from a drone-based server. All information is finely tuned in the instructions until proper use.
The main feature that buyers will appreciate about such a device is the support of mobile technology from Apple. This brand itself seems to be forgotten by many manufacturers of dartless printers and routers. Therefore, for iPhone, MacBook and iPad users, purchasing a drone-free server with each other will be the only major problem associated with each other on the printer.

Direct access to the printer
The simplest, but not the least effective way to complete the task of creating a edge printer is to provide illegal access to the local computer. The algorithm is simple, and it’s best for the student.
- Once you have access to the printer installed in the Windows system, go to the “Access” tab and set the proportions opposite the “Responsible access” and “Missing order” fields.
- Having signed up with the authorities of the system and moved to the “Computer Name” tab, see that the “Work Group” is registered however for all computers at the local boundary.
- To create a hemline printer, Windows 7, 8 and 10 will require additional settings for the hemline adapter. To do this, you need to go to the “Ceruvan Center by Measures” and change the additional parameters of the back-door access, setting the proportions opposite all fields that begin with the words “Dry”.
- It is recommended to set the encryption to 128-bit, and to enable password protection.
Far from connecting to an available printer
Having completed the first lesson on how to set up a printer as a remote printer, you can proceed to connecting the remotely accessible device to other computers at the local border. There are only two options - the stench of carnage, but the result is the same. The first version of the descriptions is more important, and even though there is no particular difference for setting up, what type of connection is determined – it is important to know the IP address of the printer.
And there is another way for people who are looking for easy ways. Essentially, this is an instruction about how to set up a edge printer as a local one. Having moved to the “Margin connection”, which can be found in the connection panel, you must select the “Margin connection” item. An alternative could be to launch the shortcut “Merezheve otochennya” from the desktop, since the owner has not seen it before due to lack of need. Here you need to select the computers you want to enter into the work group – for which there is a button. Once you know the computer you need, go to the next one. The printer will be shown in the list of available resources. If you just click on the name of the device and use it for all future work, the printer connects easily.

At the end
Having asked yourself “how to make a hemlock printer”, the developer will be able to find out what solution he needs. If you don’t have enough options, it would be a pittance. However, a lot of people forget about security when connecting to an unsecured Wi-Fi channel. The printer will be visible to all users within the radius of the droneless router. Judging by the numerous opinions of professionals in the field of IT technologies, it is not recommended to provide behind-the-scenes access to the computer using a drone-free system, and saving special information will always outweigh any safety concerns.