Translation of messages from the computer's bios. Setting up the BIOS on your computer. Optimization of robots and peripheral devices
BIOS (input/output system) is an important part of the system software, implemented in the form of low microprograms integrated in a single interface. The main purpose of the BIOS is to give the operating system access to the PC hardware and connected devices.
Given the importance of this system, it is not surprising that doctors will ask how to properly configure the BIOS. This is a big topic and often comes up in our other articles, but today we will try to understand a little bit about the disparities that create a complete picture of BIOS setup.
Zagalnye Vidomosti
The main task of the BIOS is to check the functionality of the warehouse computer’s hardware and connected devices and launch them with the previous parameters.
If, for example, you wanted to connect a sound card, then you will first have to enable the audio controller in the BIOS so that the device works correctly. Applications using the BIOS can be made anonymous. If you want to set a password on your computer, check the BIOS. If you want to install Windows XP from a flash drive, change the system I/O priority. 
There are a lot of versions of this software, but we can only rely on the BIOS AMI. Once you understand the interaction with one version, you will quickly understand the other interface.
Work with BIOS
As soon as you turn on the computer, it is not the operating system that begins to interfere, but the BIOS itself, which begins to check the usefulness of all devices.
To enter the BIOS, press the F10 or Delete key immediately after opening the computer (in other versions these may be different). To complete the process, press the button several times in a row so that you don’t miss the moment of startup.
Once the login is successful, a window will appear on the screen. This is your BIOS. 
Main
In this section of the BIOS you can adjust the system date and time, as well as work with the parameters of connected disks.
All available drives are listed in the "SATA 1-4" list. If there are no connections to the disk channel, the value “Not detected” appears.
Using the keyboard arrows, navigate to the required disk and press Enter to go to the parameters of that work. All obvious parameters are adjusted so that the computer shows maximum productivity and speed. If you don’t know exactly what you can change, it’s better not to change the hard drive configuration and remove the “Auto” value for all parameters. 
On the Main tab there is also a section of system information, which is called System Information. Here you can check the BIOS version, the release date, and also get acquainted with important information about the processor and memory. 
The remaining section on the Main tab is called Storage Configuration. This indicates that the disk subsystem has been configured and allows you to set the capacity mode in Windows 95/98.
To install capacity from Windows 98/95/Me, set the SATA Configuration parameter to Compatible.
Here you can set the hour the system spends to scan the disk. The processing time is 35 seconds; if you change this parameter, it will not be possible to change it again, otherwise the verification will be carried out incorrectly.
Advanced
On the Advanced tab, the first sections allow you to configure the parameters of the processor, as well as the installed ports and controllers.
In the Onboard Devices Configuration section, you can enable the supplied edge adapter if you do not need to use the supplied board. For this purpose, you need to set the Onboard LAN parameter to Disabled.
You can also click the USB Configuration section, where you can configure all available USB connectors or connect them completely. 
Power
In this section, you can set up the energy saving function, as well as set the order in which the computer is turned on/off.
On the Power tab, it’s best to leave all the parameters behind you because you don’t know what needs to be changed to make the computer work better.
There is a small section of Hardware Monitor, when you open it you will get all the information about the processor temperature, fan speed, etc. 
Boot
The Boot tab allows you to customize the boot settings.
In the Boot Device Priority section, you can set the boot priority, which is constantly discussed in articles about installing Windows.
You need to click on the item “1st Boot Device” with the Enter button and in the window select which device will be chosen first. There is a hard drive behind the drive, or you can install an optical disk or USB drive. 
Offensive division – Hard Disc Drivers. It will be brown because you have two hard drives connected, so it will be determined which hard drive the operating system will be installed from. 
Another simple koristuvach section - “Security”. You can set two types of passwords:

Once you set a password, when you enter the BIOS, a window will immediately appear that requires you to enter it in order to deny access to the basic I/O system.
Tools
Section “Tools” for updating BIOS from a disk, floppy disk or flash drive. Another option here is “AI NET”. Allows you to view information about connections to the cable controller. 
Exit
The remaining section of the BIOS, where you can select parameters to exit the input/output system:

The remaining item allows you to correct problems when starting the computer that prevent Windows from starting up normally.
Visnovok
Most of the descriptions of BIOS parameters are unlikely to be needed by the average user. However, certain moments, such as changing the priority of attraction, need to be known carefully. In addition, with the help of the basic system, you can manage power supply operations from the safety of your computer and the ease of connecting devices.
Remember: the BIOS settings can be reset. To do this, you need to disassemble the system unit and remove the small battery located on the motherboard at any time.
Therefore, if you have adjusted the basic system, you can quickly correct the grinding and adjust the configuration to the fullest extent.
mysettings.ru
Setting up the BIOS for speeding up your computer
Without further ado, adjusting the BIOS is the basis of any computer, and it is probably the most important process of adjusting the system.
As many of you know, the BIOS is a basic input/output system that is essential to the stability and reliability of the system. To optimize your computer's performance and increase its productivity, you need to start with some basic adjustments. Here you can achieve the greatest results.
And now about everything in the report. To enter the BIOS setup program (or Setup), just press “DEL” (or “F2”) when the computer is running.
To change the settings, select “Load SETUP Defaults” in the BIOS settings, the computer will restart from the factory settings.
Below I will outline the basic adjustments both for current PCs and for old ones that I would like to get back to normal.
1. Setting up the BIOS. Processor optimization

CPU Level 1 Cache – it is obligatory to select this parameter. This is responsible for the vicarious cache of the first tier, which means that the efficiency of the entire system is advanced.
CPU Level 2 Cache - this parameter plays an equally important role, just below the first one. That's why we understand it. To finalize: disabling cache memory can only be done when out of order, but it will significantly reduce the productivity of the system as a whole.
CPU Level 2 Cache ECC Check – parameter to strengthen/impair the algorithm for checking the correction of errors in the 2nd level cache memory. Enabling this parameter slightly reduces productivity and increases the stability of the robot. If you are not overclocking the processor, I recommend that you do not enable this parameter.
Boot Up System Speed – the parameter can have High or Low values and indicates the speed of the processor and the system bus frequency. Our vibe is High.
Cache Timing Control – this parameter ensures the speed of reading the Level 2 cache memory. Our choice is Fast (Turbo) – high speed, high productivity.
2. Optimization of RAM

Now that we've finished setting up the processor, let's move on to setting up the RAM. These settings can be found either in the "Chipset Features Setup" or "Advanced" sections.
DRAM Frequency – the parameter indicates the speed of the RAM. If you know this parameter (should be indicated on the packaging before the memory module), set it manually; if you are in doubt, select the Auto value.
SDRAM Cycle Length – the parameter determines the number of cycles required to send data to the bus after receiving the CAS signal. One of the most important parameters that affects productivity. If memory is enabled, the value must be set to 2.
RAS-to-CAS Delay - The number of clock cycles required to complete the data series before the boost. This also affects productivity. Values 2 are shorter and fit in most cases.
SDRAM RAS Precharge Time – hour of recharging the memory modules. The value is 2.
FSB/SDRAM/PCI Freq – indicates the frequency of the FSB bus, SDRAM and PCI memory.
Memory Hole At 15-16M – this parameter indicates that part of the addressable memory space of ISA devices is visible. It is important to select this parameter if your computer has an old ISA bus expansion card installed, for example, an external sound card.
Optimization Method – the parameter indicates the maximum speed of data exchange from RAM. It is indicated by the final way, starting from the greatest value.
Other parameters that can be adjusted can significantly speed up the process of exchanging data from the RAM.
The lower the value of hourly delays or timing (this is the slang of IT engineers and system administrators), the productivity of the machine, or, perhaps, it will all lead to unstable work.
Experiment to your heart’s content, don’t forget that you can make adjustments and change factory settings.
3. PCI controller

CPU to PCI Write Buffer – when the processor operates with a PCI device, it writes ports. For this information, go to the bus controller and register the device.
If we enable this option, a write buffer will be used, which will accumulate data until the PCI device is ready. And the processor is not responsible for checking it – it can release the data and continue running the program. I would like you to take advantage of this option.
PCI Dynamic Bursting – this parameter is also related to the recording buffer. It enables the data accumulation mode, during which the recording operation is carried out only if there is a 32-bit packet in the collection buffer. Vmikati obov'yazkovo.
PCI Latency Timer – the parameter sets the number of clock cycles sent to the skin PCI device for this data exchange operation. The more ticks, the more efficient the operation of the devices. However, due to the presence of ISA devices, this parameter cannot be increased to 128 cycles.
4. Optimization of the AGP video card

The video card, as a rule, has the greatest impact on productivity in games, so optimizing the graphics card settings can negatively affect the performance of the system.
This is especially true for those lucky enough to have old video cards with an AGP interface. Let's take a look at the main parameters.
Display Cache Window size – the parameter determines the size of memory that is cached for the needs of the video system. If your computer has less than 256 MB of RAM, set the value to 32 MB. Otherwise, set the value to 64 MB.
AGP Capability – Indicates the robot mode of the video card. The main performance characteristic of AGP video cards. Select the best mode – 8X.
However, not all video cards support this mode. If after restarting the computer, the operating system will not be restored or the image will be corrupted if the value of the parameter is changed.
AGP Master 1WS Read / 1 WS Write – the parameter sets the number of cycles in one read and write cycle. As with adjusted RAM, the timing parameter will increase the productivity of the process, preventing instability in the read and write operations.
When this parameter is enabled, read/write is performed in one clock cycle – maximum productivity. When this parameter is turned on, the system operates stably or completely.
VGA 128 Range Attribute – enables data exchange buffer between the central processor and video adapter. Productivity is increasing.
Also, please enable the AGP Spread Spectrum parameter and always enable AGP Fast Write Capability.
5. Optimization of hard disk work

HDD S.M.A.R.T Capability – the parameter enables or disables the S.M.A.R.T. diagnostic system, which anticipates possible problems with the hard drive. Vikoristuvati this system is not important to you. I'm especially emphatic about this, because... Vikorist specialized software. When this function is in operation for a little while, the performance of the computer will be reduced.
IDE HDD Block Mode – a parameter that indicates block data transfer. Tobto. More information is transferred per hour, which also improves system productivity. It is possible to automatically select a specific parameter.
IDE Burst Mode – this parameter enables the data exchange buffer from the IDE interface, which also increases productivity.
Virus Warning – I am turning this function off from now on. There's no substitute for an antivirus, but your productivity is crap.
Quick Power on Self Test (or Quick Boot) – you must enable this option so that your computer’s hardware is not tested. There is also virtually no bark, and the resource is wasted.
Boot Up Floppy Seek – select this option. We don't need the sound of a valuable floppy disk just before starting the computer.
And most importantly, since the system after re-enablement will not be activated and/or sound signals will sound, go back to the BIOS and enter the settings for the settings (I have described how to get to the beginning of the statistics).
Or there is another correct way to reset the settings - turn off the computer, unplug the power cable, open the cover of the system unit and carefully remove the battery from the motherboard, insert it back after 2 minutes, pick up the computer and try to start it. The settings will be reset, the BIOS settings will return to standard values, and the system will return to normal mode.
pc4me.ru
How to set up your computer's BIOS
 Hello, friends! Today we’ll talk about how to adjust your computer’s bios. BIOS is the basic system for entering the computer. She starts working as soon as you press the power button on the computer. BIOS means it tests all components connected to the motherboard. If something is wrong, you immediately recognize it. If all connections to the device have passed the test, their working configuration is confirmed and the connection is transferred to the owner of the operating system. These parameters can be manipulated to optimize the computer's performance. Adjust the BIOS a lot. It’s not hard to know all of them, but basic, basic training is possible and necessary to know. This statistic lets us know everything that I know and what I use when configuring the BIOS.
EZ Mode
First you need to go into the BIOS. For this reason, you should read the instructions for the motherboard or computer. Recently I got busy myself. There was a lot of coffee there. You can also respectfully look at the monitor screen while you are on your computer. There will be a sign at the bottom that indicates which key must be pressed in order to enter the bios.
The widest keys are Del, F2, F10, Esc. If you don't need to use these keys, follow the instructions.
When you get into the BIOS, you will immediately enter EZ Mode (see the little ones below)

This mode, which is better for everything, is designed to allow you to regulate various settings of the BIOS without going into the extension mode.
Let's look at everything one by one.
With your left hand turned on, you read the time and date in the system. By clicking on the gear, you can manually and intelligently set the current values.
On the right is information about the motherboard model – H87M-E and BIOS version – 0604. The version is updated according to the previous statistics. Read below about the processor and its clock frequency. Even lower, you can marvel at the operative memory and the frequency at which the arms work.
On the right is the menu that drops down to select your BIOS. Motherboards with 7 and 8 series chipsets now support the Russian language. Now changing the settings will be even simpler and more intelligent.
Below you can find information about the temperature of the processor and its voltage. Information given updated in real time.
On the right you can find out practically all the information about the installed RAM. Find out how many slots you have on your motherboard. All of them have RAM modules installed. What kind of skin treatment does the module perform at what frequency?
This information can be found whether dual-channel mode is enabled or not. In this case, the memory modules are installed in channel A and thus have a dual-channel switching mode.
You can also select the XMP profile from the drop-down menu. Since the memory supports profiles, you can select the one you need right away. In our configuration, profile 1 is selected, in which the memory operates at a frequency of 1600 MHz.
To the right, information about fan installation is displayed. This motherboard has 3 connectors for connection. One of them is for the processor fan, the other two are chassis (fan housings). Make sure one is installed on the back of the body to produce a warm air. The other fan of the chassis is installed at the bottom front to take in cold air. You can read a report on computer cooling here.
Below you can choose the productivity of the system depending on your needs. It seems that if you select Energy Saving, the system will lower the processor frequency and thus save energy. Let me choose Optimal.
Below we can use the help of the bear to change the priority of attraction. This field displays all connections to the device’s computer. Alternatively, you can simply install the app from a flash drive or optical drive to install the operating system. I recommend installing your storage device (SSD or HDD) first, and if you need to install the OS (I'm sure you will have rare cases) quickly access the advanced menu. You can use the additional F8 key to remain on your computer while you're at it.
At the very bottom there are buttons: Yarlik (F3), Dodatkovo (F7), SATA Information, Vantage Menu (F8) and Standard (F5)
The Shortcut button opens a list for quick access to the selected functions. These functions are selected from the advanced mode by pressing the F4 key or the right button on the item. When you finally appear in which you select where you want to add the selected item to your bookmarks (Shortcut) or to the About tab
The Advanced button allows you to switch to the advanced BIOS setup mode.
The SATA Information button displays information about your storage devices connected to SATA ports.
Button Menu button Displays a menu in which you can select memory from a flash drive or optical disk for reinstalling Windows for example.
The Standard button allows you to reset the BIOS settings. Universal settings will be installed, like installing a motherboard driver. In 99.9% of cases, the computer requests these settings. So there is no need to exaggerate and adjust. It is necessary to try. Someday you will turn everything around after washing. (Don’t worry about adjusting the voltage)
This setup in the EZ Mode window can be accessed by almost all registered users. To save changes or delete them, or go into Advanced mode, press the button at the very top of the right hand

Select the required item from the drain window
Basic bios settings
After we have selected Advanced Mode - Additional or Extensions solutions are immediately available on the Basic Bios Setup tab

The screen is divided into parts. At the left - information and settings that can be changed, the right hand at the top - help and a short summary of the selected item, the right hand at the bottom - a hint from the control and change settings. So the right-handed one has two buttons: Quick Note and Last Modified. First, she opens the notepad, from which you can make a note. The other displays the changes you made last time. It’s even easier, since the instability of the computer did not appear immediately after pressing the button, you can see what you changed to reverse the changes.
On the main settings tab we have access to information about the BIOS, processor and memory. Here you can also select your system, set the date and hour.
The access level is displayed – Administrator. This means that we can change it if we are adjusting the bios. There is access on the level of koristuvach, there are possibilities of exchange. In the Security section, you can set the password Administrator and Koristuvach. The following password will need to be entered immediately before entering the BIOS.
AI Tweaker
AI Tweaker tab for more precise tuning of your computer. Turn for acceleration. We have seen the following points: Processor frequency, RAM frequency, Processor cache frequency, DMI/PEG frequency and frequency of the processor graphics core.

Below are the options that you can change the values you see next to this tab.
Ai Overclock Tuner – allows you to select an XMP profile. When the processor multiplier is selected, the base frequency and memory parameters will be adjusted automatically. In this case, we have below a point in which we can select the required profile.
How can I change the values of points? Point the bear at the desired item and press the left button of the bear on the new one. When does the drain window open? possible options value for the selected item. Select the required one and confirm with the Enter key or the left mouse button. If you have problems with the bear, look at the clues below, right-handed.
This set of options has a lot of scrolling effects. Steeply down and many steps forward

GPU Boost is a technology from ASUS for overclocking the video core installed in the processor. If you don’t have a discrete video card, but want to get the most out of the installed one, then it’s best to use this option quickly.
Below you can turn on the EPU power saving mode. Repeat the procedure to select the Energy Saving mode in the EZ Mode window. Additional functions are activated that will reduce the accumulated energy.
Other options, especially food management, are subject to change.
If you really want to speed up the system, you can try setting a few lower timings or lowering the RAM in the DRAM timing parameters management section. At the very beginning there are major timings, reducing which can speed up the system. Change one setting at a time. Then re-engage and test. It is important to test the RAM test.
At the very bottom, the voltages are being adjusted, although I don’t know much about them, I don’t care about them.
Additional BIOS setup
On the Additional settings tab, you can configure the hardware built into the motherboard

This tab is made up of sections and a number of sub-points. This is where the images with the new BIOS end. Let's take a look at the example of the old BIOS up to the P8H67-V motherboard

Processor configuration
In this section we can view all the necessary information about the processor

Intel Adaptive Thermal Monitor - in my opinion, allows you to monitor the temperature of the processor and, with a raised temperature (meaning 72-75 degrees Celsius), lowers the frequency until the temperature reaches a normal range. This often gets messed up if the computer hasn’t been cleaned with a saw for a long time. The cooling system does not cope with its functions and overheats. This means a decrease in productivity. This function prevents your processor from overheating, so this option is disabled.
Hyper-threading is a function that allows the physical core of the processor to run two processes at a time. As a result, the operating system (the task manager) has twice as many cores. This has a significant impact on productivity, since if you have an Intel Core i3 or Core i7, this feature will not be enabled.
Active Processor Cores is a function that allows multiple processor cores to be active. You can remove the physical core. For example, Core i3 has two physical cores. You can choose one more active one. As a result, productivity will greatly change. This function is canceled by ALL – as it is.
Points that I miss, I delete.
Intel Virtualization Technology – Intel virtualization technologies. Turn it on if you are complaining virtual machines.
At the bottom there is also a section CPU Power Management Configuration, where I will add everything as it is.
PCH Configuration from which section I delete everything as it is
SATA Configuration
If you have a current hard drive, then to enable NCQ technology (a natural command line that improves HDD productivity) and on-the-go operation, you must enable the robotic hard drive mode - AHCI

For Windows XP, you will need to work before installing the system or install additional drivers first. The rest should be taken from the website of the manufacturer of the motherboard and computer
After enabling the AHCI mode, you can enable the hot plug mode for the skin device connected to the main port.

This section also has the S.M.A.R.T. option. Status Check. You should carry out diagnostics of the hard drive and monitor the storage device’s parameters. If these parameters are normal, then everything is fine. Otherwise, when you turn on the computer, you will be prompted to check for backup. This function helps, if there are multiple failures, it is better to make copies of important data to another physical disk. For example, on an external hard drive. You can also set up automatic archiving of data and not worry about it.
System Agent Configuration
Memory Remap Feature - a function that allows you to reassign the addresses of devices connected to a computer beyond 4 GB of RAM. This function is enhanced when installing memory greater than 4 GB and a 32-bit operating system allows you to install a little more memory for the system. How to find out all the RAM on a 32-bit system, you can read and try it here. Result not guaranteed

To guarantee a maximum of 4 GB of memory, you must install 64-bit operating systems.
In the Graphics Configuration section we can configure the Primary Display. So that the system does not spend an hour searching the monitor for necessary information output, but immediately outputs it. You can speed up the process, but if you have a connected or connected discrete video card, you will need to change the settings.
iGPU - embedded video
PCIE - discrete video card, installed in the PCI Express slot
PCI - older discrete video cards are installed in the PCI slot

So, if you use the built-in graphics, then in the iGPU Memory section you can clearly see the RAM that appears to be for the loaded video card. I’m depriving myself of the value on Auto, I’m not wasting any more.
USB configuration
Here you can download all devices connected to the USB ports of your computer.

I’ll leave everything out here because...
Onboard Devices Configuration
Configuration of devices found on the motherboard

HD Audio Controller – enables audio output in HD format.
Front Panel Tupe - the type of sound that is displayed on the front panel.
The following items (VIA Storage Controller and VIA Storage OPROM) are required more than anything else to support IDE devices. I don’t know exactly, I’ll give it away for the rest. (Having used these functions on my computer, I started to become more interested in it twice. Without experiencing such an effect)
Atheros Lan - allows you to insert a memory card.
Asmedia USB 3.00 Controller - function allows you to turn the USB 3.0 controller on or off
Asmedia USB 3.00 Battery Charging Support – allows you to charge the device via a USB 3.0 port. The function has been removed. I don’t intend to turn it on because when charging devices, there is a lot of pressure going through the port and it could burn out.
In the Serial Port Configuration section, you can enable the last port that is not detected. COM port. It’s no longer practical to vikorize anywhere

Vimikaem this function
Restore AC Power Loss - allows you to restart your computer after an electrical failure. You can set Power Off - then the computer will not turn on. If you set Power On, the computer will turn off as soon as life is normalized. Tsikava function koristuvatimusya. Failures in a live computer are not only bad for your computer's components, but can lead to data loss. That’s why it’s important to ensure uninterrupted life.
You can also set the computer to turn on for an additional keyboard Power On By PS/2 Keyboard and mouse - Power On By PS/2 Mouse. You can also install the computer in front of other devices.

Everything has been taken care of for the purpose. Lose it as it is.
Monitor
This tab includes monitoring of system parameters. You can control the temperature of the processor and motherboard (if I don’t sleep with anyone, I don’t know where exactly this sensor is installed, as you know, write a kind comment, I’ll add it to everyone if it’s nice)

Also here you can marvel at the speed of wrapping the fans connected to the motherboard. Everything can be turned off if you don’t need it, but you can turn it off by selecting the desired item, pressing Enter and selecting Ignore.
The BIOS has a fan control function - Q-Fan Control. You can use either a processor fan or case fans.
Using the additional CPU Fan Speed Low Limit, you can set the minimum speed of the processor fan. If you go any lower, there will be a delay and the computer will not turn on. A silent computer does not have a fan on the processor, so this function must be turned off.
CPU Fan Profile - specifies fan control parameters. For me, silence is important, so I chose Silent
Also here you can see the voltage that is supplied to the processor along the lines +3.3V, +5V, +12V. You can tighten or go out if the tension is between the boundaries (5% is given). Once you get out, you can think about adding to the life block.
Zavantazhennya

Bootup NumLock State - allows you to set the state of the Num Lock key. The digital keyboard will either be turned off or the digital keyboard will be turned off if the computer gets wet.
Full Screen Logo - if the option is enabled, you will be shown the logo of the motherboard or computer manufacturer while POST (Power-On Self-Test) is running. For washing, the option is disabled. If you want to read everything that appears at the time of verification, turn on this option.
Wait For "F1" If Error - if the function is disabled, then if a failure is detected or corrected during the POST test on the screen, you will be prompted to press F1 for further detection or elimination of the failure.
Setup Mode - allows you to select a mode when you enter the BIOS. Behind the tricks is EZ Mode. If you need to immediately access the advanced mode, select the appropriate option.
First I select Boot Option #1 - my hard drive on which the operating system is installed. This, as for me, changes the time of my obsession with the computer. If you need to be attracted to another accumulator, then the Attraction Menu can help by clicking on the F8 key when the computer is turned on.
In the Hard Drive BBS Priorities section, you can select which hard drive will come first. This itself can be given priority to attraction.
For example, you have two hard drives with Windows 7 and Windows 8. If you give priority to the hard drive with Windows 8 and then select the option in Boot Options #1, then Windows 8 will be selected. infatuated with Windows 7 You will need to change the priority of hard drives in Hard Drive BBS Priorities.
Floppy Drive BBS Priorities – you can select the priority of the flash drive. Let's say you have two flash drives. Select Boot Option #1 to select the flash drive. To get the desired flash drive, you need to select the first one in Floppy Drive BBS Priorities.
I don't know how to go astray, so I get confused by the fancy F8 menu.
Service
The Service or Tool section has three sections: ASUS EZ Flash 2 Utility, ASUS SPD Information and ASUS O.C. Profile

The ASUS EZ Flash 2 Utility is designed to assist with the updated BIOS. The statistics reported on it.
The ASUS SPD Information utility allows you to view information about the installed RAM. Obsyag, frequency on which it works, serial number, date of production, brand of the manufacturer and settings or timings


The profile is saved in this way. In the Label field, enter the name of the profile. In the Save to Profile field, enter the profile number, save the exact BIOS settings and press Enter. A window will appear where you will need to confirm your intentions. Okay, your profile has been saved.
More advanced versions of BIOS (for example, for motherboards with 7- and 8-series chipsets) have the ability to save and transfer a profile to a flash drive.
I don’t yet know what will happen to the profiles if the bios is reset (for example, the battery runs out). If anyone has information, please write in the comments.
How to reset bios
Of course, this article would not be complete without the information needed to reset the BIOS for setup. At the moment, I know of two ways to update your routine

Another third option is to configure the BIOS using a special utility. Although I haven’t done anything yet, I don’t know anything about his dream.
Visnovok
The axis is based on the principle and all settings of the BIOS of the ASUS P8H67-V motherboard. After making changes, they must be saved. Press the F10 key or the Exit button at the top right to confirm the saving settings. Now the computer will be re-installed with new settings and the operating system will become more and more ready.
Behind-the-scenes ambushes of robots with a computer bios. (I’m currently using Yakimi).
- You can change any parameter without fear (depending on the voltage). If you don’t have to worry about the computer, everything can be turned around by resetting the BIOS
- Change parameters as quickly as possible at once. This makes it easier to unwind and eliminate the possible unstable behavior of the computer
- All parameters that are not visible are subject to change.
This axis allows me to safely adjust the computer's BIOS.
Of course, for other motherboards, the settings may not be different, but the main parameters, I promise, have been sorted out. If you put your questions in the comments, we’ll try to respond at once.
With respect, Anton Dyachenko
YouPK.ru
How to open and configure BIOS settings on your computer? Minimum software for dummies
Every person who needs to work on a computer will have to work with BIOS - a standard input system, which means the type of interaction between the components and devices connected to the PC. Everyone’s rhubarb is so different, it’s insanely different. So, while some computer users have long ago mastered all the subtleties of the “software shell”, others will continue to suffer from problems with the power supply that they will need in the bios and how to set it up on the computer. Perhaps, when the time has come, we will be able to identify the correct species for them?
What is your required BIOS?
By understanding the characteristics of bios, you can get a completely unambiguous conclusion about those that you yourself software security Skincare users have the opportunity to fully use their laptop or desktop PC. Zokrema, who was brought into motherhood for help BIOS board on computer:
- This includes initialization, POST testing and configuration of hardware connections;
- PCI devices will be configured and system resources will be redeployed;
- set parameters for launching the operating system, including from an HDD disk, CD/DVD disk and flash drive;
- Program interruptions are generated for system devices and others.
- The optimal values for energy consumption are selected, the power levels are adjusted, the computer is switched to sleep mode, and the computer is turned off.
Obviously, the manner in which the bios is adjusted has a huge impact on the productivity of the PC, and the efficiency of its other components. True, you need to make sure that the BIOS shell is on different laptops may vary depending on the type of motherboard installed.
What is the BIOS type?
It is necessary to say that there are plenty of bios versions available today. Zokrema, on your computer you can install Award, Phoenix-Award, UEFI, and AMI, which may be supported by other versions of the build: 
In this case, with this type of bios it will not be so difficult for you to get it right when setting it up. If you are completely obsessed with Windows, for example, you can quickly use the Viconati system utility. In this case, in order to find out the version of your bios after pressing +R, we only need to enter the msinfo32 command in the “Open” row, and then press Enter and read the information we need in the information section system: 
If the computer is not turned on, to view information about the BIOS version, just press the Pause/Break button on the keyboard when a black window appears, which indicates the end of the POST procedure: 
Of course, you can find the same data in the bios interface itself.
How to open the BIOS and configure it?
In order to access the BIOS menu, you don’t need to turn the button: all you need to do is press the special hot keys designated for this purpose when starting the computer. The list is in front of you: 
Nowadays, information about “hot keys” for entering the BIOS can be found on the PC screen itself at the time of your request: 
Golovne - respectfully marvel! At the same time, on computers with Windows 8, to gain access to the BIOS, you may need to restart the system. The bottom line is that this edition of Windows starts up on the desktop, so pressing the hot keys is given for about 0.2 seconds. It’s easy to get rid of this problem using this plan:

Has the situation with launching the BIOS been clarified? Then let's move on to the basics of your setup. Vlasna, you can configure it in the BIOS:

You can also turn your computer to safe or optimized settings by selecting the Load Fail-Safe (or Optimized) Defaults tab. In any case, to save the changes made to the bios, you need to press F10. Exiting the setup can be done immediately by pressing Esc on the keyboard.
WindowsTune.ru
Setting up Bios

Bios adjustment
The Basic Input-Output System is an important part of the procedures of any PC, which is stored in a separate chip on the motherboard. At his core, he is an intermediary between the computer “hack” and the operating system. Without it, the operating system would not be able to communicate with the “leakage” and kernel. In other words, Bios is the most important component of any computer. If your settings are set incorrectly, the productivity of your PC can be affected by up to 40%. Unfortunately, as new processors and motherboards come out in the world, options continue to become increasingly confusing. As a result, many people simply don’t understand the sense. Each motherboard and computer will be used in different versions. Here is a look at the example of BIOS optimization based on the Asus A7N8X-E Deluxe motherboard, since after it there were a large number of other motherboards with similar BIOS. It is quite certain that your motherboard is no different from this model, then you can cancel the notices about possible adjustments.
BIOS: Fundamentals
When the computer starts, it “introduces” the processor to the main components of the motherboard and informs the processor which program to run next when completed. As a rule, it transfers control of the storage sector of the storage device, which can be a flash drive, DVD or hard drive. The backup sector launches the downloader, which activates the main operating system, either Windows or Linux.
The BIOS demonstrates no less than the installation process. Many operating systems are used as an intermediary for access to various devices.
1. BIOS version The skin “motherboard” is a high-quality version of the BIOS, specially divided for its hardware filling. The most common type is the Phoenix Award, and in two varieties. In addition, computer companies use American Megatrends (AMI).
The menu structure and the settings that are selected vary from one selection to another. The BIOS menu settings for the two latest motherboard models may be different. However, we cannot give an accurate description of the options of the skin computer known to mankind. There's no point in getting angry. You can easily find out the relationship between the sections below (based on the Phoenix Award) and the BIOS items of your PC. Don't be embarrassed if you don't see the adjustment steps: this means that the Basic Input-Output System of your PC does not allow you to perform these adjustments without any delay.
2. How to go to Bios
Whenever you check the hardware components of the system, it is important to know the available memory and hard drives, drives or devices; you can use the special key to enter the BIOS Setup program. Often it is enough to press the key, but other options are available, for example. It is important to keep an eye on the screen when viewing: most BIOS will display a row on the “F10 = Setup” icon close to the bottom of the monitor. If nothing comes of it, open the chamber to the motherboard, where the magic combination will be entered. Press this key (or combination) and hold the PC for a second or two hours.
If you ask, you can calculate the amount of available memory, which will bring up the BIOS menu. If that doesn't work, reboot your computer and try a different key combination. For example, many laptops fail at the BIOS by pressing the key or . You can use different keys or a combination.
3. How to change Bios settings
To select a menu in a new menu, move the cursor and use the arrows to navigate to the desired item. By pressing the Enter key, you will go to the section or open the settings selection window (as in the illustration below). To change the settings indicated, press the keys plus [+] or minus [-], or another combination on the default and . From the main settings menu of the Bios, you will be able to access various settings settings that can be divided into different parts.
Let us briefly go through the sections of the main menu for setting up the BIOS.
- In the “Main” or “Standard CMOS Setup” section, you can set the date and hour, as well as hard disk parameters.
- There are differences in the “BIOS Features Setup” section Zagalni customization.
- The "Integrated Peripherals" section covers interfaces and additional system functions.
- The Power Management Setup section allows you to configure all power supply and life options.
- In the “PnP/PCI Configurations” section you can assign IRQs to the expansion cards of your PC. While such functions are common in the section, they can be found in the Advanced section.
- The Hardware Monitor section allows you to determine the values of system sensors: processor temperature or fan speed (rpm). The speed of the fans in the processor and the case will be displayed, but there may also be parameters of the fan in the housing unit or others.
- The Load Setup Defaults item updates the BIOS settings and takes into account all the changes you may have made. This point will be relevant, since your actions have led to any problems with the system.
4. Apparently you have configured the BIOS Setup
To complete the BIOS setup, click or select the “Save & Exit Setup” main menu item. Otherwise, you will first need to select the Exit item, then select the Exit & Save Changes option. Then the choice to save changes will appear: “So” [Y] or “Ni” [N]. Select the required option, after which the computer will restart.
Main BIOS options (Main Options)
Let’s start with the BIOS main options menu (Main Options), which can be accessed by clicking on the “Main” tab in the upper left corner.
Below you can set the hour and date, as well as the parameters of hard drives and other storage devices. Right now, when you have an attached PC that has done everything, it automatically detects the storage devices installed on the system. On most computers, it only takes a second or two, but if you manually enter the required parameters, you can quickly speed up the hour of your choice.
To do this, select the drive by moving the cursor to the next one and press “Enter”. Then write down the values of “Cylinders”, “Heads”, “Sectors” and LBA. Some BIOSes have options for "Block Mode" and "32-Bit Transfer Mode". Change the storage type from AUTO to USER. Then enter the same numbers that were displayed. On most current computers, turn ON LBA Mode, Block Mode and 32-bit Transfer Mode, whichever was turned on earlier.
If up to which controller channel is not connected to the water drive, select NONE. For example, if the hard drive is configured as the main one on the first channel (Primary Master), and the CD-RW drive is configured as the main one on the other channel (Secondary Master), switch so that the secondary drives (Primary/Secondary Slave) on the skin channel are set to NONE. If you disable the AUTO option without detecting the device, then the computer will immediately check the presence of the drive. By setting the value to NONE where there are no drives, you will speed up the process a little.
Advanced Features
Then select the “Advanced” tab, which will be divided into several submenus. The first tab is called "Advanced BIOS Features."
Do you need to carefully test your memory and disk drive immediately when you turn on your computer? If you do not suspect that there is a problem with one of these components, you are unlikely to immediately carry out BIOS diagnostics. In this part of the BIOS, you can change the system startup time by turning off or turning on the song functions. For example, what we indicated above. Below are recommendations for adjustment.
Boot Virus Detection: "Enabled". This item is also located in the main section of the BIOS (Standard or Main). Today's dangerous viruses are no longer as widespread as they used to be, but this function allows you to steal your data when stored on an infected floppy disk or CD-ROM.
CPU Level 1 Cache (processor L1 cache): "Enabled".
CPU Level 2 Cache (processor L2 cache): "Enabled".
Quick Power On Self Test: Enabled. This item allows you to skip the memory test, which is repeated several times when the PC is turned on. If you have a bad memory, this test won't tell you anything.
First, Second, or Third Boot Device: set the order of booting and turn off all devices that you do not plan to boot.
Boot Up Floppy Seek (reversing the drive during storage): “Disabled”. Zaiva waste of time and loud noise.
Boot Up NumLock Status (status of the NumLock key when enabled): choose here yourself. Some people need to ensure that the NumLock key is activated when Windows is running, but others don't.
Gate A20 Option: FAST (Swedish). Although this function has lost its significance under Windows XP, it is still recommended to leave it enabled. Older versions of Windows and OS/2 work more quickly if the parameter is set to FAST. The only reason for setting this parameter to “Normal” is the obsession with DOS.
Typematic Rate Setting: "Disabled". Here, choose for yourself. This parameter determines how often keyboard symbols are typed in order to press the soft key.
APIC Mode: "Enabled" APIC requires advanced programming of the Interrupt Controller (Advanced Programmable Interrupt Controller), which supports multiple processors that support IRQ and more efficient interrupt processing.
OS/2 Onboard Memory > 64M (OS/2 memory > 64 MB): "Disabled". This setup is difficult for those who need to run the now outdated OS/2 operating system from IBM.
Full Screen LOGO Show (display of the full screen logo): select. When the Memory Cleaner option and the Power-On Self-Test (POST) are enabled, the graphical little one will run. When this option is checked, you will see the initial display screen. Most of the computers have it. Some users should grab the POST screen, while others like to monitor the process.
POST Complete Report (renamed POST): choose for yourself. When this option is enabled, you will receive the latest POST tone.
Overclocking options in advanced BIOS settings
Overclockers and enthusiasts who want to increase system performance often increase the processor bus and core frequencies. In addition, they often move and stress the components, which means that higher clock frequencies can be achieved, but more heat is generated.
Rozgin will no longer lead to such a difference in productivity, to which there were some fatalities. In addition, rebooting reduces system guarantees and may result in component failure and the system may operate unstably. Therefore, for more frequency and voltage parameters in this section of the BIOS, disable the “AUTO” option. If you want to adjust settings, click on the Advanced tab of the BIOS screen, then select the Advanced Chipset Features checkbox.
CPU External Freq. (MHz) (external processor frequency, MHz): Make sure this is set according to the specifications of your processor.
CPU Frequency Multiple Setting: AUTO.
CPU Frequency Multiple: Make sure that the setting multiplier is consistent with the processor specifications.
In other BIOSes, the multiplier item may be called CPU Multiplier. To understand the value of the multiplier, keep in mind that the processor frequency varies with other components of your system. The application uses an AMD Athlon 2600+ processor, whose frequency is 2133 MHz. The processor FSB frequency is set to 133.33 MHz. The robot processor frequency of 2133 MHz (2.133 GHz) is set as a multiplier of the FSB frequency. In this case we still take 16 x 133.33 = 2133.
Based on additional testing, AMD found that the 2133 MHz processor performs as fast as the 2.6 GHz Intel processor. Researchers tend to use clock speed to evaluate productivity, but AMD has found a way to outbid customers with a lower clock speed. AMD processors does not mean less productivity. For which model numbers have been entered. It's no wonder that the AMD Athlon 2600+ (in our application) operates at 2.133 GHz, and not at 2.6 GHz.
System Performance: "Optimal"
CPU Interface: "Optimal"
Memory Frequency (memory interface): "By SPD" (via SPD). Most memory module manufacturers add a special chip (Serial Presence Detect, SPD), which informs the computer BIOS about the module size, frequency, voltage and other memory parameters. These adjustments are determined by the manufacturer to ensure maximum productivity and reliability. We also recommend that you disable the “By SPD” option. If you manage your memory settings manually, you can gain a little more productivity. But be careful: in this case, the system can begin to “take off” at the wrong moment, not be attracted to the proper rank, but may be tempted to become attracted in advance.
Memory Timings: Optimal.
FSB Spread Spectrum: "Disabled" This feature allows systems to pass European Electromagnetic Interference (EMI) tests. It gradually changes, albeit slightly, the Front Side Bus (FSB) frequency. Please note that enabling this function may result in interruptions in your Internet connection, as well as stability problems when overclocking the system.
AGP Spread Spectrum: "Disabled" Here the same things are true that are indicated in the previous paragraph. In addition, the frequency of the Advanced Graphics Port (AGP) interface is modulated.
CPU VCore Setting (adjusting the voltage of the processor core): "AUTO".
CPU VCore (processor core voltage): reconfigure the settings to match the processor specifications.
Graphics Aperture Size (AGP): 64 MB or 128 MB. This function stores the Graphics Address Relocation Table (GART) and the amount of memory that can be addressed by the AGP bus. Regardless of the memory capacity of the graphics card, we recommend specifying 64 or 128 MB. As a result, the video card provides optimized performance, while the program uses additional memory for textures - at the same time, GART does not go beyond reasonable boundaries.
AGP Frequency: "AUTO".
System BIOS Cacheable: Disabled. You may think that keshuvannya is good. So, never mind. Increasing this function may cause the system to crash if the program tries to write data to the cached area of the BIOS. If you are using DOS, it is best to enable the function.
Video RAM Cacheable: "Disabled" This option allows you to copy video memory directly to the L2 cache, which is the lower ROM of the video card. However, Windows today has moved far beyond DOS, so video card ROMs are rarely used. Due to the size of the L2 cache fragments, it is recommended to optimize the efficiency of other tasks.
DDR Reference Voltage (voltage of DDR modules): 2.6V. The tuning is based on the voltage of your system's Double Data Rate (DDR) memory modules.
AGP VDDQ Voltage (AGP VDDQ voltage): 1.5V. VDDQ is a technical abbreviation (Voltage between Drain and common for Data Quad-band). Let us not go into detail. You just need to understand that the voltage of the AGP port of the video card is installed here.
AGP 8X Support: Check this option if the video card supports the 8X AGP interface. In addition, on motherboards with a VIA chipset, install VIA 4-in-1 drivers.
AGP Fast Write Capability: We recommend enabling this option. This function allows you to bypass the main RAM while recording from the chipset to AGP, increasing productivity by up to 10%. However, some functions of the card may cause problems. We recommend experimenting to find out which settings are best suited for your PC.
Setting up peripherals in BIOS (Integrated Peripherals)
This section of the BIOS contains settings for the built-in peripheral devices installed on the motherboard. This includes serial and parallel ports, sound, LAN, USB ports, etc. If the ports are not checked, but the BIOS is enabled, then the ports consume active system resources. It’s still better than getting in.
Primary VGA BIOS (main BIOS VGA): This function is only applicable if your PC has two graphics cards installed: one AGP (accelerated graphics port) and one PCI (peripheral component interconnect). The system is responsible for knowing how to initialize the card first and make it the main one. If you have one video card, it will most likely support the AGP interface. For more problems, the settings for the washing process will not be correct and change the trace to AGP VGA Card. If you have two video cards, then choose the main one. It displays information about the POST test and the presence of the OS.
USB Controllers: This feature allows you to combine the functionality of Universal Serial Bus (USB) controllers on your PC. You can select USB 1.1, USB 1.1 and 2.0 and turn USB on. For most homeowners, the shortest option would be USB setup 1.1 and 2.0.
USB Legacy Support (support for legacy USB devices): This function must be enabled if your PC is equipped with a USB keyboard and you want to use it in DOS-ready or before the OS is updated (in the update menu, for example). Once setup is disabled, the keyboard will not function after using a floppy disk or CD-ROM. You won’t be able to get to the BIOS either. If your PC has a USB keyboard (straight through the plug), then set the settings to Enabled. If you have a PS/2 keyboard (round), select “Disabled”. Please note that increasing this function may lead to problems waking up from Standby or Hibernate modes, or causing problems with the PC being turned off incorrectly. In other words, activate the function only when necessary.
USB Mouse Support: exactly the same as for the previous point. It is best to turn this option on.
Onboard AC97 Audio Controller: If your PC is equipped with an additional sound card, such as Sound Blaster Audigy, or your system does not have speakers, enable the onboard sound card (“Disabled”). This will free up valuable resources and avoid potential conflicts. However, many computers have integrated audio solutions, so disable the “Enabled” option.
Onboard AC97 Modem Controller (incorporating an AC97 modem controller): motherboards can be used to install an onboard modem for dial-up access. If there is no modem socket, a modem is not required, or a modem card is being used, then turn on the “Disabled” option. Otherwise, turn it off (“Enabled”).
Onboard LAN (nVidia) (onboard LAN controller): this option allows you to install or uninstall the installed interface card. The possible options are "Auto" or "Disabled" (checked). The ASUS motherboard, which we review for our review, has two built-in edge cards, which are especially useful when the PC is used as a router for distributing an Internet connection: one edge card is connected to the cable/D SL modem, and a friend - up to switch of your network. If you are using only one fencing port or the fencing is not required, turn on the controller to save valuable resources.
Onboard LAN (3Com) (onboard LAN controller): This option is shared with another onboard LAN controller. Here it is true that what is said above is true.
Onboard 1394 Device (FireWire): This feature enables or disables the IEEE 1394 (FireWire) port on your PC. If you don't use any FireWire devices, turn on this option to save valuable resources.
Floppy Disk Access Controller: Most current boards do not have floppy drives. If this is correct for your PC, but you do not need a disk drive, then turn it on and release resources. Note: if you have a floppy drive installed and you enter it into the BIOS, you will not be able to use it unless you enable this function in the BIOS again.
Onboard Serial Port 1: Most computers no longer use onboard serial ports for connecting peripherals, as this interface has virtually replaced USB. If you do not use the latest ports, turn them off to save resources. On the other hand, if the last port is being monitored, select the “3F8/IRQ4” option.
Onboard Serial Port 2 (default serial port): exactly the same as above. If the port is being configured, set the value "2F8/IRQ3".
UART2 Use As (UART2 type): UART (Universal Asynchronous Receiver/Transmitter) is a chip that receives and transmits data serially. The same serial port is used on the same chip, although it is possible to integrate several UARTs into one chip. There are many motherboards that offer contacts for connecting to the IC port instead of COM2, so choose it yourself. Please remember that for the IC port you need to install an IC adapter, which is sold separately.
Onboard Parallel Port: This function allows you to select or turn on the parallel port mode. If you do not have a parallel port enabled, this option allows you to save valuable system resources. If the port is being tested, it is recommended to set the value “378/IRQ7”.
Parallel Port Mode: If you have connected a parallel port, then the settings are not significant. However, when the parallel port is enabled, you can set the EPP (enhanced parallel port) or ECP (enhanced capabilities port) modes. The “EPP” mode is recommended if your system is equipped with one device that connects to a parallel port (for example, a printer). Select "ECP" if a number of devices are connected to the port: for example, an external zip drive, a scanner, a printer or a streamer. Make sure you are using IEEE 1284 certified parallel cables.
ECP DMA Select: If you have selected “ECP” or “EPP plus ECP” mode for the parallel port, this option will appear. Here you can also set a direct memory access channel (DMA, Direct Memory Access) that you plan to use. We recommend a value of "3".
Onboard Game Port: If your system does not have a large sound card, or you do not use MIDI devices or older joysticks, this function should be enabled in order to save valuable resources. If you are using the new game port, enter the value for “201”.
Onboard MIDI I/O: MIDI (Musical Instrument Digital Interface) allows you to connect musical instruments to the hardware and software of a storage PC. If your computer is not configured to connect external MIDI devices, feel free to enable the option. Otherwise, we recommend the standard value “330”.
Onboard MIDI IRQ: the same as above. If you are using MIDI devices, then set the default settings to “10”.
Setting up energy management in the BIOS (Power Management Settings)
This is the area of the BIOS that most home users are wary of. If the correct adjustments are not made here, the system will no longer function correctly, and it will also not correctly exit from the “Standby” or “Hibernate” settings. Windows is already equipped with built-in energy saving options, and all other options can be turned on in the BIOS. Otherwise, they conflict one with the other, and they will not work correctly. Motherboard vendors understand that not everyone uses Windows, so adjustments are more important for users of other OSes.
ACPI Suspend to RAM: ACPI stands for Advanced Configuration and Power Interface - do not confuse it with APIC or IPCA, which is also an option in any BIOS. The "Suspend to RAM" function, also called S3/STR, allows the computer to save more power in standby mode, across all devices connected to the computer that are ACPI-compatible. The BIOS settings for this scenario include the “S1/POS” option. If you turn off this function and are having problems with the cleanup mode, then go to the BIOS and turn it off.
Video Off Method: DPMS stands for “Display Power Management System”. This option allows the BIOS to support the graphics card, which supports the DPMS function. The "Blank Screen" option simply displays a blank black screen - this is vicious for those monitors that do not support the "green" option or the power saving mode. The “V/H SYNC Blank” option does not show a black screen, but the vertical and horizontal scanning changes. If your computer and monitor are equipped with the remaining five devices, we recommend the “DPMS” option.
HDD Down In Suspend (disable HDD in Suspend mode): the function means that the hard drive will automatically turn off in Suspend mode. Most of these settings are carried out by Windows, so that the hard drive does not freeze when the computer enters the “Suspend” sleep mode, then turn off this option. Otherwise it’s better to disable it (Disabled).
Power Up On PCI Device: If you use Wake-On-LAN - this option is often found in many office applications for remotely turning on computers - then leave the option enabled ("Enabled"). Otherwise, we recommend turning on this option (Disabled).
Wake/Power Up on Ext. Modem (enabled behind the existing modem): This function allows the computer to automatically connect to the modem when the telephone line is activated. Once again, this is a handy function for remote cleaning. In other cases, for most users, it is better to turn it on (Disabled).
Automatic Power Up: This function allows you to set the hour when the computer will automatically power up. If you need such a function, turn it off (“Enabled”). Otherwise, select “Disabled”.
Time (hh:mm:ss) of Alarm: Sets the hour for automatic alarm. Don't forget to turn on the Automatic Power Up function.
AC Power Loss Restart (enabled after losing life): This option tells the computer what to do after uncontrollable loss of life and its renewal. If the option is disabled (“Disabled”), the system will not start. If it is checked (“Enabled”), the system will be re-enabled. We recommend turning on this option (Disabled).
Power On By PS/2 Mouse: If the option is enabled, a PS/2 mouse (not USB) can be used to turn on the PC. Disable this option so that you do not turn on the computer by suddenly pointing the mouse.
Power On By PS/2 Keyboard: When this function is activated, you can power up the system using special keys. It’s best to turn on the “Disabled” function to make sure you don’t use the key too quickly.
PnP/PCI BIOS configuration (PnP/PCI Configurations)
This area of the BIOS is mainly used to solve problems with the old "leak". Most business owners will not need to change the adjustment after the adjustment.
Reset Configuration Data: ESCD (Extended System Configuration Data) resets information about all non-PnP devices (plug and play). Here, information about the system is also saved from the moment of previous installation. Click this option to clear the data during the Power-On-Self-Test (POST). Please note that cleaning is carried out when diagnosing any component that is working incorrectly. After enabling the option (“Enabled”) and exiting the BIOS, the configuration data will be cleared and the option will be automatically turned off (“Disabled”).
Resources Controlled By: This configuration allows the computer to either set IRQ automatically or manually assign IRQ to all devices. Please note that manually entering an IRQ may cause problems. This option is only needed when working with older, non-PnP peripherals. It is recommended to set to “AUTO”(ESCD).
IRQ Resources: This option allows you to manually configure IRQ. It is activated only if you have selected manual insertion (MANUAL) in the previous step.
PCI/VGA Palette Snoop: this function is intended to be applied to additional video cards such as MPEG encoders. They don’t smell like a damp palette of colors, so you have to snoop the palette from the system video card. Since, like most computer users, you do not have an additional video device connected to the video card, then turn it off (Disabled).
Security options in BIOS (Security options)
BIOS security options allow you to limit third-party access to the BIOS or computer so that they do not make necessary changes. Parts of BIOS setup are critical for proper PC operation; many company administrators block the BIOS with a password.
Security Option: This option allows you to protect changes made to the BIOS with a password (Setup option). In addition, here you can specify that the password be asked immediately before the PC is logged in (the “System” option).
Set Supervisor Password: If you enter a supervisor password, you will be asked when you enter the BIOS (if you select the Setup option). If you have selected the System option at the point above, then a password is required for cold acquisition.
Set User Password: here you can enter the password that you will be asked from when you have a private PC. If Supervisor Password is specified, you can change the date in the BIOS.
Note: if you forget or lose your passwords, you will have to reset the BIOS to factory settings using the time-consuming reset of the jumper on the motherboard.
Hardware Monitor Menu
In this part of the BIOS you can control voltage, fan speed and temperature. On the maternal pay ASUS According to our statistics, you can also change the winding speed of the fans depending on the temperature parameters. In addition, you can set the temperature of the CPU alarm, which will be activated when overheating occurs. Another option is to turn on the computer after the temperature limit has exceeded. This way your processor will not burn out due to overheating or in extreme situations.
How to engage the touchpad on a dell laptop 
This material describes almost all the parameters that are installed in the Setup BIOS program from AWARD Software International Inc. A specific motherboard may or may not have any of the parameters that are described. Some of the parameters themselves can be named differently depending on the motherboard manufacturer, so in some cases there are a number of options.
BIOS FEATURES Setup
Virus Warning
Allowing this parameter protects any record from a private sector of the hard disk without the permission of the user. There are some introductions to protect against so-called boot viruses that infect the private sector. It is recommended to always check this parameter before turning it off, because, for example, Windows 95 freezes during installation when Virus Warning is set to Enable (when a black square appears on the screen).
You can take the following values:
- Enabled - allowed
- Disabled - fenced
Boot Virus Detection (Virus detection in the private sector)
This sensitive parameter is already affected by Virus Warning. The idea is simple - if this parameter is blocked, then before the operating system is restored, the BIOS rewrites the reserved sector in the flash memory and saves it there. After setting the parameter to the Enabled BIOS value, the system will not be captured from the hard drive, as instead of the boot sector, it will be partitioned from the one saved in memory. Now, in my opinion, it is possible to either convert the system from a hard disk or from a floppy disk.
You can take the following values:
- Enabled - allowed
- Disabled - fenced
CPU Internal Cache/External Cache
The internal or external cache of the processor is allowed/disabled. To remove any type of cache memory, it is often necessary to individually enhance the computer’s operation, for example, when an old expansion card is installed.
You can take the following values:
- Enabled - allowed
- Disabled - fenced
CPU Level 1 Cache/CPU Level_2 Cache (Cache of the processor of the first level / Cache of the processor of another level)
The cache of the first tier and the processor cache of another tier are enabled/disabled for processors of the Pentium Pro architecture (Pentium II, Deshutes, etc.). To protect the trace cache memory, there is no need to manually improve the operation of the computer, for example, when an old expansion card is installed.
You can take the following values:
- Enabled - allowed
- Disabled - fenced
CPU Level 2 Cache ECC Check (Enable ECC for the cache memory of the processor level 2)
This option can only be used with Pentium II architecture processors. This is allowed only because the Pentium II class processor has cache memory of a different level with the ability to control ECC.
You can take the following values:
- Enabled - allowed
- Disabled - fenced
BIOS Update
Allowing this parameter allows you to update the BIOS microcode. In this case, new menu items may appear, allowing you to fine-tune the system for individual situations (for example, episodes of insanity).
You can take the following values:
- Enabled - allowed
- Disabled - fenced
CPU Fast String (Swedish operations with rows)
Allowing this parameter allows you to exploit the specific features of the architecture of the Pentium Pro family (Pentium II, Deshutes, etc.), while limiting the possibility of caching operations with rows. It is necessary to understand that the program itself may have a defect in the mind of its activation mechanism. This is indicated in the documentation for any processor of this family. It is recommended to disable the parameter in the “Allowed” setting.
You can take the following values:
- Enabled - allowed
- Disabled - fenced
Deturbo Mode
When this parameter is set to the highest level, the FLUSH# signal becomes active and no data is then cached by the processor in its internal cache (first-level cache) by Pentium Pro processors (Pentium II, Deshutes, etc.). Allow this parameter to be used only when necessary to improve the performance of the computer.
You can take the following values:
- Enabled - allowed
- Disabled - fenced
Quick Power On Self Test
This parameter can be used to significantly reduce the time required for initial testing of the computer BIOS, especially with significant RAM requirements. The trace should only be secured so that the memory, for example, is not tested, but only its size is verified.
You can take the following values:
- Enabled - allowed
- Disabled - fenced
Boot Sequence
The parameter sets the sequence of activation of devices that can be used to interfere with the operating system. These devices are designated either by letters for physical hard drives and primary drives, or by the name CD-ROM drive for drives CD-ROM, LS for drives a:drive 120 Mb or ZIP for drives ZIP IDE 100 Mb.
For current versions, possible values could look like this:
- C only
- CD-ROM, C
- LS/ZIP, C
- etc.
Swap Floppy Drive
If allowed, drives A and B are swapped. It makes sense that the computer has 2 drives.
You can take the following values:
- Enabled - allowed
- Disabled - fenced
Boot Up Floppy Seek
If this option is enabled, the BIOS will update to the disk drive to recognize its format (40 or 80 tracks supported). Since 1993, 40-track drives have not been released unless this option is enabled, and the BIOS now only takes a few seconds to select the drive format.
You can take the following values:
- Enabled - allowed
- Disabled - fenced
Boot Up NumLock Status (Upgrading the numeric keypad for a connected computer)
This parameter enables the NumLock indicator and the numeric keypad generates codes for numbers and characters, otherwise it generates codes for arrows, Ins, Del, etc.
You can take the following values:
- Enabled - allowed
- Disabled - fenced
Typematic Rate Setting
Allows or disables the installed fluidity to repeat the entry of characters using the keyboard while pressing the key.
You can take the following values:
- Enabled - allowed
- Disabled - fenced
Typematic Rate (Chars/Sec)
The parameter only applies to the extent permitted by the Typematic Rate Setting.
The repetition frequency has a number of fixed values that this parameter can accept:
Typematic Delay (Msec)
Sets a delay from the moment the key is pressed until the character is repeated by the keyboard. You can only fix this problem as permitted by the Typematic Rate Setting.
The meanings can be found in the following row:
PS/2 Mouse Function Control
Allowing this parameter allows IRQ12 to be applied to the PS/2 mouse port. Otherwise, as long as a mouse with a PS/2 interface is connected to the computer, IRQ12 is suitable for other devices. It is recommended to set the value to Auto.
You can take the following values:
- Enabled - allowed and IRQ12 occupied
- Auto - BIOS indicates the presence or absence of a PS/2 mouse
OS/2 Onboard Memory > 64MB (Select value for OS/2, if the memory is larger, lower than 64 MB)
This allows for the choice of two minds - the computer has more than 64 MB of memory installed and is using OS/2 as an operating system.
You can take the following values:
- Enabled - allowed
- Disabled - fenced
PCI/VGA Palette Snoop (Adjusting the palette of a VGA video card on PCI)
The Trace option only works if colors are not displayed correctly on the screen. As a rule, this effect can occur when using non-standard devices such as MPEG cards, 3D fasteners and other similar devices.
You can take the following values:
- Enabled - allowed
- Disabled - fenced
Video ROM BIOS Shadow (Video BIOS for a riddle)
Allow this parameter to be carried out before transferring the video BIOS from the PDP (permanent device) to the video card into the main memory of the computer, which significantly speeds up the work from the video BIOS (which is not necessary and is visible in DOS). It is quickly explained that the upgrading to ROM is much larger than to RAM, and also because upgrading to ROM is for 8-bit systems, and for RAM - 32 or 64-bit systems.
You can take the following values:
- Enabled - allowed
- Disabled - fenced
Floppy Disk Access Control (R/W)
This parameter allows you to write information to a floppy disk, or the floppy disk can be read. This parameter should be used to protect against unauthorized copying from your computer.
You can take the following values:
- Enabled - allowed
- Disabled - fenced
CHIPSET FEATURES Setup
AUTO Configuration
There are 3 values:
- 60 ns - sets the access parameters for DRAM via Widcode 60 ns
- 70 ns - the same for memory with 70 ns speed code
- Disabled – allows you to set any possible parameters for accessing DRAM memory
DRAM RAS# Precharge Time
This function allows you to determine the number of system bus cycles used to form the RAS signal. Changes to this value will be more flexible, but changes that are more extreme for a specific memory may result in data loss.
Accepts the following values:
DRAM R/W Leadoff Timing
Indicates the number of cycles on the bus before any operations from DRAM begin.
- 8/7 - all measures for reading and all measures for writing
- 7/5 - seven bars for reading and five bars for writing
DRAM RAS to CAS Delay
Under the hour of access to memory, the history of the centuries and the rows will be marked firmly. This parameter determines the status of one signal as opposed to another. The changed value increases the speed code.
The parameter can be set to:
- 3 - three tacts of back-up
- 2 – two tacts of trimming.
DRAM Read Burst Timing
The read and write requests are generated by the processor in several separate phases. In the first phase, the memory is scanned to a specific memory area, and in those that are lost, the data is ready to be read. Changing the total number of ticks will increase the speed.
The parameter can be set to:
- x2222 - two strokes of trimming
- x3333 - three tacts of back-up
- x4444 – chotiri takti zatrimki.
Speculative Leadoff
The separate design of this parameter allows you to see a signal for reading a few minutes before the address will be decoded. This technique reduces the costs of reading operations. In other words, the processor initiates the read signal simultaneously with the generation of the address where the necessary data is located. The read signal is received by the DRAM controller and if the Speculative Leadoff parameter is enabled, the controller issues a read signal until address decoding is completed.
You can take the following values:
- Enabled - allowed
- Disabled - fenced
Turn-Around Insertion
If this parameter is enabled (Enabled), one additional clock cycle is enabled between two successive memory cycles. Allowed for a change in speed and greater reliability during read/write operations.
You can take the following values:
- Enabled - allowed
- Disabled - fenced
Data Integrity (PAR/ECC)
Allows/disables memory control for strikes. The control view is set to DRAM ECC/PARITY Select. To activate this option, the required memory modules are required to support this function.
You can take the following values:
- Enabled - allowed
- Disabled - fenced
DRAM ECC/PARITY Select
The parameter appears only for the 430HX set (for example, on the ASUSTeK P/I-P55T2P4 motherboard) or 440FX/LX, or even if a memory module with a true pairing is installed. In some BIOS versions, this parameter can be set only by the type of verification, and the permission for verification is set by the Data Integrity (PAR/ECC) parameter. Such strips are often called 36-bit.
You can take the following values:
- Parity - every time a guilty message is displayed on the monitor, a notification about the failure for parity appears in the memory and the computer’s work slows down
- ECC - (Error Control Correction) once a single error occurs, the work will continue. Since this is not just a single problem, the computer’s work is also affected. It should be noted that, according to Intel, the speed of exchange with memory when this mode is turned on changes by approximately 3%.
Fast RAS# to CAS# Delay (Interval between RAS and CAS)
When regenerating the memory, rows and sections are addressed separately, so this parameter sets the interval between the RAS and CAS signals.
SDRAM Configuration
The parameter indicates that the BIOS program itself assigns clock characteristics to memory access on the information pad with the SPD block or allows it to be created.
You can take the following values:
- By SPD - access parameters are set behind SPD
- 7 ns (143 Mhz) - access parameters are installed in the BIOS for memory access with 7 ns access and a bus frequency of 143 MHz
- 8 ns (125 Mhz) - access parameters are installed in the BIOS for memory access with 8 ns access and a bus frequency of 125 MHz
- Disabled - installed by the user
SDRAM RAS Precharge Time
The parameter allows you to increase the amount of accumulated RAS charge before the memory regeneration cycle begins. Setting the Fast value increases the speed, but Slow increases the stability of the computer, so the Fast value should be set at different times in the memory capacity.
You can take the following values:
- Fast - shvidko
- Slow - completely
SDRAM (CAS Lat/RAS-to-CAS)
This parameter allows you to select between the strength of the CAS signal and the suppression between the RAS and CAS signals. The value of this parameter lies in the characteristics of the SDRAM stored in the motherboard and in the processor's speed code. Therefore, change this parameter very carefully.
You can take the following values:
SDRAM CAS to RAS Delay
The parameter determines the delay value after the RAS signal is issued before the CAS signal appears for synchronous memory. The less value, the greater the access to memory. Please change this trace carefully.
The parameter can be set to:
- 3 - three tacts of back-up
- 2 - two tacts of back-up
SDRAM CAS# Latency (CAS trim for SDRAM)
Sets the blocker to the CAS signal for SDRAM. The least important thing is to increase the productivity of the system. It is recommended to set a lower value for SDRAM with a speed code of 10 ns or shorter.
You can take the following values:
SDRAM Banks Close Policy
The input parameter for boards with the 440LX set through those with memory with 2 banks does not work correctly in these boards, since the parameters for accessing memory banks are set to wrong. The 430TX set does not require this, since the access rules for different memories are the same. Change the BIOS settings after wiping for this parameter in case of unstable memory.
You can take the following values:
- Page Miss - vikorista for double-banking memory
- Arbitration – for memory from 4 banks.
DRAM Idle Timer
This parameter indicates the hour (in ticks) until all open memory sections are closed. It merges both into EDO and SDRAM memory.
You can take the following values:
Snoop Ahead (Prophecy)
The separate function of this parameter allows data streaming between PCI and memory, transferring data that is needed at the right time and thus speeding up the transfer of data.
You can take the following values:
- Enabled - allowed
- Disabled - fenced
Host Bus Fast Data Ready
This parameter allows you to remove data from the bus simultaneously with its selection. Otherwise, the data will be applied to the bus for one additional cycle.
You can take the following values:
- Enabled - allowed
- Disabled - fenced
Refresh RAS# Assertion (RAS setting for regeneration)
This parameter sets the number of cycles (that is, the RAS value) of the regeneration cycle. The values that are received are determined by the memory capacity and the chipset. The least important thing is increased productivity.
MA Wait State
The parameter allows you to set or remove an additional refresh cycle, first reading the memory. For EDO type memory, one cycle after each wash and setting the Slow value adds one more cycle to wash. For SDRAM there is no clock cycle after washing and setting Slow to enter one clock cycle.
You can take the following values:
- Slow – one beat is added;
- Fast – there is no additional cycle of cleaning.
SDRAM Speculative Read
The separate design of this parameter allows you to see a signal for reading a few minutes before the address will be decoded. This technique reduces the costs of reading operations. In other words, the processor initiates the read signal simultaneously with the generation of the address where the necessary data is located. The read signal is received by the DRAM controller and if the SDRAM Speculative Read parameter is enabled, the controller issues a read signal until the address decoding is completed.
You can take the following values:
- Enabled - allowed
- Disabled - fenced
System BIOS Casheable
The separate purpose of this parameter is until it becomes possible to cache the memory area behind the system BIOS addresses from F0000H to FFFFFH in the cache memory. The option will not be available if cache memory is enabled in the BIOS Features Setup section. If any program tries to cancel the write operation to this address, the system will notify you about the cancellation.
You can take the following values:
- Enabled - allowed
- Disabled - fenced
Video BIOS Cacheable
This parameter allows caching of the memory area behind the BIOS addresses of the video card from C0000H C7FFFH to cache memory. The option will not be available if cache memory is enabled in the BIOS Features Setup section. If any program tries to cancel the write operation to this address, the system will notify you about the cancellation.
You can take the following values:
- Enabled - allowed
- Disabled - fenced
Video Memory Cache Mode
This parameter is only valid for processors of the Pentium Pro architecture (Pentium II, Deshutes, etc.). The Pentium Pro processor has the ability to change the cache mode individually for a specific memory area through special internal registers called Memory Type Range Registers - MTRR. Using these registers, the UC (uncached), WC (write combining), WP (write protect), WT (write through) modes can be set for a specific memory area. ) that WB (write back). Installing the USWC (uncached, speculative write combining) mode allows you to significantly speed up data transfer via the PCI bus to the video card (up to 90 MB/s instead of 8 MB/s). Please note that the video card must support access to its memory in the range of A0000 – BFFFF (128 kB) and the linear frame buffer. It would be better to set the USWC mode, otherwise if you have any problems (the system may not be activated), set the values for the UC settings.
You can take the following values:
- UC (uncached) - not cached
- USWC (uncached, speculative write combining) - do not cache the shared write mode
Graphics Aperture Size (Graphic aperture size for AGP)
This parameter indicates the maximum size of the memory area for a video card with an AGP interface. The value of the payment, which is installed for the implementation of life or discount, is 4 MB. After initialization, the BIOS accepts the value received by the motherboard manufacturer (usually 64 MB).
Resolution range of graphic aperture values:
- 16 MB
- 32 MB
- 64 MB
- 128 MB
- 256 MB
PCI 2.1 Support
Each parameter allowed is subject to the capabilities of the PCI bus specification 2.1. Specification 2.1 introduces two main features from 2.0 – the maximum bus clock frequency is increased to 66 MHz and a mechanism is introduced for the PCI-PCI bridge, which allows the removal of the boundaries of specification 2.0, Therefore, no more than 4 devices can be installed on the bus. Disabling this parameter may be less important if problems arise after installing a PCI card (this may only occur with old cards).
You can take the following values:
- Enabled - allowed
- Disabled - fenced
8 Bit I/O Recovery Time (Refresh hour for 8-bit devices)
The parameter is measured in processor cycles and indicates what kind of lock the system installs after the input/output is sent to the read/write device (or, as is customary with Intel, the port). This lock is necessary, since the read/write cycle for input/output devices is significantly longer than for memory. However, 8-bit input/output devices themselves are usually larger than 16-bit input/output devices. The value of this parameter will increase if you install any large 8-bit device on your computer.
You can increase the value: from 1 to 8 measures.
16 Bit I/O Recovery Time (Refresh hour for 16-bit devices)
The parameter is measured in processor cycles and indicates what kind of lock the system installs after the input/output is sent to the read/write device (or, as is customary with Intel, to the port). This lock is necessary, since the read/write cycle for input/output devices is significantly longer than for memory. The value of this parameter will be increased if any large 16-bit device is installed on the computer.
You can increase the value: from 1 to 4 measures.
Memory Hole At 15M-16M ("Memory Hole" in the middle of the 15th megabyte of memory)
This parameter allows you to access input/output devices as a way to increase the speed of access to such devices. For this mechanism to function, it is necessary to disable the memory capacity of all standard programs (15 megabytes), and then open the BIOS at the highest setting. Select this parameter below, as it is required in the documentation for the board installed on your computer.
You can take the following values:
- Enabled - allowed
- Disabled - fenced
Peer Concurrency (Parallel robot)
This parameter allows or disables the simultaneous operation of a number of devices on the PCI bus.
You can take the following values:
- Enabled - allowed
- Disabled - fenced
Chipset Special Features
This parameter allows/disables new functions that have appeared in the HX, VX or TX sets in conjunction with FX.
You can take the following values:
- Enabled - allowed
- Disabled - fenced
Passive Release
This parameter enables/disables the mechanism for parallel operation of the ISA and PCI buses. If this parameter is allowed, processor access to the PCI bus is allowed under passive conditions. The need to select this parameter may not be necessary when ISA cards are victorious and DMA channels are actively victorious.
You can take the following values:
- Enabled - allowed
- Disabled - fenced
PCI Delayed Transaction
The presence of this parameter means that there is a 32-bit buffer on the motherboard to support the cycled exchange on PCI. If this parameter is enabled, then access to the PCI bus is allowed for up to 8-bit devices on the ISA bus. This significantly increases productivity, since the cycle of such processing on ISA takes 50-60 cycles of the PCI bus. If you install cards that do not comply with the PCI 2.1 specification, this parameter must be protected.
You can take the following values:
- Enabled - allowed
- Disabled - fenced
Parallel Port Mode (ECP+EPP)
The parameter allows you to set the robot mode parallel to the port. Please note that the exchange rate for certain devices can be significantly increased. correct installation robot mode for the printer port, for example, for external information storage devices such as Iomega ZIP Drive LPT.
You can take the following values:
- Normal – the printer’s initial interface, also called SPP
- ECP - port with expanded capabilities
- EPP – expanded printer port
- ECP+EPP - you can vikorize two modes
ECP DMA Select (Select DMA channel for ECP mode)
The parameter appears only when separately assigned to ECP mode or ECP+EPP to Parallel Port Mode (ECP+EPP). For normal support, the ECP mode needs to select the DMA channel, which is selected from channels 1 or 3.
You can take the following values:
- 1 - channel 1
- 3 - channel 3
- Disabled – blocked by vikorystuvati DMA
The same is true for selecting the EPP robot mode.
You can take the following values:
- EPP 1.9
- EPP 1.7
Onboard PCI IDE Enable
This parameter controls the separate operation of the two channels of the IDE controller installed on the motherboard.
You can take the following values:
- Primary - robots are allowed only to the first channel
- Secondary - the robot is allowed to be deprived of another channel
- Both - both channels are allowed
- Disable - both channels are blocked for the robot
IDE PIO Mode (Select skin disc robot mode)
Several parameters allow you to set the operating modes of the skin disk individually or allow the BIOS automatically installed High speed mode for the disc. For skin disc acceptable parameters however For example, for IDE 0 Master Mode the allowed values are: 0, 1, 2, 3, 4 and AUTO.
The UDMA parameter can be set to Auto or Disable.
PnP/PCI Configuration Setup
PNP OS Installed (Is an operating system installed that supports Plug&Play mode?)
Set Yes, if the operating system supports Plug&Play (for example, Windows 95), and No otherwise. If you selected No, the BIOS can configure the Plug&Play devices.
Resources Controlled By (How resources are managed)
If AUTO is selected, the BIOS itself will automatically assign DMA channels to all devices connected to the PCI bus, and these parameters will not appear on the screen. Otherwise, set all these parameters manually. For some BIOS versions, this parameter can be set individually for each PCI slot and look like this:
- Slot 1 IRQ
- Slot 2 IRQ
- etc.
Reset Configuration Data
It is recommended to set it to Disabled. When installing Enabled BIOS, the area of Extended System Configuration Data (Rodshiret Danim about the System Systems - ESCD), in the yaki zbergianga, the BIOS Systems of the Systems, the can be arapy conflict at the Kinatikh Calm.
IRQ n Assigned to
Any breakdown of the system may be due to one of the following types of devices: Legacy ISA (classic ISA cards) - Primary cards for ISA, such as modems or sound cards without Plug&Play support. These cards must be checked for documentation on them PCI/ISA PnP (devices for the PCI bus or devices for the ISA bus with Plug&Play support) - this parameter is set only for devices on the PCI bus or ISA cards with support yu Plug&Play.
DMA n Assigned to (DMA channel number n is assigned to...)
The skin channel of the DMA system can be assigned to one of the following types of devices: Legacy ISA (classic ISA cards) - Primary cards for ISA, such as modems or sound cards without Plug&Play support. These cards display DMA channel assignments in accordance with the documentation on them PCI/ISA PnP (devices for the PCI bus or devices for the ISA bus with Plug&Play support) - this parameter is set only for devices on the PCI bus or ISA cards from the support I wash Plug&Play.
PCI IRQ Activated by
The parameter can take the following values: Level (level) – the interrupt controller only reacts to the level of the signal Edge (difference) – the interrupt controller only reacts to the level difference of the signal.
PCI IDE IRQ Map to (Interruption of the IDE controller on PCI is displayed on...)
Allows you to perform interruptions that occupy the IDE controller on the PCI bus from any device (or fence) on the motherboard and to their devices on the ISA bus. Standard interruptions for ISA are IRQ 14 for the first channel and IRQ 15 for the other channel.
You can take the following values:
- PCI IDE IRQ mapping (Victorized for PCI IDE)
- PC AT (ISA) (Victorized for ISA)
IRQ n Used By ISA (Interruption n is used on the ISA bus)
The parameter is saved with IRQ n Assigned to and the following values can be entered:
- No/ICU (non-configuration utility for ISA) - if this value is set, the BIOS can be configured according to its authority. For DOS, you can also use the additional ISA Configuration Utility program from Intel to configure settings for this option.
- Yes (so) - means the Primus-based override of any card on the ISA bus, which does not support the Plug&Play mode. It is recommended that you always specify Yes for such cards and those that require interruption, since in another version of the BIOS there may be an interruption that will severely affect any card on the ISA, another card that can be used instead of being assigned to a normal robot and a computer.
DMA n Used By ISA (DMA n channel is used on the ISA bus)
The parameter is saved from DMA n Assigned to and the following values can be entered:
- No/ICU (non-configuration utility for ISA) - if this value is set, the BIOS can manage this DMA channel freely. For DOS, you can also use the additional ISA Configuration Utility program from Intel to configure settings for this option.
- Yes (sic) – means the DMA channel is assigned to any card on the ISA bus that does not support Plug&Play mode. It is recommended to always specify Yes for such cards and the DMA channels they require, so that in another version of the BIOS you can specify a channel that strictly selects any card on the ISA, another card that you can select to use in normal computer operation 'yutera.
ISA MEM Block BASE (Base address of the memory block for ISA)
Each card for the ISA bus allows access to the memory located on such a card at specific addresses. This is why you need this BIOS parameter.
You can take the following values:
- No/ICU (ні/ICU) - disables this parameter for the discretion of the BIOS or ICU programs
- C800, CC00, D000, D400, D800 and DC00 - specify the addresses of the memory block.
Whose cream appears additional parameter ISA MEM Block Size (memory block size), which is required for this type of ISA cards, and this parameter can be set to 8K, 16K, 32K, 64K
Onboard AHA BIOS (BIOS of the Adaptec SCSI controller)
The parameter allows/disables the BIOS entry of the installed SCSI controller and thus allows/disables the operation of the installed SCSI controller.
You can take the following values:
- AUTO (automatically) - Allowed to search for the Adaptec SCSI controller and launch the BIOS for the new
- Disabled (blocked) - Set to the value of the SCSI card.
ONB AHA BIOS First (Launch Adaptec controller BIOS first)
The parameter allows/disables starting the BIOS of a built-in Adaptec controller before starting any other SCSI controller.
You can take the following values:
- Yes - allowed
- No - fenced
ONB SCSI SE Term. (Terminator for the installed SCSI controller)
The parameter allows/disables the connection of voltage resistors (terminators) on the installed SCSI controller.
You can take the following values:
- Enabled - allowed
- Disabled - fenced
ONB SCSI LVD Term. (Terminator for the installed SCSI LVD controller)
The parameter allows/disables the connection of voltage resistors (terminators) on the installed SCSI LVD controller. Using this parameter allows you to increase the length of the SCSI cable up to 25 meters.
You can take the following values:
- Enabled - allowed
- Disabled - fenced
SYMBIOS SCSI BIOS or NCR SCSI BIOS
I was looking for a SCSI controller based on NCR 810 microcircuits, which was used, for example, in the ASUS SC-200 card.
You can take the following values:
- AUTO (automatically) - Allowed to search for the SCSI controller and launch the BIOS for the new
- Disabled - Set to the value of the SCSI card
PCI Latency Timer
Sets the maximum hour (in bus clock cycles) that any device on the PCI bus can access the bus, if another device requires access to the bus. The permissible range for changing this parameter is from 0 to 255 with a limit divisible by 8. The parameter values should be changed carefully, as they remain dependent on the specific implementation of the motherboard.
USB IRQ (USB bus interruption)
This parameter allows or prevents interruptions for the USB bus controller. Shards in the computer often do not need to be interrupted, allowing this parameter is not due to the presence of the device on the USB bus of the system.
You can take the following values:
- Enabled - allowed
- Disabled - fenced
Power Management Setup
Power Management
Allows you to allow the BIOS to reduce the energy consumption of the computer, if you do not take care of it, but protect it.
You can take the following values:
- User Define (indicated by the user) - with this parameter installed, you can independently set the hour to switch to the low energy saving mode
- Min Saving (minimum energy saving) - when you select this parameter, the computer switches to low-power mode after an hour for 40 minutes to 2 years (depend on the specific BIOS of the motherboard)
- Max Saving (maximum energy saving) - the computer will switch to low-energy mode 10-30 seconds after the computer is connected to it
- Disable (disables energy saving mode) – disables energy saving mode
Video Off Option (In which mode the monitor is disabled)
Allows you to set at which stage the computer is “sleeping” and switch the monitor to low-energy mode.
You can take the following values:
- Susp, Stby -> Off (in Suspend and Standby modes) - the monitor will switch to low-power mode when Suspend or Standby mode is set
- All modes -> Off (disabled in all modes) - the monitor will be switched to low-power mode in any mode
- Always On (always turned off) - the monitor will never go into low-power mode
- Suspend -> Off (in Suspend mode) – the monitor will go into low-power mode when Suspend mode is set.
Video Off Method
Sets the method for switching the monitor to low-power mode.
You can take the following values:
- DPMS OFF - reduces the monitor’s energy consumption to a minimum
- DPMS Reduce ON - reduction monitor and can be used
- DPMS Standby – monitor in low power mode
- DPMS Suspend - monitor in low power mode
- Blank Screen – the screen is empty, but the monitor becomes increasingly tired
- V/H SYNC + Blank – the ignition signals are heard – the monitor switches to the lowest energy saving mode.
Suspend Switch
The parameter allows or disables the transition to the suspend mode (time clock) behind an additional button on the system unit. For this you need to connect the SMI jumper on the motherboard with a button on the front panel. As a rule, for which there is a special Sleep button or a Turbo button. Suspend mode is a mode of maximum reduction of energy consumption by the computer.
You can take the following values:
- Enabled - allowed
- Disabled - fenced
Doze Speed (CPU frequency in Doze mode)
Indicates the coefficient of the clock frequency of the Doze mode.
Stby Speed (CPU frequency in Standby mode)
Indicates the coefficient of the clock frequency distribution in the Standby mode.
HDD Power Down
Sets the hour after which the hard drive will be jammed, or it will prevent the jam from rotting. The parameter does not apply to SCSI drives.
You can take the following values:
- From 1 to 15 days
- Disabled - fenced
Doze Mode
Sets the hour for the transition or blocks the transition to the first stage of decreased energy consumption.
You can take the following values:
- 30 Sec, 1 Min, 2 Min, 4 Min, 8 Min, 20 Min, 30 Min, 40 Min, 1 Hour – hour of transition (Sec – second, Min – hvilini, Hour – hour)
- Disabled - fenced
Standby Mode
Sets the hour for the transition or blocks the transition to another stage of decreased energy consumption.
You can take the following values:
- Disabled - fenced
Suspend Mode
Sets the hour for the transition or blocks the transition to the third stage of decreased energy consumption.
You can take the following values:
- 30 Sec, 1 Min, 2 Min, 4 Min, 8 Min, 20 Min, 30 Min, 40 Min, 1 Hour – hour of transition (Sec – second, Min – hvilini, Hour – hour)
- Disabled - fenced
PM Events
In this section, there are those interruptions, for which the computer is forced to “throw away”, as to devices that are vikoryst, such interruptions, and for the beast.
IRQ 3 (Wake-up)
The separateness of this parameter will lead to the “waking up” of the computer, modem or mouse connected to COM2.
You can take the following values:
- Enabled - allowed
- Disabled - fenced
IRQ 4 (Wake-up)
The separateness of this parameter will lead to the “waking up” of the computer, modem or mouse connected to COM1.
You can take the following values:
- Enabled - allowed
- Disabled - fenced
IRQ 8 (Wake-up)
The separate setting of this parameter will result in the computer “waking up” according to the date of the real hour. It is recommended to disable this feature; some programs can use the “alarm clock” function of the computer for their own purposes.
You can take the following values:
- Enabled - allowed
- Disabled - fenced
IRQ 12 (Wake-up)
This parameter is used separately to “wake up” the computer on the mouse connected to the PS/2 port.
You can take the following values:
- Enabled - allowed
- Disabled - fenced
The next section includes those devices for which the computer is not responsible for their activity.
IRQ 3 (COM2)
If this parameter is enabled, the computer does not “freeze”, if connections to the COM2 port of the device are disabled.
You can take the following values:
- Enabled - allowed
- Disabled - fenced
IRQ 4 (COM1)
If this parameter is enabled, the computer does not “freeze”, if connections to the COM1 port of the device are disabled.
You can take the following values:
- Enabled - allowed
- Disabled - fenced
IRQ 5 (LPT2)
If this parameter is enabled, the computer does not “freeze”, if connections to the LPT2 port of a device (usually a printer) are disabled.
You can take the following values:
- Enabled - allowed
- Disabled - fenced
IRQ 6 (Floppy Disk)
If this parameter is allowed, the computer does not “freeze”, since storage is carried out on disk drives.
You can take the following values:
- Enabled - allowed
- Disabled - fenced
IRQ 7 (LPT1)
If this parameter is enabled, the computer does not “freeze”, if connections to the LPT1 port of a device (usually a printer) are disabled.
You can take the following values:
- Enabled - allowed
- Disabled - fenced
IRQ 8 (RTC Alarm)
If this parameter is enabled, the computer does not “freeze”, since the RTC (real time clock) is used as a timer. It is recommended to disable this feature; some programs can use the “alarm clock” function of the computer for their own purposes.
You can take the following values:
- Enabled - allowed
- Disabled - fenced
IRQ 9 (IRQ2 Redir)
Since the computer is separate, the computer does not “freeze”, but the device interrupts 9 (2), and is victorious.
You can take the following values:
- Enabled - allowed
- Disabled - fenced
IRQ 10 (Reserved)
If this parameter is allowed, the computer does not “freeze”, if a device that takes 10 minutes to restart is victorious.
You can take the following values:
- Enabled - allowed
- Disabled - fenced
IRQ 11 (Reserved)
If this parameter is allowed, the computer does not “freeze”, if a device that takes up 11 interruptions is victorious.
You can take the following values:
- Enabled - allowed
- Disabled - fenced
IRQ 12 (PS/2 Mouse)
If this parameter is selected, the computer does not “freeze”, if a device that takes 12 transfers (Misha connected to the PS/2 port) is selected.
You can take the following values:
- Enabled - allowed
- Disabled - fenced
IRQ 13 (Coprocessor)
If this parameter is vicorized, the computer does not “freeze”, since the processor is vicorized.
You can take the following values:
- Enabled - allowed
- Disabled - fenced
IRQ 14 (Hard Disk)
If this parameter is allowed, the computer does not “freeze”, since the hard drive on the first IDE channel is disabled.
You can take the following values:
- Enabled - allowed
- Disabled - fenced
IRQ 15 (Reserved)
If this parameter is allowed, the computer does not “freeze”, even if the hard drive or CD-ROM on another IDE channel is disabled.
You can take the following values:
- Enabled - allowed
- Disabled - fenced
Power Up Control
The parameters in this section indicate the type of power supply that is required for power supply devices of the ATX standard and motherboards that allow connection to such a device.
PWR Button
Carries out the functions of the Power button on the system unit of the computer.
You can take the following values:
- Soft Off (software) - the button functions as the primary button for turning up/down the computer, but which allows the computer program to run (for example, when exiting Windows95)
- Suspend (time clock) – when you press the power button for an hour less than 4 seconds, the computer goes to the Suspend stage of reduced energy consumption
- No Function - the Power button becomes the default power button.
PWR Up On Modem Act
Allowing this parameter allows you to turn on the computer when dialing to the modem.
You can take the following values:
- Enabled - allowed
- Disabled - fenced
Wake On LAN
When this parameter is selected, the computer will shut down based on a signal from the local network. This is only possible if you install a memory card in your computer that supports this mode.
You can take the following values:
- Enabled - allowed
- Disabled - fenced
AC PWR Loss Restart
This last option allows you to turn off the computer after it is no longer active. Otherwise, after updating the computer, the computer will not turn on and you will need to press the Power button again.
You can take the following values:
- Enabled - allowed
- Disabled - fenced
Automatic Power Up
Vikorista this parameter, you can enter your computer today indications hour Or turn on the instructions for the day and time.
You can take the following values:
- Everyday (every day) - when the hour is entered, the computer will turn on every day at the hour setting. The hour is entered in the Time (hh: mm: ss) Alarm field in the order of godini: hvilini: second either by using the PgUp, PgDn buttons, or by entering numbers directly.
- By Date (behind the date) - the computer goes into detail on the tasks day and at the tasks hour. When you select this parameter, a field appears for entering the hour (the same as for Everyday) and a field for entering the day of the month. Date of Month Alarm - day of the month - in which field you enter the day of the month. This automatically means that you can program the hardened computer only in the middle of one month.
- Disabled - fenced
In the following sections, the BIOS only indicates the characteristics of certain computer devices. Allowing parameters in these sections allows you to adjust the BIOS for these parameters and notify you if they go beyond the permissible limits.
Fan Monitor section
Chassis Fan Speed (xxxxRPM)
If Ignore is selected, the fluidity of the fan wrap will not be adjusted. This parameter will no longer be displayed if you select a special fan with additional displays that is connected to a special connector on the motherboard. Otherwise, if there is a problem or critical change in speed, the BIOS will display notifications on the screen before changing the operating system.
CPU Fan Speed (xxxxRPM) (Control the speed of the processor cooling fan)
If Ignore is selected, the fluidity of the fan wrap will not be adjusted. This parameter will no longer be displayed if you select a special fan with additional indications that is connected to a special socket on the motherboard. Otherwise, if there is a problem or critical change in speed, the BIOS will display notifications on the screen before changing the operating system.
Power Fan Speed (xxxxRPM)
If Ignore is selected, the fluidity of the fan wrap will not be adjusted. Otherwise, if there is a problem or critical change in speed, the BIOS will display notifications on the screen before changing the operating system. This parameter can be used to determine the existence of a vital block.
Thermal Monitor section
CPU Temperature
Shows the processor temperature in degrees Celsius and Fahrenheit. If you select Ignore, the temperature will not be adjusted. Otherwise, when the temperature is critically elevated, the BIOS will display notifications on the screen before changing the operating system.
MB Temperature (Motherboard temperature)
Shows the processor temperature in degrees Celsius and Fahrenheit. If you select Ignore, the temperature will not be adjusted. Otherwise, when the temperature is critically elevated, the BIOS will display notifications on the screen before changing the operating system.
Section Voltage Monitor (monitoring voltage)
In this section, both the voltage supplied to the motherboard by the power supply and the voltage on the motherboard are indicated. There are no explanations for these parameters, except VCORE is the life voltage of the processor core. This voltage vibrates, as a rule, on the motherboard.
Find information about methods for correcting a computer (PC) and increasing its productivity, using the material that highlights the Bios adjustment in pictures and explains in detail the algorithm of action.
To protect your life, there will be a lithium battery built into the motherboard and maintains the necessary parameters when the voltage is wasted. Every program helps to improve the stability of interaction between the operating system (OS) and PC devices.
The Bios entry is activated when the system starts and a message appears on the monitor informing about the beginning of the acquisition. Press the F2 key to go to the setup menu.
Respect! All motherboards are adapted to the pressure of the "DEL" button - the correct operation is written in the lower part of the screen.
There are a number of menu options that vary depending on the order of the main and additional items. We would like to respect the latest version of Ami, which consists of the following key sections:
- Main– indicates the clock parameters and the total number of disk drives;
- Advanced– changes port modes, memory and helps to restart the processor;
- Power- Regulates food;
- Boot- Immerses in the parameters of attraction;
- Tools- Special adjustments.
Respect! The present section of the Boot configuration configuration allows you to adjust parameters that maintain system fluidity and configure the keyboard and mouse.
After completing the work or familiarizing yourself with the Bios Setup Utility menu, you need to press the Exit key so that it is lit, automatically saving the change.
Rozdil Main - Main menu
Let’s start with the robot in the MAIN section, which is dedicated to changing the hard drive settings and adjusting the clock displays.
Here you can independently set the time and date of the computer, as well as set up connected hard drives and other storage devices.
To reformat the hard drive mode, you need to select the hard drive (for example: “SATA 1”, as shown in the picture).
- Type - This item indicates the type of connected hard drive;
- LBA Large Mode- provides support for storage volumes over 504 MB. Thus, the recommended value here is AUTO.
- Block (Multi-Sector Transfer) - For automatic operation, it is recommended to select the AUTO mode;
- PIO Mode - Enables the hard drive to work in the old data exchange mode. Here the AUTO vibration will be most beautiful;
- DMA Mode - Gives direct access to memory. To obtain greater read and write speed, select AUTO;
- Smart monitoring - This technology, based on the analysis of robotic accumulation, has been developed in advance Mozhliva Vidmova disk from the nearest one;
- 32 bit Data Transfer - This option means that the system uses a 32-bit mode for exchanging data with the standard IDE/SATA controller of the chipset.
Using the additional ENTER and arrow keys, the Auto mode is set. Please note that there is a 32 Bit Transfer application that will require the Enabled setting.
Important! It is necessary to avoid changing the “Storage Configuration” option, which is located in the “System information” section, and not allow correction.SATADetectTimeout".
Section Advanced - Additional adjustments
Now it’s time to set up the basic PC nodes in the ADVANCED section, which consists of several sub-items. You will first need to set the necessary processor and memory parameters in the system configuration menu Jumper Free Configuration.
By selecting Jumper Free Configuration, you will be taken to the Configure System Frequency/Voltage section, where you can select the following operations:
- automatic or manual launch of the hard drive - AI Overclocking;
- changing the clock frequency of memory modules -;
- Memory Voltage;
- manual mode for installing voltage to the chipset - NB Voltage
- change port address (COM, LPT) - Serial and Parallel Port;
- installation of adjusting controllers - Onboard Devices configuration.
Section Power – PC Life
The POWER item indicates that the PC is active and there are a number of devices that require further adjustment:
- Suspended Mode- Automatic mode is set;
- ACPI APIC- Installation Enabled;
- ACPI 2.0- Fixed mode Disabled.
It is recommended not to change the APM configuration, but to adjust the storage axis entirely in the Hardware Monitor subsection, which at the same time allows access to temperature modes and regulation of cooler wrappers.
Rozdil BOOT – keruvannya zavantazhennyam
The most important thing is to take care of additional parameters in the BOOT section. Here you can select the priority storage device, choosing between a flash card, a disk drive or a hard drive.
If hard disks are selected, the priority hard drive is selected in the Hard Disk sub-item. The most important PC configuration is installed in the Boot Setting section, where you can place a menu that consists of several points:
Winchester vibe
The most important PC configuration is installed in the Boot Setting section,
- Quick Boot- Fast forwarding to the OS;
- Logo Full Screen– turning on the screensaver and activating the information window to display information about the acquisition process;
- Add On ROM– installing blackness on the information screen of modules connected to the motherboard (MT) in the slots view;
- Wait For 'F1' If Error- activation of the primus pressure function F1 at the time of identification by the grinding system.
The main responsibility of the Boot section is to ensure that the designated devices have the necessary priorities.
Respect! If you want to limit access to your PC, then set a password forBIOS in a childSupervisorPassword.
Section Tools – Detailed adjustment of the main parameters
Let us pay attention to the basic points that are important to require adjustments during the operation of the PC.
- ASUS EZ Flash– with this option, you can update the BIOS from such storage devices as: floppy disk, Flash disk or CD.
- AINET– by selecting this option, you can retrieve information about connections to the cable controller.
Section Exit - Exit and Saving
With special respect, you need to add the EXIT item, which allows 4 operating modes:
- Save Changes- We save changes;
- Discard Changes + EXIT– it is deprived of factory settings;
- Setup Defaults- Enter parameters for processing;
- Discard Changes– we cover all our actions.
The following instructions will explain in detail the meaning of the main sections of the BIOS and the rules for making changes that can improve the productivity of your PC.
Hello dear prepayers and guests of the site. In this article I want to talk in detail about the BIOS microprogram. It is known what it is, what values it contains, its functions, and how to configure BIOS to install any version of Windows.
What is the BIOS subsystem?
First, I would like to talk about the settings of the BIOS, and then about adjusting the parameters.
BIOS– This is a basic input/output system, which is a set of microprograms that are located in independent dynamic memory CMOS. This phrase is translated like this: Complementary Metal-Oxide-Semiconductor(complementary metal oxide conductor - CMOS). The BIOS indicates the status of all components in the PC configuration, and indicates the launch of the operating system. When the system starts, the BIOS launches the firmware POST If all the components (disks, RAM, video card, processor) are tested, if everything is good, then the interest will continue. If the BIOS has noted a problem with the internal device, you will feel the characteristic beep or else it is not accepted. You can read about BIOS beeps.
The BIOS chip is located on the motherboard. Of course, the BIOS deployment on different boards will be different, but it is typical for the reinstallation to rely on non-volatile memory - a round CMOS battery. There are two types of such microcircuit on the system board:
- EPROM– the data on the board will be reduced due to the addition of ultraviolet radiation, and the BIOS microcircuits were relevant before. Contagious vikorist type
- EEPROM– the data is erased following an additional electrical signal.
What is the POST self-test program?
POST– This procedure is even more important if the computer is hidden. BIOS for additional POST to carry out testing of equipment for malfunctions and malfunctions. Hard drives and SSDs are checked, system bus frequencies are adjusted, and equipment such as video cards, sound cards, monitors, disk drives, random access memory (RAM) and external device connections are adjusted.
By the way, after the additional POST, a lot of tests are carried out, clicking to check the hardware, and if something is wrong with one of the components, the BIOS displays a confirmation message on the screen and a sound signal. If the tests are successfully completed, you will hear almost one sound signal – a squeak. As a matter of fact, the system unit has a special speaker. There is no such thing on laptops.

Moreover, the BIOS allows you to customize a lot of parameters that will help you install Windows or a new device, as well as some. There are too many secrets and nuances of working with this technology that cannot be included within the framework of this article. Therefore, I recommend that you read the miracle book. 1000 and 1 BIOS secret A.V. Kubin P.A. Dmitriev. In this book you will find a lot of information on how to work with BIOS, including all types of software – AMI BIOS, AWARD BIOS and Phoenix BIOS.
In fact, BIOS is a very old technology, as it has survived in an unknown way until the present day. I want to use the latest technology - BIOS UEFI. Created in 2007 jointly with Intel, Microsoft and AMD. Unfortunately, it is not possible to update the original BIOS to UEFI.

I wrote a report about this type of BIOS.
Briefly about BIOS sections
Now I’ll briefly talk about the main sections of the BIOS, which covers all the basic settings, including installing Windows.
Main
In this partition you can configure the system time and date, disk drive parameters, POST program type options, keyboard and OS. The Main item is found in the AWARD BIOS or AMI type.
Tse korisno:

Advanced
In the section you will find options for the processor, memory, setting the bus frequency and changing port parameters. In general, this section is for enthusiasts who are involved in overclocking.
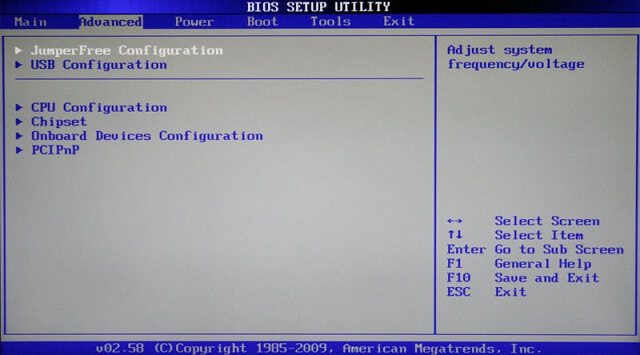
Boot
This is the part we need today. Here we can set up the procedure for storing devices – disks, flash drives and other devices. In simple words, in order to gain access from an inserted USB flash drive with Windows, you need to install this device in the first place.
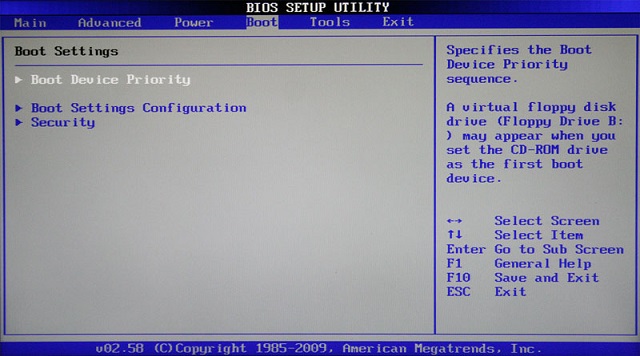
Power
At this point you will find options that affect the energy efficiency of your PC. Here you can monitor your computer's operation and set the hour of your PC's shutdown or shutdown.

Exit
The remaining section, which indicates exiting the BIOS. Here you can exit without changing your settings, as well as your savings. In addition, you will find it here. We read about this for sending, as it is good.

Customizing the BIOS for installing Windows and other programs
The axis we moved to the main topics of our statistics. To begin with, you will need to go to the BIOS, but on different models of motherboards and laptops it will work differently. Read the article. More login information is in your passport before the motherboard, I’m sure you’ve saved it.
Let’s say you’ve used a simple method in the BIOS, now follow the additional arrows and go to the Boot tab. There you will find the option Boot Device Priority.
There are 3 attachments for the little one. To use an optical disk, you need to put the CDROM in the first place, and if you want to use a flash drive, then naturally USB will be in the first place.

If you have a different type of BIOS, with completely different configuration and expansion of options, then the device priority parameters are found in the section Advanced BIOS Features.
In which section will you find the subsection? First Boot Device, which indicates the first acquisition of devices when the PC is hardened. Next comes the Second section, which represents another device, and Third, the third device.

Saving settings can be accessed on the main BIOS screen for additional options Save & Exit Setup.

Tweet
Let’s say you have a valuable Windows disk in your hands. Or anti-virus disk Dr.Web LiveCD. Or perhaps you want to install Linux. You insert the disk into the computer, but the power suddenly fails: What should you do next? Because there are some misconceptions (for now) about the use of the computer, the food supply is not one of the first. Experienced computer users also need to know about the installation procedure in different BIOS versions. Well, my instructions are suitable for everyone.
Well, let's face it: we need to tell the computer which disk it wants us to use first. For this you need to set up the BIOS. How to earn money - read further.
How about pushing the button?
The greatest nutrition is due to the unprepared koristuvach. How to get money from a bad disk or flash drive?
Two decisions:
- Open the device menu with a list of connected devices and select from the list as required.
- Adjust the BIOS of the motherboard so that the operation of the operating system comes first from the required device, and not from the hard drive.
Option 1 Simple, but not all BIOS support this menu. If you're in a bad mood, try Varto. Make sure the menu appears when you press F11 or F12 immediately after turning on the computer. Above – Esc, F8 or other buttons. Sometimes you try to push it, but sometimes it gets wet. At this time, read the instructions for the computer's motherboard.
Option 2 This will be done in the first place - customization is practical in the skin BIOS. I will tell you about the adjustment.
We need to spend some time before setting up the BIOS. BIOS (or abbreviated as UEFI) is a special system that is installed immediately after turning on the computer. The BIOS is not stored in Windows, no matter what, since it is located on a memory chip soldered into the motherboard. You can read the report on terminology.
To enter the BIOS setup, you need to press the Delete, F2 or Esc button 1-3 seconds after turning on the computer. How to find out what the press button is: after the PC is closed, look for the Press Del to enter Setup row on the screen (you can replace Del with F2 or another key). This is what I will write about - like the push button. Butt:
Instead of the black screen with the diagnostic text, the logo of the laptop or motherboard manufacturer may be displayed, and the prompt will look like this:
Before speaking, on the remaining two screenshots there are hints for the button for the important menu (aka click simpler) – on the first one Esc, on the other F12. Let me remind you that this option is shortest, if not always present.
There is no writing on the beautiful screens of many laptops, so look at the table of keys
We press the required button and press it into the BIOS. If you press that button, nothing bad will happen, because... The computer will simply ignore your actions or show you another BIOS that is not what you need. Then you need to press Reset (restart button on the system block) or Ctrl Alt Del to restart the computer.
After pressing the required button and the BIOS screen appears, we are faced with a surprise - there are many BIOS versions, the settings for them look different. And the good news is that all the stinks most often lurk at new points, so you can get rid of it, no matter what. There are two BIOS versions, which are very different from each other, we will look at them below.
Please note that similar tips are in the instructions for your laptop or desktop computer's motherboard. If you don’t have instructions from the paper, you can always access this page of the model on the official website of the manufacturer.
After reading this article and admiring the explanatory illustrations, you will be able to set up downloads from the Windows installation disk on any computer.
Popular BIOS version. Vaughn, zocrema, on rich Acer laptops:
We need to get to the Boot section. Emboss the right arrow three times:
Before us is a list of devices that you can get interested in. On your computer, the names of the rows will vary, but the first two words will tell you what the device is:
- IDE CD – CD/DVD drive
- IDE HDD - hard drive
- USB HDD – portable hard drive
- USB KEY – flash drive.
Be sure to select the first disk drive (the row that starts with the IDE CD), then. change the priority of attraction, use the up/down arrows to see this item, then click F5/F6(on some versions of this BIOS you need to press - or else), put it first on the list. It will be something like this:
Shchob save embossed, embossed right arrow, please go to the menu Exit(Exit), select menu item Exit Saving Changes(Exit and save changes) and then press Enter.
Note: the Sign out without changes option allows you to exit the BIOS without saving your settings.
The computer will restart, and instead of the Windows backup, the backup may be retrieved from the selected drive. Then, for example, the installation of Windows will end. Misia vikonan!
The main menu of the Bios looks like this:
Press Enter, turn to the front side, adjust, go to Second Boot Device(Another fancy device) and we install it there Hard Disk– you can allow your computer to play normally when you insert a DVD or flash drive.
We press Y on the keyboard, then Enter – the settings will be saved, the computer will be reset.
Ready! Now, when a hard disk is inserted, the computer will start flashing right in front of the hard drive itself, and not behind the hard drive. If the disk is not inserted, I will attach the next one to the list.
Old version of AWARD BIOS
I was so familiar with old computers before 2003. The main menu looks like this:
To configure the boot order, you need to go to the BIOS FEATURES SETUP menu:  Paragraph Boot Sequence indicates the order of attraction. Buttons PageUpі PageDown(or Enter and with arrows - unfortunately, I can’t verify) you need to insert the first CDROM, the other C (the hard disk), the third is not important - insert whatever.
Similar to the fortune-telling AWARD BIOS. Most often it says BIOS Setup Utility without the usual names.
Use the "right arrow" button on the keyboard to navigate to the tab Boot:
On the Boot page you need to go to Boot Device Priority:
Here are the points 1st Drive, 2nd Drive- “The first vantage device”, “Another vantage device”. You need to open 1st Drive and specify CDROM (for the drive) or USB (for transferring from a flash drive), in 2nd Drive specify SATA or IDE, depending on which hard drive and which item will be available in the menu.
Another AMI BIOS
Everything has become clearer here, marvel at the picture:
Buttons and – You can move through the menu items by pressing the button F10 Click on the option to save settings.
Nutrition and types
IN: I can't enter the BIOS settings. What is it timid?
IN: Make sure you are doing everything right. 99% of problems occur due to failure to read the instructions. Everyone is confident that they should correctly feed the almighty Google: “the model of the motherboard/laptop is adjusted.”
IN: Having adjusted the trace, the message “NTLDR is missing” appears, or the evil cursor blinks on the side of the screen.
IN: You wrote the original disk or flash drive incorrectly.
IN: How can you get attracted to a flash drive (or a portable hard drive) rather than a DVD?
O1: You need a USB-HDD, USB-ZIP or Removable for your setup. The name of the item may vary. If you have problems, read the instructions before paying for the payment.
O2: Since the BIOS does not support storage from USB devices, you can create a backup DVD from Plop Boot Manager and, if it is enabled, enter the “USB” item in the menu. The advantage of this method is that on older computers, where USB is mostly used in USB 1.1 mode, it will be faster to switch to USB 2.0 mode. Minus - again, it’s not always possible to get excited about these kinds of motherboards. A report about Plop is written
IN:How can I get a flash drive?
IN: If you need a flash drive with installation of Windows 7 or 8, then in the section
IN:The system does not have instructions for how to configure the BIOS. Please write please!!111
IN: Between motherboards, where UEFI is used instead of BIOS, Windows has a large number of different connections, but not really new screens with settings. So, when setting up, you need to do the same thing, or carefully read the article above and find similar items in your BIOS, or read the instructions for your motherboard/laptop.
IN: Having adjusted the BIOS, we are now ready to not bother with anything. Help!
IN: In 10 cases out of 10, the problem is the lack of importance or incorrect creation of a valuable flash drive/disk. Remove the BIOS settings or get the batteries out of the way vimknegogo computer or the Load Default Settings menu item. Then learn again by carefully reading all instructions.
IN: When you are about to use the flash drive, a blue screen appears.
IN: You started here to make peace with the unlocked flash drive. Read the instructions carefully or look for other ways to create fancy flash drives richly.
IN: Having purchased a new disk/flash drive, configured the BIOS, you still can’t get rid of the hard disk.
IN: Either the backup disk/flash drive was prepared incorrectly or the backup was set up incorrectly. If you are unable to carefully read the instructions, think: what would you do better? Is it possible to get angry with the people in charge (at the service center)?
Visnovok
For additional information from this article, you can run downloadable disks on any computer or laptop - either a LiveCD, an installation disk with Windows or Linux, or a flash drive (as the BIOS supports downloading from a USB device їв).
On today's computers Check the BIOS version (or UEFI) for other purposes, beautiful menus and other things. Regardless of the outside appearance, everything is guided by the very same principle that I live above.
Do not forget after installation (or you are still setting up the BIOS) to turn the settings back so that the computer is normally connected to the hard drive!