Hyper v installed programs on a virtual machine. Backup and update of the virtual machine. Creation and adjustment of a virtual machine
Hyper-V is a virtual machine from Microsoft, based on a hypervisor, with hardware support for virtualization for 64-bit systems. Previously, the hypervisor was limited to Microsoft server operating systems.
Microsoft Hyper-V only works on 64-bit Windows operating systems, in Pro and Enterprise editions, in Windows 8, Windows 8.1, Windows 10 operating systems, as well as in server operating systems (Windows Server).
The editions of certain operating systems have the Hyper-V component, which is optional. Users can install a Hyper-V virtual machine without installing third-party virtualization programs (for example, VirtualBox) on their computer.
Hypervisor Hyper-V
The virtual hypervisor (Hyper-V) allows you to create a virtual machine for installing a guest operating system. Using a virtual guest operating system, you can learn how to work in a new operating system, test setup, experiment, install unknown programs, etc.
The hypervisor is primarily designed for server operating systems, so the Hyper-V virtual machine has several exchanges: daily support for sound cards and CD/DVD recording, in addition to exchange, compared with competitors, visual parameters on editing, no possibility of direct copying or pasting files between real and guest systems, etc.
For testing, it’s not the most important thing, but the ascetic adjustments of Hyper-V, for some business enthusiasts will be more to the soul, less similar to the adjustments of more advanced competitors.
Please be aware that with one-hour operation of real (host) and guest operating systems, the resources of one computer are consumed, so it is not good for you to try the work in a virtual machine on a weak computer. When working with a virtual OS, do not use resource-intensive programs on a real computer, so as not to disturb the computer’s operation.
The article will look at the installation and configuration of Hyper-V in the Windows 10 operating system. In Windows 8.1 or Windows 8, configuration is carried out in a similar manner.
Installing Hyper-V
The first thing you need to do is turn off the Hyper-V component. Go to the “Windows Panel”, then “Programs and Components”, click “Windows Components or Windows Components”.
In the “Windows Components” window, check the box opposite “Hyper-V”, and then click the “OK” button.
After searching for the required files and changing them, you need to restart your computer.
From the "Start" menu, under the "Windows Administration" folder, you will open the classic program Hyper-V Manager. Launch the program on your computer.

In the Programs window, click on the computer name; the right hand will open a column with a list of commands that are available from the “Actions” menu.

Now you can set up an Internet connection.
Click on the item “Virtual Switch Manager”. In the next window, in the “Create a virtual switch” section, select the “National” switch type and click the “Create a virtual switch” button.

Next, in the “External network” section, come up with a name for the virtual switch, and then from the list of available network adapters, select the adapter that is suitable for connecting to the Internet on your computer. After selecting settings, press the “OK” button.

In advance, please wait for changes to be made on the computer.
Creation of the Hyper-V virtual machine
To start the process of creating a virtual machine, go through the following path: menu “Action”, “Create”, “Virtual machine...”. Next, the virtual machine creation master will open.
At the first window “Getting Started”, click the “Next” button. At the next window “Enter a name and location”, give a reasonable name for the virtual machine that is being created (I named it “Windows 7×64”), and select a location to save it.
After installation, the virtual machine files are saved on the “C” drive in the “ProgramData” folder:
C:\ProgramData\Microsoft\Windows\Hyper-V\
On my computer, virtual machines are saved not on the system drive, but on another drive in a special folder (Virtual Machines). If you want to save the virtual machine somewhere else, check the box next to the item “Save the virtual machine in another place”, and then select a folder to save. Create a folder to save virtual machine files away.

In the “Enter generation” window, “Generation 1” is selected for the selection, which is suitable for most types. “Generation 2” is not popular because of all images, in fact, it is a virtual machine with UEFI.

In the “See memory” window, you need to select the memory that is visible for this virtual machine. I saw 2 GB of memory on my computer out of 8 GB.

In the next window “Setting up the network”, select the network adapter (virtual switch) first.

The “Connect virtual hard disk” window will display information about the name of the virtual machine, which is located on the hard disk, about the amount of disk space that is visible for the virtual machine (after considering the There was 127 GB, I chose 50 GB).

In the “Installation Options” window, you can select an installation option for the operating system: install later or select an installation option.
To install the OS, select “Install the operating system from a purchased CD or DVD.” Here, select “Physical CD or DVD” to install the system from a disk placed in the optical drive, or select “Image file (.iso)” to install the operating system directly from the ISO image of the OS located on the computer.
Using the “Look…” button, I selected the image of the Windows 7 Ultimate SP1 x64 operating system, installed on an external hard drive that is connected to my computer.

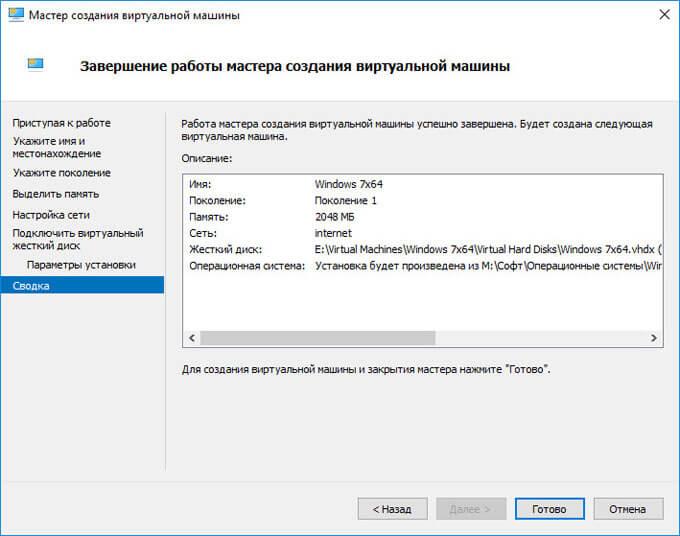
The “Completing the creation of a virtual machine” window displays the configuration of the created virtual machine. Click the “Finish” button to complete the creation of the VM.
After the setup has stopped, the created virtual machine will appear in the "Hyper-V Manager" window and the setup will be displayed.

To start the installation process, see the virtual machine, select “Connect...” in the context menu.
In the window, go to the “Action” menu, select the “Start” command, or simply click on the green “Start” button.

Once the installation of the operating system is complete, the guest OS is ready for use. This image shows that my computer is running the Windows 10 operating system, and the window is running a Hyper-V virtual machine running the Windows 7 operating system.

In a virtual machine, you can take snapshots of the virtual system (checkpoints) in order to save the state of the operating system for the next period of time.
You can create a checkpoint from the program window; you can add checkpoints (renew the virtual machine, delete unnecessary points) from the “Checkpoints” section in the Hyper-V Manager.
File sharing in Hyper-V
The Hyper-V virtual machine does not perform dragging and copying of files between physical and virtual operating systems in the same way as is implemented in VMware Workstation or VirtualBox. The exchange of data between the guest and systems installed on the PC can be carried out using additional border folders.
Create and configure a sleeping folder in the real operating system to access the sleeping folder from the virtual system. Then create and configure a sleeping folder on the virtual machine to access the sleeping folder on the real system. Read how to do it.
Once the setup is complete, you can exchange data step by step, transferring files from the computer to the storage folder on the virtual machine, or, in turn, from the virtual machine to the storage folder in the operating room. systems on a computer.
Visnovki statistics
The Hyper-V virtual machine from Microsoft is installed in the Pro and Enterprise edition in 64-bit operating systems Windows 10, Windows 8.1, Windows 8. After installing and configuring the Hyper-V hypervisor, create and install the virtual machine from a guest operation a new system for software testing, as it does not interfere with the main operating system installed on the computer.
A new version of Windows Server 2016 has recently been released. At the same time, it has also updated Microsoft's computer-free hypervisor - Windows Hyper-V Server 2016. As always, the initial setup is complicated and not obvious, so you have to tinker a little to get the functionality you want.
Enter
Then proceed with the installation in the standard way, as if it were a different system. Become interested in the ISO image and follow the instructions of the installer. There are some nuances or problems with this, so installing a hyper-v server does not exist, so I will not comment on your respect. I will be grateful for the end of the installation. I came up with something like this:
In this case, I could not earn or choose anything. I'm clicking ctrl+alt+delete And there was a proposal to set the administrator password. I completed the installation, the installation was completed, and I was presented with the standard management interface:
If you close this window for any reason, you can click it in the command row for an additional command sconfig.
Setting up Hyper-V Server 2016
Now let’s start by setting up Hyper-V Server 2016 via the standard Windows console:
- Indicate the work group if you are not in control of the standard.
- We are changing the server name to make it more meaningful and understandable.
- Add another administrator. You will need to create another administrator account, the administrator account. Next, I recommend that all settings and connections be filed under this cloud account.
- Remote communication is allowed, including ping.
- I’ll add automatic updates to your thoughts. I hum and pay everything by hand.
- I recommend that you immediately check the update and install it.
- Remote Desktop is enabled using all client versions.
- The adjustment of the boundary is indicated. The default is dhcp, I recommend setting the address statically.
- Adjust the hour, as it is wrong to stand behind the promotional items.
- Telemetry adjustment cannot be turned on completely. Such Microsoft. Don't be surprised by the innovations in the remaining versions of the system.
We've just completed the basic setup of hyper-v server 2016. Now we'll immediately start installing virtual machines, but, unfortunately, we won't be able to earn any money yet. We need to properly connect to the server behind the additional control panel. Still available to us only rdp access, but that's not enough.
Remote connections and servers Hyper-V Server 2016
Connect via rdp to the server so that you can manually copy and paste other commands in the command line. At the console cmd let's go to powershell, simply by entering the command:
Powershell
Enter commands to adjust permissions on the firewall for remote browsing:
Set-NetFirewallRule -DisplayGroup "Windows Management Instrumentation (WMI)" -Enabled true -PassThru Set-NetFirewallRule -DisplayGroup "Remote Event Log Management" -Enabled true -PassThru Set-NetFirewallRule -DisplayGroup "Remote Volume
Now let's move on to the client system. Let me guess what I think is Windows 10 Enterprise. You need to access it under a cloud account with the same parameters created by the hypervisor. Give the same kind of koristuvach and practice under him. This requires a mental connection to directly manage the server, its services, the disk subsystem, etc. To connect only to manage the hyper-v role with the server, it is not obligatory, in the end I will tell you how to do it.
We'll make a record of the file first hosts from the hyperv server. In my configuration, this entry looks like this:
192.168.1.100 hyperv2016
Convert from the client machine to ping the hypervisor to your name. Now we need to make sure that the settings of the edge adapter indicate that the connection is connected to a private edge. This is necessary in order to ensure that the maximum detection of devices is ensured. Language axis about what:
Behind the scenes, this parameter is disabled for private spaces and disabled for hidden ones. You can either turn it off for those who are behind the scenes, or change the private connection parameter to private connection. You can get it from your partner's section of the ceramic panel:
I didn’t immediately know where to earn money, so I’ll show you. We continue to configure the host for connection to hyper-v server 2016. Launch cmd as administrator and we turn into tension. Let's enter the command:
Winrm quickconfig
Press firmly and then chew. Enter the command that allows the connection of remote systems:
Winrm set winrm/config/client "@(TrustedHosts="hyperv2016)"
In this application, hyperv2016 is the name of the hypervisor.
When copied, the command is directed to increase the strength on single and double legs. Notes may change during copy/paste times. As a result, you withdraw your pardon at the hour of the team’s defeat. Whenever necessary, edit them manually.
Now you need to change one more parameter. We are launching equipment dcomcnfg.exe, having entered the cmd command. The equipment is equipped with a component service.
The sequence of actions shown in the image is shown. Then it is necessary to install standard equipment for hyperv. For whom are we going to Windows Panel -> Programs -> Windows Components or Windows Components. Choose there Construct Hyper-V then install it. The installation is now complete and you can connect to the remote server:
If you have done everything correctly, you will connect to the server and you will be able to interact with it.
Let's talk about one more nuance. You can connect to a remote hyper-v server, as long as you do not operate under the same cloud account, which has administrative rights on the hypervisor. When connected, you can enter the parameters of another device. In order for this to be possible, it is necessary to log out of low activity both on the server and on the client. For now, you need to change one setting in the local computer policy. For which we add the cmd command gpedit. It is possible to equip the server with local computer policies. Let's go down the road: Computer configuration -> Administrative templates -> System -> Cloud data transfer -> Allow the transfer of new cloud data with only NTLM server authentication. Include this and add the entry:
Set-Item WSMan:\localhost\Client\TrustedHosts -Value "hyperv2016" Enable-WSManCredSSP -Role client -DelegateComputer "hyperv2016" !}!}
Now you need to make some changes on the hypervisor itself. Connect to a new rdp, go to cmd, launch powershell and finish the commands:
Enable-PSRemoting Enable-WSManCredSSP-Role server
After this, you can work under your original computer, or connect to hyper-v server 2016 under another cloud account and use it.
They worked hard. Now we can freely connect to the hypervisor. Forgetting to remember how to connect to the server itself, how to look at the list of disks, services, read logs, etc. It's really easy to give up. Log in to the computer under the same cloud account as the administrator on the hypervisor. Launch the standard equipment “Keruvana Computer”, select a local computer, right-click the mouse and select connect to another computer:
Write the server name and connect to a new one. All sections of your computer are available, except Device Manager. I can’t wait to connect until now, I’m sorry. I clearly don’t understand what’s wrong and how to correct it.
Setting up virtual switches
Before we can install virtual machines, we prepare a framework for them. I don’t know much about the nuances of robotic boundaries in hyper-v. This is not the topic of streaming news. Easy to create hemstone bridge for virtual machines. In the management tool, select the right hand “Virtual Switch Manager”, select the “External” type. Specify the name of the switch. I recommend giving meaning to the name, so that it would be simpler later. If there is a bridge in the local network, call the virtual switch local.
Save your adjustments. You will learn in advance about those that will be dropped as soon as possible. Everyone, hang on, hang on. A new virtual edge interface will be created using the same adjustments that the physical one had. There is one important aspect here. If your server has configured the settings via dhcp, it will automatically assign a new IP address for everything. May tse na vazі.
Creation of virtual machines
We have just finished setting up Windows Hyper-V Server 2016 and are ready to start installing virtual machines. You will also need to transfer the iso image to the hypervisor. Everything here is very simple. We open the disk in Explorer on the computer using the standard capabilities of Windows machines, create the ISO folder and download the required image.
I also recommend that you use some kind of file manager for manual navigation through folders on the hypervisor itself. It would be better to vikorist the ported version. You can launch this manager through the command line by connecting to rdp
Now everything is ready to create virtual machines. Get a bunch of test ones, and then we’ll start backing them up.
Backup of Hyper-V virtual machines
I already heard about the program earlier. It works miraculously with Windows Hyper-V Server 2016, and the article is completely up-to-date. To use the program, it is necessary to install it on the hypervisor .Net Framework 3.5 For more help, use the powershell command:
Install-WindowsFeature NET-Framework-Core
The program is, of course, monstrous, it takes a lot of time, it takes a long time to install, but there are no problems. Everything can be set up easily and clearly through the program interface. After installation, launch the program. Add a new server:
Specify that you are a Standalone Hyper-V server, add cloud data, and check that the installation of required components on the hyperv server is complete. After this, you can create a backup copy of the virtual machine. To do this, select the hypervisor, virtual machine you want to backup and right-click on it. Select VeeamZIP:
Next, specify the location where the backup and everything will be saved. Start the task and check for completion of the process. Backup is possible in any place where there is access from the machine, as Veeam itself is installed. You can connect the edge drive and backup to a new one.
Connecting to Hyper-V Server 2016 with Windows 7
Let's look at another option for connecting to a cost-free hyper-v, if you have a Windows 7 operating system. You will need to create a virtual machine, or change the settings of the current one, shut down the robot, or finally start it. The Hyper-V management hardware cannot be installed on Windows 7. The 5nine Manager Free program will come to help. You can download it either from the designated site, but registration is required after you receive an email to download the file with the license. For normal installation you need .NET Framework 4.5 or higher. If there are no installations in the wine system, then the installer is simply no different than installation, without saying why. I had a chance to read the manual to understand why it’s okay to install the program on one computer, but I don’t want to install it on another.
Since there is no standard equipment, this program varies. I myself often complain for my needs.
Visnovok
Having tried to look at all the most significant aspects of working with a computer-free hypervisor from Microsoft. Having not yet tested it in the robot and especially not being impressed with the innovations, it was not time yet. Marveling at the new sight at the test stands. You can compare him with the cost-free hypervisor on kvm - proxmox, which I looked at in my article.
The greatest advantage of the rest is the ability to install a software raid. I have never tried to install a Hyper-V server on a software raid, I really don’t know what’s possible. Also, you can only vikorize it there, where there is a hardware raid, or in test variants. I especially never install hypervisors for production on single disks. Reshta on the right zvichki and handiness. At proxmox, I need to use a web browser. There is no need to install anything on your computer. Once installed, the hypervisor is immediately ready for use.
online course “Linux Administrator” to OTUS. The course is not for beginners; to enter, you will need basic knowledge about installing Linux on a virtual machine. The start period lasts 5 months, after which successful graduates of the course will be able to have interviews with partners. Let me give you this course:
- Knowledge of Linux architecture.
- Mastering current methods and tools for analyzing and processing data.
- It is important to select the configuration according to the necessary conditions, manage the processes and ensure the safety of the system.
- Introduction to the main working tools of a system administrator.
- Understanding the features of the throat, configuration and maintenance of systems based on Linux.
- It is important to quickly detect problems that arise and ensure stable and uninterrupted operation of the system.
It’s no secret that Windows Server 2016 includes Hyper-V virtualization. Regardless of the fact that at the time of writing this article only the Technical Preview 5 version is available, in it you can even get to know the new functionality, which I will briefly describe in this article.
I would like to point out that everything said is valid for the pre-release version and may be revised as of the official release.
If you like the topic of Windows Server, I recommend going to the tag on my blog.
The function of nested virtualization has been available in hypervisors of various vendors for a long time. For example, VMWare implemented support for 64-bit embedded virtual machines in the ESXi 5.1 version as early as 2011, not to mention support for 32-bit embedded OSes that were available earlier. Other vendors also did not show up. Tim no less, Microsoft could not provide such functionality until today. Why? It was not possible to find an official answer, but we can either talk about the zagal position (not a priority at that time of the day), or about the daily logical demise - in 2008 there was a movement with the release of Windows Server 2008 and on In 2008 R2, talking about embedded virtualization was not entirely relevant. Even the hypervisor was already in a lot of trouble directly (for example, the max. vCPU was limited to 4 pieces), and the situation with competitors was such that Microsoft, in essence, was actively harassing them.
Architecture
Classic virtualization of the first type is a hypervisor that separates access to ownership between a single host and multiple guest partitions. When only one virtualization level is available - Level 1 - and any nested virtual machines (VMs in the middle of a VM) are not transferred. In a typical way, the architecture looks like this:

Previously, the attempt to activate the role of Hyper-V in the middle of the virtual machine inevitably ended with a smile:

This was due to the fact that the hypervisor was deliberately masking from the guest OS sets of hardware instructions (Virtualization Extensions), which represent virtualization - Intel VT-x and AMD-V (all of which are remembered, so Hyper-V is a hardware-based virtualization system without supporting the functionality on the side, the “climb” is not practical).
Now the architecture has changed in such a way that it is possible to transfer sets of hardware instructions to the guest OS (this functionality is excluded from implementation):

All this reveals the possibilities of embedded virtualization, which is not surrounded by another level (Level 2 in the figure above).
Note: In laboratory minds, I absolutely calmly ignited a virtual machine with a fourth level of investment.
Even though it is a new technology (in this case, it is new for Microsoft), it has actions, such as below.
Obmezhennya
It can be mentally divided into hardware and software.
Equipment
The hardware interfaces are supported by an Intel processor with VT-x and EPT technology. While VT-x was a standard feature for earlier versions of Hyper-V, the need for EPT appeared only immediately and only for nested virtualization:

Note: Intel EPT gives virtual machines direct access to memory, bypassing the hypervisor and essentially the technology of virtualization of memory pages. The technology is not new and can be compared to the old Core 2 Quad.
And I didn’t forget anything, without writing about AMD processors. On the right, Windows Server 2016 TP5 includes virtualization on AMD processors that is not yet supported.
Software
There are significantly more software boundaries:
- Vikoristannaya Windows Server 2016 and Windows 10 both in Batkivsky and in guest sections;
- Virtual machine with configuration version 8.0 and higher;
Note: Windows Server 2016 by changing the format for saving virtual machine configuration files. According to the vendors, the new format has become more reliable, and there has also been an increase in new functions that will not be available on selected virtual machines with the old version of the configuration (for Windows Server 2012 R2 I version is 5.0).
For embedded virtual machines the following is not supported:
- Dynamic memory;
- Dynamic migration;
- Photos of virtual machines will be saved/restore;
It is important to remember that if you decide to release virtual machine deposits from an external network, then a virtual switch will be installed on the virtual adapter of the “host” virtual machine and a virtual switch will be installed on the new one. them edge adapters, which means the MAC address, which means You need to enable MAC address spoofing on the adapter. Ce tezh u sing sensі obmezhenya.
Another workaround is to use NAT (this is a new functionality that we will discuss below).
Zastosuvannya
For those who started with embedded virtualization first, they may lose their nutrition before it freezes. I'm waiting for this report.
The most adequate scenarios are testing and development. In production, you may end up using a lot of the embedded virtual infrastructure, or you will immediately experience a drop in the productivity of the embedded instances.
It became useful for me to check the real average decline in CPU productivity among virtual machines of different levels of investment. For this reason I am a victor of Hot CPU Tester Pro. Although the testing turned out to be entirely subjective, at the very least, there is a significant drop in CPU performance:

Note: To quantify the CPU productivity index, I simply ran the test across the host on the host (with all VMs shut down), then turned on the virtual machine and simulated the index in the middle of it, seeing the maximum possible number of vCPUs. Next, we will launch a VM in the middle of the VM and adjust the productivity index in the middle of a virtual machine of another contribution.
My patience was too tired to rip through the throat of a copy of the third contribution.
Setting up
To be able to use embedded virtualization, you need to complete a series of adjustments on the host OS. Let's get started.
Updated VM version
If, for any reason, your virtual machine has a configuration version lower than 7.1 (for example, it was downloaded to your Hyper-V with the latest versions of the Technical Preview), then you can update the configuration manually by right-clicking on VM and selected Update the configuration version:

Or via Powershell:
PowerShell
Update-VMVersion -Name "vm_name"
Update-VMVersion -Name "vm_name" |

The remaining option is available for mass updates of virtual machines. You can update all VMs at once using the command Get-VM | Update-VMVersion.
Activating nested virtualization
Behind the scenes, the hypervisor still masks the hardware with instructions for virtualization, without transmitting them to the guest OS, as I mentioned earlier. To change this behavior, you must exit the command:
Shell
Set-VMProcessor -VMName VMName -ExposeVirtualizationExtensions $true
Set - VMProcessor - VMName VMName - $true |
Change options ExposeVirtualizationExtensions Only available via Powershell.
Spoofing MAC address / NAT
If you plan to configure a network of nested virtual machines in such a way that all of them are located in a real local network, then set a MAC address on one single network adapter of the “host” virtual machine. This clearly indicates problems with connections, since the adjustment is not activated Enable MAC address spoofing(and won’t be activated for umovchannyam).
Let's check the box manually:

Or via Powershell:
Shell
Get-VMNetworkAdapter -VMName "vm_name" | Set-VMNetworkAdapter -MacAddressSpoofing On
Get - VMNetworkAdapter - VMName "vm_name" | Set - VMNetworkAdapter - MacAddressSpoofing On |
If you do not plan to release VM contributions to a local network, but still want to ensure their ability to communicate across the network, you can raise NAT. To do this, you need to create an internal type virtual switch using the command (currently setting up NAT is only possible via Powershell):
Note: Since all configuration has been carried out so far on the host OS, then NAT needs to be configured in the middle of the virtual machine.
Shell
New-VMSwitch -Name "NAT 01" -SwitchType Internal
New - VMSwitch - Name "NAT 01" - SwitchType Internal |
Creating NAT:
Shell
New-NetNat -Name "name" -InternalIPInterfaceAddressPrefix "ip-address/netmask"
New - NetNat - Name "name" - InternalIPInterfaceAddressPrefix"ip-address/netmask" |

Please note that at this stage it is necessary to identify yourself with the submersion, as you will need to follow the NAT. Of course, the address range does not have to interfere with the real ranges in your local network.
Indicates the address for the interface.
The third leader in the software market for virtualization of operating systems – VMware, VirtualBox and Hyper-V – the remaining hypervisor sits in a special place. This is especially true because Hyper-V is a standard component of Windows server systems and some versions of Windows for desktop PCs. By sacrificing VMware Workstation and VirtualBox in functionality, cross-platform and often ease of use, Hyper-V, protea, without sacrificing their advantages. And the main thing among them is the productivity of guest operating systems.
Below is information about activating Hyper-V in Windows 10 and creating a virtual machine using its hypervisor.
1. Hyper-V – standard hypervisor from Microsoft
The standard Hyper-V component of the Windows 10 system was phased out in versions of Windows 8 and 8.1, and their hypervisor migrated to Windows Server. Both Windows 8.1 and Windows 10 optionally transfer the Hyper-V component to the Pro and Enterprise editions. The hypervisor is less efficient on 64-bit systems.
For a long time, Hyper-V did not support other guest operating systems other than Windows. Microsoft recently made a joke about hypervisor support for Linux guest OS. And today, with the help of Hyper-V, you can test Linux distributions, including the popular Ubuntu.
2. Vimogi to robot Hyper-V
The minimum amount of RAM on a physical computer for Hyper-V is 4 GB.
The computer processor supports SLAT technology (Intel EPT or AMD RVI). Almost all modern processors demonstrate this.
This is also possible for the processor, which also carries a wide range of current models - support for hardware virtualization technology and, obviously, the active state in the BIOS. In the BIOS of motherboards for Intel processors, this technology (depending on the version) can be called differently - Intel VT, Intel Virtualization Technology, Intel VT-x, Vanderpool or Virtualization Extensions. AMD's hardware virtualization technology is called AMD-V or SVM (Secure Virtual Machines). For example, in AMI BIOS version 17.9, the hardware virtualization function of an AMD processor can be found under the heading Cell Menu - CPU Feature - SVM Support.

For AMD processors, the hardware virtualization function is always enabled. Any specific processor model supports hardware virtualization, which can be found on the websites of Intel and AMD.
3. Activation and launch of Hyper-V
Hyper-V is available optionally with Windows 10 Pro and Enterprise. The regular hypervisor is disabled for the first time. It turns on in the “Programs and Components” section of the panel. The best way to get there is an internal search.

Launch “Increasing and turning on system components.”

At the end, which appears, a check mark indicates all the items under Hyper-V. Printed "OK".

The system will stall for a few seconds and ask you to re-enable it. After restarting, the shortcut to launching the Hyper-V Manager appears. The Hyper-V Manager shortcut can be easily pinned to the main screen of Windows 10 by following the Start menu admin options.

Access to the Hyper-V Manager shortcut can also be denied using additional internal system search.

Launch the Hyper-V Manager.
4. Adjusting access to the limit
In Hyper-V Manager, the network is configured in the next step, and now you need to create a virtual switch – a parameter that allows access to the network. Simply click on the name of the physical computer, and on the right side of the window select “Virtual Switch Manager...”.

The virtual switch creation wizard will start, and you will first need to select the type of network. There are three:
- External - this type of network card or Wi-Fi adapter of a physical computer connects the virtual machine to the very edge where the physical computer is located. This is obviously the type of network that transfers access to the virtual machine to the Internet;
- Internal – this type provides a connection between a physical computer and Hyper-V virtual machines, but does not transfer their access to the Internet;
- Private - this type allows you to create a connection between Hyper-V virtual machines, but without a physical computer or access to the Internet.
For our type, virtual machine access to the Internet is necessary, so we chose the first type – external network. The symbol “Create a virtual switch.”

In the power window of the virtual switch, you can assign a name to it, which could be, for example, “Merezheva card 1”. You can add a note to the virtual switch. If the physical computer has on board both a network card and a Wi-Fi adapter, the specific device for which the virtual machine will connect to the network, you can select from the list that appears in the “Connection type” column. After watching them, click “Zastosuvati” at the bottom of the window.

5. Creation of a virtual machine
Now you can print the directly created virtual machine. On the left side of the Hyper-V window, select the same as before under the name of the physical computer. At the top of the right corner is embossed “Create”, then – obviously, “Virtual Machine”.

The vital window of the master, which is launched, is embossed “Dali”.

Set the name of the virtual machine; You can also change the location on the disk of a physical computer by specifying the required disk partition and the required folder using the additional browse button. Embossed "Dali".

One of the new features of Hyper-V is the choice of virtual machine generation. Our breed has 2 generations.

What does this mean? Generation 1 – these are virtual machines that support 32- and 64-bit Windows systems. Generation 1 is combined with earlier versions of Hyper-V.
Generation 2 – virtual machines of a new format using built-in UEFI-based software. Such virtual machines provide low levels of new capabilities and therefore provide a small increase in productivity. On generation 2 virtual machines as guest operating systems, 64-bit versions of Windows 8.1 and 10 are installed, as well as server servers Windows Server 2012, Server 2012 R2 and Server 2016.
The UEFI platform provides another feature for virtual machines of generation 2 – advanced UEFI. This point needs to be clarified by obtaining the ISO image from the Windows distribution and third-party downloads on the Internet. It’s best to download Windows distributions from official Microsoft devices. Thus, the Media Creation Tool utility, which downloads Windows 8.1 distributions from the Microsoft website and, as a result, creates a compelling ISO image that supports the UEFI middleware.
If you have Windows 10 installed as a guest OS, this method of extracting the ISO system image is recommended. Windows 10 transfers the installation process with the option of a later entry. In our version, as a guest OS, Windows 8.1 will be installed, and its official distribution, which is selected using the Media Creation Tool, requires entering the product key during the installation process. To ensure support for the UEFI system and quickly and cost-freely protest the Windows 8.1 system, use the TechNet Software Trial Center website. On this site you can download the English-language edition of 64-bit Windows 8.1 Enterprise and test the system freely for 3 months. The problem with the lack of Russian language support after installing the system can be solved by installing the Russian language package and adjusting the Russian main system.

Let's turn to the master of the virtual machine. In the Memory View window, it is not possible to install parameters if the physical computer has no more than 4 GB of RAM. If you have more than 4 GB, you can increase the display that is visible when the virtual machine starts. For guest Windows XP, the RAM display can, for example, be changed to 512 MB. Embossed "Dali".

In the window for setting up connections in the list, select a virtual switch before creating it. Embossed "Dali".

In the window for connecting a virtual hard disk, you can specify the name of the virtual machine, the desired location on the computer disk, and the specified size. These are the parameters for creating a new hard drive. Another point to be taken into consideration is if the computer already has a virtual hard drive, with a guest OS installed. When choosing a generation 2 virtual machine, the file of such a virtual hard disk is in VHDX format (not VHD), and the guest OS is in UEFI format. Embossed "Dali".

Once you have selected the option to create a new virtual hard disk in the first step, you will soon be on your way to the Windows distribution kit. Generation 2 virtual machines do not transfer data from a physical CD/DVD drive. Those who are interested in the distribution of the guest OS may be deprived of the package and the ISO image. Our video has an ISO image. Embossed "Dali".

The final stage of the master is the “Ready” stamp.

6. Virtual machine connections
Having created the virtual machine, go to the Hyper-V Manager window. Now you need to connect. For this purpose, the “Connect” command is among the other commands in the context menu that can be clicked on the virtual machine. The “Connect” command is on the right side of the Hyper-V Manager window. To connect, you can also double-click with the left mouse button on the last-first selected virtual machine.

The connection window has an embossed green start button.


The initial process of installing Windows 8.1 is as it would have been on a physical computer.

Once you have finished copying the installation files, you can close the window for connecting to the virtual machine and use other rights.

When you close the connection window, allow all resources of the physical computer to shut down and continue to run in the background for your virtual machine. These working indicators are displayed in the Hyper-V manager.

You can connect to the virtual machine if necessary.
That's it - Windows 8.1 is installed. You can turn off, suspend, save the virtual machine, or reset it using commands in the Hyper-V manager or using the buttons on the top panel of the connection window.

7. Priority of attraction
To avoid spending an hour trying to download a CD/DVD when starting a virtual machine, you need to open the settings window and select the ISO file with the distribution. Please refer to the DVD drive settings for the virtual machine.

An alternative option is to upgrade the hard drive to the DVD drive (other than the “bootmgfw.efi” file). Please visit the deposit “Vbudovane PZ” to improve the equipment.

In both cases, changes can be saved using the “Save” button below.
8. Bypass the Hyper-V connection window
The main focus of the Hyper-V hypervisor is the productivity of virtual machines, not functionality. In contrast to their competitors - VMware and VirtualBox - Hyper-V virtual machines do not operate from connected flash drives, do not produce sound, and interaction with a physical computer is only possible by inserting a middle guest of the OS text copied to the main OS. This is the price of productivity of Hyper-V virtual machines. How to use the default Hyper-V connection window.
Full integration of a physical computer and a virtual machine can be achieved using an additional standard utility for connecting to a remote desktop.

This utility allows you to customize connection parameters, making them available in the middle of the virtual machine not only connecting to a physical computer via USB storage, but also outside the hard drive partition.

Connecting to the virtual machine in this way ensures that the guest OS supports sound and two-way file transfer.
Have a wonderful day!
De know how to activate hyper-V. Creation of a virtual machine and installation of the operating system.
Every new release of Windows brings not only new features and ways of working, but also new problems. One of these problems is the promotion of craziness with older software.
Windows 8.1 Pro and Windows 8.1 Enterprise use Hyper-V virtualization technology. This technology is the remaining Microsoft virtualization client for transfers from Windows Server. And it’s strong enough to start working on your old security program again.
However, the complexity of very old software does not support virtualization, since it still has its own, based on the stability of software, updating for the throat, and the security of the development minds, What are we setting up for koristuvachiv, obezhenya.
Uvaga. For convenience, Hyper-V is only available in 64-bit versions of Windows 8.1 Pro and Enterprise.
Please note that virtualization is an additional function and is not used by primary users. This does not mean that you will always damage your Windows installation, but you still need to be careful.
There are many reasons for choosing a virtual machine. And one of them, as it was written above, is a replacement for outdated software. If you need to use Windows XP properly, but not Windows 8.1 software, install a copy of Windows XP in a virtual machine and continue to use the software.
The VM can be used for testing scenarios. Let's say you want to install a patch or update the software on your computer, rather than interfering with other software. To change the risk and impact of software security, first turn it over to a virtual machine.
- Click the “Next” button and proceed to configure the VM.

- Name your VM and select a location to save your data. After installing Windows 8.1, you are advised to save them in the same section as the Windows installation. Select section. Press "Distance".

Uvaga. Saving the virtual machine on another disk that is dedicated to installing Windows 8.1 includes a backup image, reducing the size of the copy. Another plus is the ability, when the system is reinstalled, to “pick up” VM parameters that were not affected. However, rotating the VM in one partition with the installed copy of Windows also has its advantages, for example, being included in the backup image.
- One of the improvements in Hyper-V technology for Windows 8.1 is a new type of virtual machine file container that supports the function of various storage options. Generation 2 is completely compatible with Windows 8 and Windows 8.1, as well as Windows Server 2012. However, it does not work on older operating systems. If you want to use a virtual machine on computers running Windows Server 2008, select generation 1 and save money.

- Set the required amount of visible memory for the virtual machine. The size depends on the type of operating system running in it and the capabilities of your PC.

For example, to install a Windows XP virtual machine, 512 MB of RAM is enough. However, if you plan to use it with graphical work, you will need more memory. If your computer has 4 GB of memory, you do not need to specify more than 1 GB for the virtual machine. If you have 8 GB, you can add 2 GB.
The same is true for dynamic memory. This function allows the VM, at times of need, to automatically see additional memory. You can choose this option as a cinnamon, otherwise you will be victorious if necessary. Click the "Next" button.
- Adjust the settings for the virtual machine. Why do you need to select from the drop-down list of previously adjusted measurements? Click the "Next" button.

If you want to completely isolate the operating system, there is no need to configure a border adapter for working with a VM.
However, this does not only completely isolate the virtual machine from the outside world, but also prevents you from opening files and documents on your computer. You will no longer be able to access the virtual machine from a remote desktop.
Uvaga. At this time, you will not be able to add a network connection, because Hyper-V networks are likely to be configured independently from other VMs. Virtual machines can exchange information in individually configured networks, which give them access to the Internet, to a local computer, or even to other virtual machines. In this case, with a virtual switch installed and configured, you need to install integration services in the VM.
- Connect a virtual hard disk. This side of the master allows you to specify the size of the virtual hard disk. Depending on your needs, the size can be increased or changed. An alternative option is to attach an existing virtual hard disk. Click the "Next" button.

- Install the operating system. You can get it from a floppy disk, CD, DVD, USB flash drive, or ISO file.

- Confirm the entered data. Click the "Done" button.

- Start the virtual machine. In the Hyper-V Manager, in the upper central area, you are now running your VM. Click on it. To connect to a virtual machine, at the bottom half of the right panel, click the “Connect” option.

- Open the Action menu and select to launch the Start virtual machine.

After starting the virtual machine, you will run a window with a virtual OS, which is in the middle of it.
When you start the virtual machine, you will see a dialog box with connection parameters. Where do you need to supply the screen you want to use to start the virtual machine? The screen size is changed step by step until you reach your new screen size. It is important to start a VM as long as you work in it, without going to the extent of changing the separate monitor part of the virtual machine. At the bottom of the dialog box there is a “Show parameters” button, which includes basic settings, including audio for the VM.
