Web server extension module. Install the Web server extension modules. Publication of databases on a web server
For the work of Agent 1C: Link, the presence of the installed 32-bit extension modules of the Web server from the distribution kit 1C: Enterprise.
Please note that you may need administrator rights to install web extension modules.
After installation it is necessary to restart Agent "1C: Link".
Try this:
On the PC with the Agent, open the wizard panel (for Windows 7) and go to the "Programs - Software and Components" section, as shown in the small box below. For Windows XP - open the Kernel panel and in it - "Installing that remote program".
Next, select the version 1C: Acceptance from the list of programs, if you win, then press the "Change" button. You can also select "Change" from the context menu, so that you can right-click the mouse on the row of programs in the keying panel. The same is true for Windows 7, and for Windows XP.

You can check the version of the platform 1C: Acceptance by clicking on the icon "About the program" at the 1C program window.

Select the Web Server Extensions option as shown in the thumbnail below.

In case you have a version of the platform "1C: Enterprise 8" installed on your computer, you can download it from the site https://users.v8.1c.ru/distribution/
Detailed information about the installation and adjustment of componentsplatform "1C: Enterprise" available in chapter 2 kerіvnitstva a administrator "1C: Pіdpriєmstvo".
For the 1C:Enterprise system 8. For this article, we can look at the process of publishing the server of the configuration repository on the IIS web server to enable access to the folders, the server that is being served, behind the protocol http(otherwise https).
1. Installing the server of the "1C: Enterprise" configuration collection 8
First of all, it is necessary to install the server of the configuration gallery itself, so that the publication is created without intermediary for the server and already for the help of the new one it is necessary to interact with this collection. Read the report about it in the article:
2. Installing the IIS web server
Next, you need to activate the IIS web server in order to log in to the Windows warehouse, as it was not disabled earlier. The web server and the server of the configuration gallery can be installed both on the same machine and on different computers in the same local area. When installing shoes, it is necessary to select components:
- General HTTP Features
- Static content (Static Content)
- Document for locking (Default Document)
- Directory Browsing
- HTTP Pardons (HTTP Errors)
- Development of programs (Application Development)
- ASP.NET 3.5
- .NET Extensibility 3.5
- ISAPI Extensions
- ISAPI Filters
- Correction and diagnostics (Health and Diagnostics)
- HTTP Logging (HTTP Logging)
- Request Monitor
- Zasobi management (Management Tools)
- IIS Management Console (IIS Management Console)
A report about the installation of the IIS web server in various operating systems of the Windows family can be read in the following articles:
After the web server is installed, on the computer running the IIS server in the browser at the address http://localhost, the start page may appear ( Default Web Site) web server of a different version.
3. Installing extension modules for the 1C:Enterprise web server 8
On the same computer where the IIS web server is running, it is necessary to install extension modules for the 1C:Enterprise web server version 8, similar to the version of the configuration repository server. In addition, at the time of writing the article, the server of the configuration gallery could be less than a 32-bit add-on, so the web server extension modules must be installed from the 32-bit distribution kit of the 1C: Enterprise system 8.

A report about the installation of components in the 1C: Enterprise 8 program can be read at the article:
4. Improved access to extension modules of the 1C:Enterprise web server 8
In order for the IIS web server to be installed on the front side by the 1C:Enterprise 8 web server extension module, it is necessary to give new rights to the directory with these components (for locking C:\Program Files (x86)\1cv8\ for "1C: Enterprise" 8.3 that C:\Program Files (x86)\1cv82\ for 1C:Enterprise 8.2) group IIS_IUSRS.
For this click, right-click on the desired directory and select " power» (Properties) from the context menu.

At the vіknі authorities go to the tab " Bezpeka" (Security) and press the button " Change» (Edit…), to change official permissions. Seeing each other is allowed for this catalogue. At the new onslaught it is stashed under the list " Groupi chi koristuvachi» (Groups or user names) button « Add"(Add..), and in the case of a choice of groups, abo coristuvachіv is pressing" Dodatkovo"(Advanced...).

Let's push the right-handed button " Poshuk» (Find Now), after which the required group is selected IIS_IUSRS at the table of results, I ask that it’s pressing “ OK».

Group IIS_IUSRS to appear at the list of groups or koristuvachiv. Give me more rights to select a directory and press " Zastosuvati» (Apply) to save money.

5. Creating a configuration file
Let's proceed without delay before publishing the previously installed configuration store server to the early IIS web server. Let's take a look at the fact that the catalog has taken care of the site Default Web Site web server (for locking C:\inetpub\wwwroot) we are creating a catalog for future publications, let it be a catalog for im'yam repository.

And then we will create a file from extensions in this catalog .1ccr(Come on, for an analogy with a directory, there will be a file with names repository.1ccr) and zі zmіstom:
De<Name of the Server> im'ya merezhі or IP-address of the computer, on which the server of the collection of configurations is running.

6. Programming for IIS
Now, launch the Internet Information Services (IIS) Manager and open the tabs " Website" (Sites) - " Default Web Site»Mostly a catalog that we created at the front stage. Let's remake this virtual catalog for an addendum. For this, click on it with the right button of the mouse in the context menu, select the item “ Convert to supplement»(Convert to Application).

After that, it is necessary to create a sample for this virtual addendum. For which next you see an addition at the tree, the connection and at the end of the authorities, select the item “ Record keeping»(Handler Mappings).

At the vіknі zіstavlennya obrobnіv v menu « Dії(Actions) right-handed select the item " Supplementing the script with substations(Add Wildcard Script Map…).

Vіdkriєtsya vіkno adding a new obrobnik. A new one has a way to the extension module of the 1C:Enterprise web server, and to the library itself wsisapi.dll, which is saved in the catalog bin, directories, appointed time for the installation of the components of the 1C: Enterprise system in this instruction. It is also asked by im'ya obroblyuvacha that onslaught " OK».

We add the ISAPI extension as it is allowed to the list of ISAPI and CGL extensions by pressing " So»(Yes) at the vіknі, what happened.

Because of this, a lot of contributions, the collector is guilty of appearing on the list of records in our virtual program. I lost more than enough to add to the vikonannya of this obrobnik. For which click on the new one, right-click the mouse in the context menu and select " Change allowed functions.»(Edit Feature Permissions…).

At the vіknі allowed, scho vіdkrylos, we set the ensign at the field " vikonannya» (Execute) and pressing « OK».

As I wrote earlier, the configuration repository server is a 32-bit program. Obviously, it is necessary to allow the pool of add-ons that serve the virtual directory to the robot with 32-bit programs. To look at which pool serves a specific virtual directory, you need to right-click in the connection tree, select " Addendum management» (Manage Application) - « Additional parameters»(Advanced Settings…).

The window has the parameter " Pool of donations» (Application Pool) that designates a pool of add-ons, which serves as a virtual directory, in this case DefaultAppPool. For each other, you can change, at the time of consumption, given the value of the parameter.

In order to create a pool of add-ons for robots with 32-bit programs, it is necessary to add yoga to the add-on pool available on the tab " Additive bullets" (Application Pools) near the connection tree, right-click on it in the context menu and select " Additional parameters…»(Advanced Settings).

Change the parameter " Allowed by 32-bit programs» (Enable 32-Bit Applications) to value True.
It is necessary to remember (!), when this happens, the pool will no longer work correctly with 64-bit programs. So, if you have 64-bit programs on your web server, for example, that are served by a 64-bit web server extension module, you should create an okremium add-on pool, allow on the new 32-bit program and install it as a pool for the streaming virtual directory.
Having set the necessary parameters, tisnemo " OK».

7. Connection to the collection
Well, the axis, all the components of the 1C:Enterprise system are installed, the IIS web server is installed and you can go directly to the work of the repository, the server of the configuration repository for the protocol that is being served. http. To create a collection (you can read about the creation of a collection in the article ""), that connection of information bases to a collection must be written to the address of the form:
http://<ИмяВебСервера>/<ИмяПриложения>/<Файл.1ccr>/<ИмяХранилища>
For example, for the parameters that are featured in this article, they can be like this:
http://WIN2012R2/repository/repository.1ccr/Accounting
http://localhost/repository/repository.1ccr/Accounting
or navit like this:
https://website/repository/repository.1ccr/Accounting

Chi helped you chia article?
p align="justify"> Operating systems of the Linux family with skin rock are calling for more and more interest among 1C: Enterprises, especially after the release of the platform for the most popular distributions. In most cases, Linux wins as a server platform for 1C, and in the rest of the hour, more and more often workstations based on the operating system. If you add such a working station with a web server, then you can easily organize remote access to infobases that are similar to the file mode.
Regardless of simplicity, improving web access to file databases is more complicated, lower to server databases, it is necessary to correctly set access rights for all participants in this scheme. Official documentation to give sparingly visvitlyu tse nutrition, to that lower we attach special respect to you:
After publishing, it is necessary to set the correct name, in the name of which Apache is started, the rights to the file directory to be iconized (/opt/1C/v8.3/i386/ for the 32-bit version or /opt/1C/v8.3/x86_64/ for 64-bit version) of a specific version of the 1C:Enterprise system (read and see). At the time of the file version of the infobase, it is necessary to give rights to modify the directory of the infobase to the coristuvachev, depending on which web server is working.
Again, let's take a look at the report of all the participants in our scheme. The key role is occupied by the information base, the rights to modify all the clients that are connected to it, as well as the files of the platform, to which the web server access is to blame.
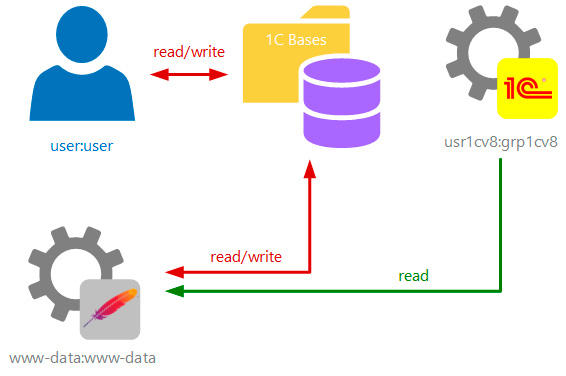 Let's get out of the platform, it's spreading out in /opt/1C ta maє vlasnik usr1cv8:grp1cv8, such a recording format is permanently live in Linux and denotes a link koristuvach:group. To be precise, the web server needs access to read and write to a single platform file - the library wsap24.so(For Apache 2.4).
Nabagato tsіkavіshe z іnformatsiynoyu base, spochatku її vlasnik є local koristuvach user:user who is also a member of the same personal group. By default, you may have all necessary access rights to the database (read and write). Similar rights are also due to the mother of the web server, which works in the name www-data:www-data.
Іsnuyu ways to run Apache in the name of the required koristuvach, but in practice it was explained that 1C does not work mpm-itk, to launch as a web server launches as a system server, it is practical to immediately after the launch of the database you will have the following pardon: Session daily chi vanished.
 It’s time for you to guess what rights are restored in Linux for koristuvacha, groupieі reshti, rights for zamovchuvannyam, fallow in the system, deshcho vіdіznyayutsya. For їхнє recognition vіdpovіdaє such a parameter yak umask, rudely seeming, tse mask, as a requirement to see the povnih rights, to take away the rights, to zastosovuyutsya for the mind. On Ubuntu umask dorivnyuє 002
, while in Debian 022
, again, dialing standard rights in Ubuntu/Debian will 775/755
for folders 664/644
for files.
It’s time for you to guess what rights are restored in Linux for koristuvacha, groupieі reshti, rights for zamovchuvannyam, fallow in the system, deshcho vіdіznyayutsya. For їхнє recognition vіdpovіdaє such a parameter yak umask, rudely seeming, tse mask, as a requirement to see the povnih rights, to take away the rights, to zastosovuyutsya for the mind. On Ubuntu umask dorivnyuє 002
, while in Debian 022
, again, dialing standard rights in Ubuntu/Debian will 775/755
for folders 664/644
for files.
Dial 775/664 grants read/write rights to both the Vlasnik and the group, and 755/644 - Tіlki vlasnik. In this way, Ubuntu will need to set the standard permissions for our purposes, and in Debian it is necessary to change umask on the 002 .
If you are right, then you will need to turn on the web server to personal groups one by one, as well as the web server to the group of the master of binary files 1C. Theory has understood, let's move on to practice.
Web server extension installed
Let's take into account that you already have a platform installed, according to our signature. At this time, we need packages 1c-enterprise83-wsі 1c-enterprise83-ws-nls from server delivery. Please note that the version and size of these packages is due to the version and size of the installed platform.
Copy the assigned packages from the appropriate folder and install it with the command:
dpkg -i 1c*.deb
Please pay attention that this command is to install all the packages from the in-line distribution with the mask 1s *, so be respectful and change your mind, because there is nothing wrong with it.
Let's install the necessary vlasnik for the platform:
Chown -R usr1cv8:grp1cv8 /opt/1C
on which the installation of the web server module is completed.
Installed Apache 2.4
Starting from the 8.3.8 platform, a update to the current version of Apache 2.4 has been added, now there is no need to downgrade the package version, as you win over an earlier version of the platform, then you will need to be described to downgrade Apache to version 2.2, as in our article.
Also, we categorically do not want to win an instance of Apache, which is won for 1C: Enterprises for other purposes, as we already bachili, 1C turned out to be insane mpm-itk In addition, 1C can freely download configuration files, ignoring virtual hosts and adding its directives directly to the main Apache configuration file.
Obviously, you can manually fix everything beautifully, but for the sake of increasing the cost of administrating when adding new databases, the smartest solutions will be seen for the 1C cloud instance of Apache.
Yogo installation is carried out by one single command:
apt-get install apache2
no additional adjustments to the package are made.
Setting up the necessary access rights
How do you vicorist Debian, then first for all next change umask system on 002, for which open the file /etc/pam.d/common-session and add a row to yoga ending:
Session optional pam_umask.so umask=0002
Let's turn on the backing of the web server of the 1C group and the streaming backing of the system:
Usermod -a -G grp1cv8 www-data
usermod -a -G user www-data
Also, enable the streaming koristuvach to the web server group:
Usermod -a -G www-data user
de zamist user slid vikoristuvati im'ya flow koristuvach.
If necessary, set the rights to the folders with infobases, let's say the stink is in /opt/1C_bases:
Chmod -R u=rw,g=rw,o=r,a+X /opt/1C_bases
Having finished setting the rights, re-attach the server.
Publication of information base
The publication of the database can be reached in two ways: through the Configurator and through the help of the command line. Below we look at insulting ways.
Before publishing, we create a directory for it in the working directory of the web server, for locking /var/www, we publish Accounting 3.0 to that we call the directory acc30:
Mkdir /var/www/acc30
Let's run 1C:Principality with rights, for which in the terminal in the name of the supercoder vikoite for a 32-bit system:
/opt/1C/v8.3/i386/1cestart
for 64-bit:
/opt/1C/v8.3/x86_64 /1cestart
It is standard for the launch of 1C, for which reason in the Configurator we will need a database. Let's go to Administration - Publication on the web server and remember the small form:
 In the field Im'ya I can tell you aliasіnformatsiynoї basi, yogo vy nabiratimete in the address bar of the browser for access to da ї base, it does not follow robiti yogo dovgy or unruly. Web server- everything is clear here, in our mind Apache 2.4 and nareshti, Catalog- here you should designate the directory of the publication, as we did earlier, do not stray її with the working directory of IB. Because you don't cheat on the OData interface and Web services, you don't need to publish them.
After filling in all the required fields, press the button Publish then wait for the suggestion to restart the web server.
To publish from the command line, go to the directory with 1C binary files, for a 32-bit system, viconite:
Cd /opt/1C/v8.3/i386/
for 64-bit:
Cd /opt/1C/v8.3/x86_64/
Why run the utility webinst with the following parameters:
./webinst -publish -apache24 -wsdir acc30 -dir /var/www/acc30/ -connstr "File=""/opt/1C_bases/acc30/"";" -confpath /etc/apache2/apache2.conf
At first glance, the syntax is foldable, but really, everything is simple, let's take a look at the skin parameter:
- publish- indicate the necessary action, at the time of publication, there may be omissions, shards for locking.
- apache24- Specify the type of web server, for Apache 2.2 select apache22.
- wsdir- im'ya alias of the publication, ie to the base of the trace from the browser.
- dir- way of publication, we have created a directory at the working directory of the web server
- constr- a row of files is made up of three parts, the skin of which is taken into the paws: "File =" - indicates the file base, "/opt/1C_bases/acc30/" - path to the IB directory, ";" - Service symbol.
- confpath- path to the web server configuration file.
Chown -R www-data:www-data /var/www
Now we can try to launch the database by going to it in the browser to the hostname or IP address, adding the required alias through the slash, on the local machine you can type http://127.0.0.1/acc30.
Dekilka words about productivity
In a good way, here is the final paragraph of the article with bells and whistles, but our material is incomplete without the productivity of this decision. Since web access in file mode sounds like a small undertaking, then the role of a web server is most often played by a great office PC. In yoga roles, we won a virtual machine, which we saw two cores in Core i5-4670 and 4 GB of RAM, which looks like a bad office machine.
Although the power supply did not die out of the processor's disk resources, the amount of operational memory did not please us. The following shows the system in a row after the advancement:
 Then we launched two instances of the database (one for the web client, the other for the thin client) locally and two instances on the scale:
 Like a bachimo, the memory of the system ran out, and it went to the swap, and if you improve a little bit in the databases, then the download file will quickly end. With this, krim 1C, nothing else is running on this PC, which is not typical for a typical office machine. Empirically, we explained that a skin session with such configurations as Business Accounting 3.0 requires 1 GB of RAM.
Good, close all the sessions, but what about?

Just briefly, earlier 1C web services worked like that. when launching the web client on the skin, or turning it to the web service, the Apache working process was launched, which zavantazhuvav module 1C, and after the completion of the work, vivantazhuvav yoga and curled up itself. The shortfall of such a method is a high overhead for launching and completing the process.
Now the web service robot model supports a FastCGI add-on that runs once and continues to run after the session is completed. To quote the retailers 1C:
Sessions in the pool are sorted by service type, service name, password/password, shareholder value, and secure mode. Until then, the bullet can have a few sessions with the same value of reclaimed requisites.
When a call is made, the platform reverifies, what is the session, what is idle, with the confirmation of these details. Like such a session, you will be seen for the processing of a weekly. If there is no such session, a new session is created and seen for processing.
The session automatically ends after the end of the period of inactivity (Hour of Life for the Session).
What are you yelling at? And those who still run 4 sessions of the robot with the web server at once, then after the completion of the Apache work processes, continue the robot in the acquisition of new connections, and if there are no more, then after the end hour of the session, yak for zamovchuvannyam to become 20 hvilin, bude completed.
In this way, your mother will need enough operative memory to ensure one-hour work and the maximum possible number of clients who are connected at once, in another case, your system can catastrophically reduce productivity through the use of free memory. For example, the connection is of a short-hour nature, the memory for them will be "reserved" for another 20 minutes.
For small firms, we can recommend to install a total of operative memory, using 1 GB of memory for one valid 1C license, to allow the mother to have the necessary reserve of available memory and to eliminate unacceptable situations due to the inaccessibility of the server in a broken robot.
Tags:
It costs a day to wake up windows IIS webserver and publish it on a new 1c database on platform 8.3. There is nothing foldable for anyone.
In the presence of a virtual 2008 r2 enterprise server, what happens. The rights of the local administrator are different. Platform 1C 8.3.6.2041. Let's create an empty information base. And so let's get started. Join our group at VK! Under repair! Mindful master!
Installed Web Server Role (IIS)
For starters, you need to install the web server role. Vidkrivaemo Server Manager, choose zlіva gіlku Roles, embossed on the right Add a role.
We reach the server role selection and check the box next to Web server (IIS). Quietly far away. Now it is necessary to correctly select the services of the installed role. We put ticks exactly like on the screenshot below.
We bring the installation to the end. The master of adding roles is guilty in a song hour to tell us that the role and all services of the role have been successfully established:
Now it is necessary to reconsider that everything is good with us. Vіdkrivaєmo whether it's a browser that goes to the new one for the address http://localhost. We can see the axis of such a radius picture:

installation of platform and components 1c
Tse means that the web server was up and running correctly with us. So let's move on to 1s. It is necessary to put a platform. The only nuance when installing a platform is to choose:
- 1c Undertaking
- Web server extension modules
setting up access rights
We need to adjust the rights of the folder before we change the root directory of the web server. If they didn’t change anything, then you need to know the vins C:\inetpub\wwwroot. Go to folder C:\inetpub\ choose a folder wwwroot, click on it with the right mouse button and go to the authorities. Go to tab Bezpeka. Having pressed the change button, we proceed without intermediary until the permissions are set. Known to the list Groups and koristuvachi, group Koristuvachi and clicking on it, put it in the column below Allow for the group, checkboxes in the column allow.
Now it is necessary to give rights to folders from the installed 1s. Let's move on to them, for locking for the 32-bit version of 1c to lie with the papacy C:\Program Files (x86)\1cv8 for 64-bit in papacy C:\Program Files\1cv8. Also choose a folder 1cv8 go to її authority, go to the tab Security -> Change. And to replace the choice of a group from the list, we need to add a little to it. For which embossed button Add, at the window, press the button Dodatkovo.

Dali pressing on the button Poshuk and in the list you can see the result IIS_IUSRS, adding yoga with a swinging click, we are turned at the window Select "Koristuvachi" or "Groupy" ale with the already affixed group on the list. Tisnemo Ok, and turning already before the window Allow for the group put all the checkmarks in the allow field for the new group.
Having set permissions for folders with files 1c, we are left with the rest. Give group rights IIS_IUSRS flow, de in us to lie the base itself 1s.
Necessary cooking is done. Now let's move on to publication.
Publication 1c on the web server
It is necessary to run 1c in the configurator mode, selecting the required publication base. My mind has an empty base, and there is only one.
In configurator mode 1c, go to the menu Administration -> Publishing on a web server.

Marveling at the parameters and perekonavshis, what is the point, we are all in power, onslaught Publish. Since the publication went without pardon, let's move on to the rest of the crop.
setting up IIS for robots with a 32-bit 1C web server extension module
I’ll tell you that we have won the 32-bit platform and the web server extension module in 1c. Therefore, at such a time, it is even more necessary for us to allow us to win over a pool of supplements for ablutions. DefaultAppPool convert 32-bit programs. It doesn't matter. Idemo Server Manager -> Roles -> Web Server(IIS) -> Service Manager(IIS) -> Additive bullets -> DefaultAppPool. Right mouse button DefaultAppPool prompt context menu and select it in a new Additional parameters.

Shukaemo row Allowed by 32-bit programs and at the same time we put TRUE
INSTALLATION OF IIS FOR ROBOTS WITH A 64-BIT EXPANSION MODULE FOR 1C WEB SERVER
Since we have won the 64-bit platform and the web extension module, it is necessary to perform the following manipulations:
Idemo Server Manager -> Roles -> Web Server(IIS) -> Service Manager(IIS)-> I choose an addendum of transformations from the virtual catalog with the names that we set the hour of publication of the base. At the right field, go to the division Datasheets (Handler Mappings). Publication 1c 8.3 on the iis web server Publication 1c 8.3 on the iis web server
Join our group at VK!
Having already read the introductory material about the Apache server and the article that describes the difference between different versions, installed and built the server, you can proceed to look at the Apache modular system. On the right, in fact, a given web server, in fact, consists of one language module - the core (Apache Core), which is the simplest task of the server. All other functions are described in additional modules. In this material, we can see the Apache modules, which are often hacked, and so are the few web retailers.The advantage of such a structure lies in the fact that you can switch on and off add-on modules, switching on the same server configuration, which is necessary for your tasks. In this way, Apache will take up a lot of space, as much as it needs for work, and the "load" functions will not take advantage of the server's memory, making the system more savvy code.
The Apache kernel takes care of the basic functions of the server and allows you to connect add-on modules
Rozpochat rozmovu about the modules is necessary, zrozumіlo, from the core of the system. The very same add-on modules are close to the new one, like grains of cedar pea to the core. The kernel has these functions, without which Apache simply could not be called a web server. It is right to accept requests from browsers, turn them on like sides, but more than that - allow you to connect additional modules to yourself.
The delivery of the server includes a whole set of modules, which are recognized as running processes up to the job. It's no secret that most operating systems allow you to work on a daily basis overnight. The leaders of this group of Apache modules can beat all the possibilities of such systems. See the main module mpm_common, you can find the module that optimizes for skin from the most popular platforms (Windows, OS/2, BeOS, Netware, etc.).
If you want to use all .htaccess files, then you can install the mod_access module, which allows you to access directories and files on the server. With this help, you can block or, at the same time, allow access to the sing IP address of a bo.
The mod_actions model allows you to run the script for the first hour of the download to the first file type
The mod_actions module contains two directives that stop running CGI scripts. "Actions" is responsible for launching the iconized file at that moment, if the corystuvach is requesting a file of the same type. In this way, it is possible, for example, to organize the processing of the image before editing the coristuvachev or statistics. Another directive - "Script" - allows the program to be called, if any file is requested for an additional method (GET, POST or some other special one). With help, you can install a universal sample of the form, which will be around the standard ones you need. Tse mozhe buti processing of data before bringing them in to the base, overstrengthening the post, keeping statistics too much.
For redirecting that creation of aliases, the mod_alias module
If you need to use the redirect functions or recognize aliases, then you can't do without the mod_alias module. Vіn mіst іn аnу directives thаt аlѕо allow аn association а pseudonym іѕ thе song directory. For example, your image directory looks like this: /pub/we/images/, so access to the new, but not accessible via HTTP protocol. If you don't want to move it for any reason, you can create an alias: "Alias /img /pub/we/images". If you need to type in your browsers the address http://your_site/img/ , use it for the required catalog of images. By the way, such a redirect is victorious for a directory of CGI scripts.
For the help of the mod_asis module, you can see the client side "like є", without processing by the server
One more cicavia, but not too often hacked by webmasters, the module is mod_asis, which allows the client to "retrieve" files without processing by the server. For this configuration file, you need to add the line "AddHandler send-as-is asis", de "asis" - file extension. Now, if the browser requests a file with such extensions from the server, we can use it to a new one without interruption. Apache only add “Server” and “Date” identifiers to the header, reshta - for example, status - will be corrected "yak є".
Modules from the mod_auth family are eligible for authentication of cores
A whole series of purpose modules for authenticating koristuvachs on the site. Tse i zrozumilo, even the problem of security and the separation of access to dosit gostroy. We will describe only those modules, how to enter the standard installation of the Apache server, but it is significant that third-party builders created few other modules, so you can also try connecting and twisting independently.
Another type of authentication is digital (HTTP Digest Authentication), as it encrypts data with an MD5 key and is considered superior, lower base. Apache has a mod_auth_digest module that allows you to manipulate it. For you, the establishment of such an authorization is practically nothing in front of you. You will only need to use the htdigest utility to create files. The topic of authentication was raised at the same time as the creation of Internet sites in the same area. There is a lot of merit for this material, but here we tried to describe the main capabilities of the Apache server in our gallery.
Functions from the mod_autoindex module allow you to automatically create index files
Module mod_autoindex assignments for automatic folding of index files. You can also do it manually, as you created file archives, and you just need to name the files on the index side. You will not be able to do them, you will be able to speed up with the appropriate directives. For help, you can sort files, add icons to different types of files, display or attach files from specified extensions, and so on.
For additional functions from the mod_deflate module, you can grab files before overpowering the core to speed up the acquisition
In order to speed up the ability to forward compress text files from the server, you need to install the mod_deflate module. Allow me to mark the packaging of the original files before editing them. When I receive the browser, unpack the file and show it to the viewer. To allow you to speed up your weekend traffic, to speed up the download of files from the server and to reduce the delay of the coristuvach to your site. The documentation to the server has a good butt of the recommended configuration - vin to allow you to get rid of inaccuracies, as if the old browser appears at the koristuvach, which does not support the possibility of packaging, and that does not suggest anything here.
The mod_status module allows the administrator to control the server operation without additional programs. The system itself writes the file to the system, asks for a new one, reloads the server bits, locks the computer processor and other information. To install a module, you need to create a directive for the httpd.conf file:
SetHandler server-status
Order Deny,Allow
Deny from all
Allow from .foo.com
You can look at the statistics of the server in this window at the address http://your_site/server-status. It will only be available once you see a computer that is on the domain.foo.com. Vtіm, you can install other exchanges for access.
The second module, about which I would like to know, will allow you to turn your web server into a proxy server. You should try to connect to the Apache mod_proxy module and other modules from the "homeland". Apache can work in two proxy modes: direct and reverse. The direct mode allows a special setting of the browser, which allows, for example, koristuvachs of the local network to deny access to the Internet. Back, none of the addendums are disabled and access to computers is not visible, as the "call" is not visible. A typical example is access to the Internet to a site that is located in the middle of a local area.
Speaking of which, Apache allows organizing not only HTTP, but also FTP proxies with similar functions. In addition, the expanded system of directives gives the possibility to subtly divide access rights to files, to allow or to block the reception of the same types of files, and so on.
As a matter of fact, it was not possible for us to include all the possible Apache modules within the framework of one material; But, from the other side, there is not much special sensation to tell about all of them, because some of them are already well known to web retailers, and another part is needed only for a small number of people. We tried to say a little more about the needed rich modules, not everyone knows about the reasons for them.