How to build a subwoofer from the speakers. Like from a passive subwoofer, active self-tightening. Screen design for a subwoofer for help
I need a cheap and tight subwoofer for my speakers, and instead of that, I spent a lot of money on stained glass, I chose a self-contained SAB with a loud speaker in my home minds. I know a 10-inch Pioneer TS-W255C for only 800 rubles, and I can tell you how to build a subwoofer with your own hands.


What do you need:
- The old block of life from the computer
- Automobilny pіdsilyuvach (so, what can be a bridge and may be a crossover)
- Subwoofer. Here the choice is great, but the majority of car subwoofers are rotten. Joke an important magnet at the chimeric building.
- Dynamics
- 18-millimeter fiberboard to lie in the size of your subwoofer
- Dekіlka of wires for speakers
Krok 1: Design


In order to correctly design and plan such a body, I need it, I am a Google Sketchup contributor. I covered the dimensions of the case by counting the vicorist WinISD. I have a cubic-shaped body with a side of 35 cm, which made it possible to vibrate at a frequency of up to 32 Hz.
How do you know, my version has a port at the kutka. For this purpose, take the minimum possible frequency.
You need to build such a case to take the plane and the lowest frequency. WinISD - it's better to check the program, it's better for you to look at a few knowledgeable videos.
Keep in mind that the volume of the port is switched on from the volume of the case (total charges to the port and the volume of the case at once, and then re-enable)
Programs
- winisd
- The thickness of the wall and the approximate volume of the body must be developed by yourself, and not rely on the WinISD display.
Krok 2: Repair the walls of the body


Tse dosit simple krok. Cut the walls of the necessary expansion from fiberboard.
Zapobіzhnik for dynamіk I zrobiv іz neoprene - it's cheap to do it. I just pierced the area around the necessary opening with a knife, not sealing the area around the dynamics.
Krok 3: Build a port

I built the port out of a 110mm plastic gutter.
Other options are a schіlinny or a round port, but in my opinion such a pіdіyshov is the best.
Krok 4: Glue the body

I vikoristav richly glued for wood, and then creaked the body with clamps on the bottom. I didn’t vikoristovuvav tsvyakhi and gvinti, glue miraculously fit.
Krok 5: Installing the port

I glued the port to the body for additional glue and silicone sealant.
At this moment, I, perhaps, am guilty of creaking a volny kіnets, like transverse reinforcements, in order to save vibrations, but the port, zdaєtsya, dosit mіtsny. To understand the scale, you could calmly put your hand in the whole port.
Krok 6: open for speaker


I virіzav otvіr і vіdshlіfuvav yogo, schob viyshov garniy rounded edge. This image shows the size of the subwoofer. For sanding, I used a small sanding machine with sandpaper of varying grain sizes until the surface was smooth.
Krok 7: Farbuvannya to the body


The backbone needs to be primed on the surface in sprat balls. After that, I covered the body with a black farboi from a spray can.
I primed the surface the best, and then remove the hanger for the night. After that, sand the surface until it becomes smooth on the dot. Tse put on the surface of the glossy look.
Krok 8: Finishing the inner part of the body


I don’t know what kind of material, but I got it, what kind of insulation. I victorious stapler, to fix the ball of material on the skin wall.
If it is possible to increase the body less booming, the shards of the standing wind are the resonance of the exchange, which will lead to a sharp bass, but it is not necessary to add too much insulation - it is not necessary to change the internal contract and zipsuє of your rozrahunki.
Krok 9: Lively


The block of life in the form of an old PC 500 W from grounding wires and 12 V, connected at once, as well as the universal car booster Lanzar Heritage 2000 W, work well with a subwoofer.
Just connect the green wire on the power supply unit with the ground wires on the power supply, and also the power supply can REM, connect it to 12 V, so that the power supply turns on to the power supply.
Krok 10: Everything is crushed

The final product gives a wicked bass, and the 11-millimeter xmax is terribly hostile.
Zagalom, do-it-yourself viysh subwoofer for a booth is cheap - about 2500 rubles.
Possible improvements:
- The port is not bigly improved, the notes are sounding so richly on top of the lower volume, so that there is little chuvannya, but not a big problem.
- You can add some money to change the vibration.
- Check out the speaker. Yakby I robbed the lining of the fiberboard in front, I instantly drowned the speaker in the middle, so that I didn’t erase the wines, which would improve the strength.
- It is possible to put that block of life in the middle of the body, but if you don’t mind, don’t change it. You will need to fiddle with crossovers and check the temperature, but you will look better.
I have written this article especially for those who want it, but for other reasons, you cannot afford to bring a subwoofer.
I will try to be accessible, for incompetent people, to my versatility, but I can show you how much - how to build a subwoofer yourself, with your own hands.
At bagatioh my word is spinning Subwoofer, but not everyone knows what it is.
SUBWOOFER to look like two words SUB і WOOFER - as a literal translation - podnizkochastotnik, tobto. acoustic system for playing sound at low frequencies (approximately 20 to 100 Hz). Bagato is called yoga - "bass speaker". Subwoofers can be either active or passive. Active - means that in the case of the column there is a substation and a block of life, Passive - it obviously requires an active subsidiary.
Also, the text has such abbreviations:
AC- an acoustic system, yakscho simply - then a "column".
Dynamic- Vіn same guchnomovets, but the correct one would be "dynamic head".
LFO low frequency signal generator. (Pid woofers toil at high frequencies vіd 20 to 20000 Hz)
ULF- Podsilyuvach low-frequency signals.
Croc first.
Tool and material.
To prepare a subwoofer, we happen to know:
1. It’s easy to go to the end, but we’re preparing on the material side (you can do it kindly!).
2. A good, correct tool, but for itself:
- hacksaw for wood;
- chisel;
- a set of files of different caliber and type: flat, tricot, round;
- Shkirki (from small to great);
- electric drill;
- twist (you can also use a screwdriver);
- a jigsaw (more beautifully - an electric jigsaw);
- a line, a pen, an olive, an arch of paper and other office supplies;
- a pair of compasses (an eggplant with a "krill" stroke of 20-25cm);
- PVA glue joiner's chi іnshiy glue for wood;
- budmaterials for the body, and for itself: plywood for a dresser, 10mm to 20mm, or chipboard, or MDF.
- Wooden bars 20x20, 30x30, 40x40, etc.
- a mountain of screws from 10mm to 50mm, we need more of them!
3. computer, install the JBLSpeakerShop program on some kind of bagan, or else for the opening of the box.
Croc is different.
Options guchnomovtsіv (dynamics).
Kozhen from us may be named, nickname, according to the father. Leather from us may have unique drawings of appearance, color of eyes, wand of fingers, little eyes of eyes. There is nothing in the world of the same people. So you don’t have the same dynamics, you can have your own unique parameters from them. So, if you take two identical speakers from one plant on the same day - their parameters will vary, obviously not rich, but the difference can be important. First of all, and before that, before we start preparing a subwoofer, it is our responsibility to improve the main parameters of our speaker. Chi bought yoga in the store, twisted it into an old speaker, or pulled a friend from the garage, you need to change the characteristics of yoga. Nadalі, for tsimi parameters, we choose the type of box for the subwoofer.
The parameters necessary for the subwoofer's sounding are recorded on paper and saved until the moment when the sound quality of the prepared "boom-box" is satisfied.
So let's do it. Shards in most of the known programs for the opening of boxes in the AU, the Till-Small parameters are used, and we will be virakhovuvaty themselves.
In order to expand the screens, we need the following parameters:
Pnom- Nominal pressure of the speaker, which should be induced in the brass head (75GDN-1 75W).
fs- The frequency of the wet resonance of the speaker in the open space.
Fc- Resonant frequency at a closed box.
Qts- Povna quality factor at the resonant frequency.
Qes- electrical quality at resonant frequency.
Qms- mechanical quality factor at resonant frequency.
Vas- Equivalent obsyag dynamics.
D- Effective diffuser diameter.
Xmax- Maximum usunennya diffuser.
The principle may need other parameters, but it is still enough for the cob of roses. To change the parameters, you need a calculator, a voltmeter (or rather a digital multimeter), a low-frequency generator, a hermetically sealed box of liters by 20, and also have a chance to prepare a clumsy attachment.
LF generator - you can take it, for example, G3-109 or similar. Since there is no generator, you can also use a computer. To the line output of the sound card, it is connected to the power supply, and to the output of the power supply, through a resistor in 1KOM, it is possible to test the speaker. The tension of the resistor can be 2W and more, otherwise it will be very hot. On principle, everything is ready. As a substitute for the generator - a computer, it is necessary to download the program - LFO, there is a large number of them.
So let's do it.
The speaker is moved to the skewer in the center of the room to the stele, it is possible for the chandelier, or in any other way, the smut would not be entrusted to be any objects, or you can stick to the accuracy of the vimiryuvannya.
We connected it, we started the LFO program, we set the frequency to 1000 Hz. On the computer, the volume is set to the middle position, in order to prevent the formation of a signal. connect a multimeter to the output of the switch. Adjusting the thickness on the power supply, setting the voltage to 20V.
Respect! Now it is categorically not possible to adjust the volume either on the substation, or on the computer, or on the LFO.
Connect a voltmeter directly to the speaker. We set the frequency of the generator approximately 5-10Hz and smoothly move the frequency following the indication of the voltmeter. We need to know the resonant frequency of the speaker, at this frequency the voltmeter will show the maximum voltage, then change more often. Later, the voltmeter showing the maximum value - we write it down in our sheet like Umax. Then we record the frequency of the generator, on which the maximum value of the voltage is fixed, where Fs is the resonant frequency. Now it is necessary to know the minimum value of the amplitude. We start again smoothly increase the frequency Fs until the voltmeter reading stops changing, we write the value as Umin, with a further increase in frequency, the amplitude will increase again, but it doesn’t matter to us.
 Now we know a little bit of parameters in our head, but only a single cob. For the help of a generator and a voltmeter, we can induce a graph of the frequency response of the images. On the new one you can see Umax - the current stress at resonance, as well as Fs - the resonant frequency - the peak on the graph. Umin mi tezh knew, but what do you say Uср you and what for F1 and F2?
Tse frequencies, from which we will determine the quality factor of the speaker. Previously, I entered the qi parameters manually, following the formulas Uav, Qts, Qes, Qms. Now it's the TSCalc program, you need to get it right at once - get it. Pratsyuvati with her simply, substantiate the meaning - we take the result. For the cob, Rmax is required, for which we multiply Umax by 1000 and write down the value of the sheet. It is also necessary to measure the opir dynamics to the constant strum for the help of an ohmmeter, we will write it down as Re.
Now the value of Rmax is imaginable and Re is known to the program by Rx. Dilimo Rx by 1000 and take Uav. Now we know F1 and F2. Let's start by changing the frequency Fs "down" and if the voltmeter shows the voltage Uav write F1, now only "up" Fs and write the value F2. Now the value of Fs, F1, F2 is presented to the program. I take the values of Qes, Qms, Qts.
The time has come for the box prepared behind the back. We take our speaker and fasten it to the box with a magnet called, for whom there is no fundamental difference, it’s just so handy. Now we know the resonant frequency again, but we can write it down as Fc. Substitute the value of Fs, Fc and the value of the box, or take the value of Vas - the equivalent value of the box.
Well, the axis of principle and everything. The effective diameter of the diffuser is the most appropriate for the additional sound line. Don't forget to write down the value of the sheet.
Just blame the difficulties on the world, otherwise you won’t get a different result - you can speed up with the characteristics that go to the “sheet” at the same time as the speaker, or the official factory characteristics.
Crook the third.
See the boxes.
Now we have є dynamics, є real parameters, you can proceed to the selection of the box.
I want to disappoint you once. The type of the case is selected according to the parameters of the speaker. I don’t insist that I don’t see that screen on the other hand, whatever you want, it just might not sound the same as it would have sounded on the “native” screen.
Otzhe, see boxes or subwoofer options.
 |
Vіlny vipromіnyuvach or Free air This option can go up to the speakers, for some Fs more than 100Hz. |
 |
Closed screen or Closed Box. Select this box as Qts tvir Fs/Qts=50 |
 |
Phase inverter or Vented Box. Choice of Qts tvir Fs/Qts=85 |
 |
Passive vibration monitor - Passive Radiator. Passive viprominuvach tse yak phase inverter, only replacement pipes viprominuvach-membrane. |
 |
Band Pass or Band Pass Band Pass can be literally translated as an adjacent pass. |
 |
Band Pass 6th order A Band Pass 6th order class A. |
 |
Band Pass 6th order B Band Pass 6th order class B. |
Whether one of these options for housings, you can choose both on one, and on two speakers.
You know the parameters of your speaker that you have already chosen for the new viide, when the hour has come for the opening of the box.
Crook quarters.
Rozrahunok screenshots.
The JBLSpeakerShop program has been unpacked to the root folder of the disk. Let's start the setup.exe file from the DISK1 folder. After the installation is completed, enter the path of another part of the DISK2 archive. Installation completed.
Launch the program Start => Programs => JBL SpeakerShop => SpeakerShop Enclosure Module.
I don’t report about the program, it’s even simpler and in principle everything was understood.
To start, go to the menu Loudspeaker- that we enter the parameters of our head. Potim, shaping the type of box tisnemo - Box-Parameters- and there already on vibranium type. I didn’t have to introduce the obsyag and the frequency of the bag resonance, with these parameters you need to experiment, watching the graphs, which you see. After that, how they chose the parameters of the screen, embossed Vent, here we introduce the parameters of the pipe (phase inverter), yakscho vin zvichayno є. I have lost the opening of the box, podminyu Dimensions, choose the form for the gusto and roses. Menu Graphs- Choice of types of graphic charts.
To draw up the schedule, schedules, parameters, resizes - Ctrl + P.
Krok five, final.
Prepared screenshots.
Now, having rested a little, I take up the preparation of the box. At this stage, in order not to translate expensive material, it is necessary to clearly understand the rules, "Sim see once, drink once."
Distant preparations tool, material, patience. When choosing plywood, or chipboard (who has it), it is necessary to ensure that the tightness of the dynamics is higher, and the walls of the box and the thicker reinforcement are more to blame. The best material is obviously plywood (do not wart vikoristovuvaty old, withered - you just get sick of it), it is richer for chipboard, I don’t know how it is possible to build a good subwoofer with tirsi.
We removed the line, the olive, we put it forward on the arch plywood on all the sides of the box. Namagaytes zaoschadzhuvati, raptom here have mercy on what you will correct.
Now sawing, a good tool will be a hacksaw with straight and sharp teeth. You need sawing properly and bazhano under the hood, you don’t want it, the plywood has cracked and cracked. It is possible to use a jigsaw, but with a speed regulator, for already known reasons. Pilkuete evenly, do not hurry, you will be tormented with a drink to straighten humps and traps.
After that, they drank it like that, but with a drink it still happens to be treated, it is necessary to clean up all the pieces of wood, what to wash, otherwise rolling pins, iodine, bandages.
Dismantled the wooden blocks, sorted them out yourself, but obviously not too small, but great. Put the walls one to one, like the stink of the guilty buti and mіdmiryayte the necessary dovzhina bruskov.
Another important moment at the finished box is the majestic opening of the loudspeaker. On the back of the head with a compass, we circle the speaker, three times more than the diameter of the diffuser at once from the gum lift. And one more little bit smaller, equal to the radius of the drill and adding another 2-3mm. The axis of the sprat is a way to pierce the pieces of plywood. Don’t joke around with the drill, it’s unlikely that the world has a drill with a diameter of 100-300mm, that drill is needed for a giant. Take a drill with a diameter of 10-15mm, an excellent electric drill. Drilling your piece of plywood on any other non-consumable wooden sheet, so you will save the bottom surface from cracking. Now, along the inner stake, it is possible to open with a screw 1-2 mm from each other. How to finish, take a chisel, a hammer and break through the jumpers between the openings, then beat a little, so viyshov. We take the largest round file, and rather a rasp and nekvap, but I still under a small kut virivnyuemo kolo on the cross line. Gostri kuti from the front side can be rounded. In the same way, open for a phase inverter. One more way: draw a circle with the radius of the diffuser and open it in the middle, and then, for the help of an electric jigsaw, swipe along the line. Shvidshe, then more trills! Apply to the opening of the speaker, like a “dirka” you are screwed, drill open the fixing heads, and for fixing you can twist metal double-sided nuts, which are screwed in, they are twisted at the furniture industry.
Don't forget the roses! Better vikoristovuvaty in concert acoustics - better and more practical.
Well, they broke all the walls, open the loudspeaker and the phase inverter, drank the bars, we choose.
I’m calling for a drill, we put a drill bit of smaller diameter below the self-tapping screws and drilled plywood sheets in quiet places, it won’t be fixed with other sheets and bars. Now we take PVA glue or glue for wood and apply it thicker in places. Inside the walls and open the screws in the vikonan, it’s not scary that the stench passed right through, you can’t see the middle, but the curse is important to us. Glue gratime dvі roles, zbіlshennya mіtsnostі krіplennya and sealing. Keep in mind that the design did not warp, cuti were equal, even if beauty and neatness are to blame.
Don't nail the back wall yet, there's more to serve us. Zaripit dynamіk, zvnі аbo zsrediny, to whom yak befits and marveling at the design of the dynamo. Lubricate the space between the plywood and the speaker with an auto-sealant, carefully so that it does not get on the diffuser. Autosealant - to ensure tightness and it is easy to see, if you want to remember the head for another hour or another hour for repair.
Phase inverter - you can beat a plumbing pipe, an aluminum pipe, that in principle, be a pipe like you have є (krim of metal plumbing and sewer). At the program, enter її rozmіry and take away the dozhina. The phase inverter can be square, if you need to show your imagination at the ready. Yogo will also need to be closed, but not yet tightly.
Yak robiti damper. The material of the damper can be: hard, hard foam rubber, cotton wool, this vorsonit is thin. The most accessible material is cotton wool. Ale, just її don’t naphaєsh in the middle! Here, our beloved women will come to our aid, for the whole hour of our efforts to grumble about smittya, the noise of that bunch of instruments at the change of 3 pieces of wood is thin. How can they help us? It's so simple, women's tights, you can wear cotton wool in them and sound-absorbing "cowbass", as if they were glued to the walls of the box.
Adjustment of the phase inverter. After damping, we put the rear cover on the plate, but so, so that later we can remove it. If you want the speaker to be named, then the back wall can be fastened tightly with glue and a bunch of screws. The unit is connected to the low-frequency generator through the subwoofer, and to the contacts of the subwoofer (so that the dynamics, which is in the middle) is a voltmeter. By changing the frequency of the generator, we know the resonant frequency Fc according to the already known method. As a resonant frequency, it is under the control of the Rozrahunkovo, we can use it for the auxiliary phase inverter and the number of the damper in the middle of the box. The bass reflex pipe will need to be either shortened or pulled down, in certain situations the pipe can be larger than the dimensions of the subwoofer, in which case it will be necessary to change its diameter. It is also necessary to experiment with the quantity of the damper, take it away or add it, depend on a specific situation. If the resonant frequency is in your power, you can tightly fasten the phase inverter, damper.
Increase the music, which is louder, which is better, listen to a lot of third-party noises, whistling, rustling. How to whistle, otzhe, here the box has lost its opening, we can’t close it, or it’s a gap, cover it with putty or sealant, fill it with glue. How to rustle, it is possible for the damper to start the speaker diffuser, which collapses.
Now the remaining shape of the box is finished, you can round off, resolutely sand it, cover the cracks and holes with mastic or putty.
Finally, you can glue the subwoofer with a fleece or some other material, put a decorative wall to the speaker and a phase inverter, screw on the legs, so you can choose to victorious yoga in the applications, here you show imagination.
Well, the axis is nachebto and that's it! I support all my writings helped someone! Thank you for reading to the end, all the best to you, success!
It all started from the fact that the second time I bought a 12-inch woofer, instead of choosing a car subwoofer. Ale didn’t wake up for an hour, and the speaker was lying in my apartment. І axis of the second rocky by the fact, nareshti, having decided to pick up, not a car, but an active home subwoofer. This article has a detailed description of the instructions for the installation and folding of subwoofers of this type.
1. Rozrahunok that konstruyuvannya to the case (box) of a subwoofer
For the subwoofer enclosure, we need:
- Thiel-Small parameters for guchnomovets,
- Acoustic design software
1.1.Vimiryuvannya Tilya-Small parameters for guchnomovtsya
Call these parameters indicated by the picker at the passport of the guchnomovtsya or on your site. But at the same time, more guchnomovtsiv, which are sold on the markets (among them, and my guchnomovets), do not know the significance of these parameters, or do not match them (for numerical tests, I still could not know my dynamics on the Internet, but about the parameters of Tzhelya and movi could not buti). That's why we have to die everything ourselves.
For whom do we need:
- Computer or laptop with GOOD (tobto with linear frequency response) sound card,
- A software generator of a sound signal, which vikoristovuє vyhіd khіd khіd khіd іn zvіdnії ї ї card
- The voltmeter of the variable voltage will measure the voltage of the order of 0.1 mV,
- Screen with phase inverter,
- Resistor 150-220 Ohm,
- Roses, darts, etc.

1.1.1. On the other hand, we will check the linearity of the frequency response of the sound card. There are a large number of programs that automatically adjust the frequency response in the range of 20-20000 Hz (when the headphone output is connected to the sound card microphone input). And here I will describe the manual method of vibrating the frequency response in the range of 10-500 Hz (for viimirovanie parameters of Til Small low-frequency vibrator, only the whole range is important). If you don’t lean against the hand, the voltmeter of the variable voltage will vibrate the voltage of the order of 0.1 mV, don’t worry, you can use a great inexpensive multimeter (Tester). Use this multimeter to measure the voltage change with an accuracy of 0.1V and the constant voltage with an accuracy of 0.1 mV. In order to change the voltage in the order of mV, it is only necessary to put a second place in front of the multimeter input and to control the constant voltage in the voltmeter mode in the range up to 200mV.

On the back, connect a voltmeter to the headphone output (or to the right, or to the left channel).

Including all sound effects and equalizers, depending on the power of the dynamics and setting the volume level to 100%.

Open the program, click on “Options”, select “Frequency” for “Tone Interval”, and set it to 1Hz.

Curve Options, set the density to 100%, set the cob frequency to 10Hz and press Play. With the "+" button, it can be started smoothly, by 1 Hz, move the generator frequency up to 500 Hz.

At tsimu bachimo the value of the voltage on the voltmeter. Since the maximum amplitude difference is within 2dB (1259 times), then such a sound card is suitable for changing the dynamics parameters. In my case, for example, the maximum value became 624mV, and the minimum value was 568mV, 624/568 = 1.09859 (0.4 dB), which is generally acceptable.
1.1.2. Let's move on to the additional parameters of Till-Small. Minimum parameters, for which it is possible to develop and design acoustically designed (in this type of subwoofer) ce:
- resonant frequency (Fs),
- Povna electromechanical quality factor (Qts),
- Equivalent obligation (Vas).
For a larger professional job, you need even more parameters, such as mechanical quality factor (Qms), electrical quality factor (Qes), sensitivity (SPL) too thin.
1.1.2.1. Designation of the resonant frequency (Fs)
We choose such a scheme.


The speaker is guilty of being in the free space, yaknaydali in the walls, the pillars of that stele (I hung it from the chandelier). I am reopening the NCH Tone Generator program, on the scale as described above, set the initial frequency to 10 Hz and start smoothly, gradually increase the frequency by 1 Hz. At the same time, we marvel at the value of the voltmeter, like a little more statistic, reaching the maximum point (Umax) at the frequency of the water resonance (Fs), and then changing to the minimum point (Umin). With a slight increase in frequency, the voltage increases smoothly. Graph of the load of the voltage (active support of the speaker) in the frequency of the signal may look like this.

That frequency, which is the maximum value of the voltmeter, is approximately the resonant frequency (with a frequency of 1 Hz). In order to select the exact resonant frequency, it is necessary for the region of the approximate resonant frequency to change the frequency by 0.05 Hz instead of 1 Hz (accuracy 0.05 Hz). We record the resonant frequency (Fs), the minimum value of the voltmeter (Umin), the value of the voltmeter at the resonant frequency (Umax) (there will be a stench in the future for the development of the offensive parameters).
1.1.2.2.
Designation of a new electromechanical quality factor (Qts) of the Guchnomovtsya.
We know UF1, F2 for such a formula.
![]()
By changing the frequency, it is possible to reach the value of the voltmeter in the presence of voltages UF1, F2. There will be two frequencies. One lower resonant frequency (F1), the other higher (F2).

You can change the correctness of the rozrachunkiv by such a formula.

If the difference between Fs and Fs does not exceed 1Hz, then you can safely continue the reduction. Yakshcho nі, you need to work everything on the back. We know the mechanical quality factor (Qms) for this formula.

The electrical quality factor (Qes) is known by this formula.

Nareshti, we assign the same electromechanical quality factor (Qts) for this formula.

1.1.2.3. The designation of the equivalent volume (Vas) of Guchnomovtsya.
To determine the exact equivalent volume, we need a backlog of preparations, a hermetic box-phase inverter with an opening for our speaker.

The volume of the drawer should be determined according to the diameter of the speaker, and selected according to the table.

We fasten the speaker to the box and connect it to the circuit described above (Fig. 9). I start the NCH Tone Generator program again, set the initial frequency to 10 Hz and use the “+” button to start it smoothly, by 1 Hz, increase the generator frequency to 500 Hz. When we marvel at the value of the voltmeter, I will change again, as soon as possible to the frequency FL, then change, reaching the minimum point at the frequency of the adjustment of the phase inverter (Fb), re-growth and reach the maximum point at the frequency FH, then change again and again. The graph of the fallow of the voltage in the frequency of the signal may look like a two-humped camel.


І nareshti, we know the equivalent obsyag (Vas) for the formula (de Vb-obsyag box with a phase inverter).

We repeat all our experiments 3-5 times and take the arithmetic mean of all parameters. For example, as we subtracted the Fs values in the range of 30.45 Hz 30.75 Hz 30.55 Hz 30.6 Hz 30.8 Hz, then we take (30.45+30.75+30.55+30.6+30, 8)/5= 30.63 Hz.
As a result of all my experiments, I took the following parameters for my speaker:
- Fs = 30.75 Hz
- Qts=0.365
- Vas=112.9≈113 L
1.2.Modeling and opening the cabinet (box) of the subwoofer using the JBL Speakershop program.
There are many options for acoustic design, including the most wide-ranging options.
- Vented box with phase inverter,
- Band-pass 4th, 6th and 8th order,
- Passive radiator-box with passive vibration
- Closed box - the box is closed.

The type of acoustic design is selected, depending on the parameters of Tilya-Small Guchnomovtsya. Yakscho Fs/Qts<50, то такой громкоговоритель можно использовать исключительно в закрытом оформлении, если Fs/Qts>100, then the switch is for Vented box or Band-pass or Closed box. Yakscho 50
Download and install the program on the fly. This program is written for Windows XP and does not work on Windows 7. To run the program on Windows 7, you need to install the Windows Virtual PC-XP Mode virtual machine (you can download it from the official Microsoft website), and run the installation of JBL Speakershop through it. Calling JBL Speakershop is also required via a virtual machine. After opening the program Bachimo such an interface.

Click on "Loudspeaker" and select "Parameters - minimum", and click on "Accept".

With this program, two optimal (with the most equal frequency response) options, one for the closed box (Closed box), the other for the Vented box (box with phase inverter). We press "plot" (in the Vented box area and in the Closed box area) and look at the frequency response graph. We choose those designs, the frequency response of which is the most suitable for our needs.

In my opinion, the Vented box has small fluctuations at low frequencies (20-50 Hz), the Closed box has a larger drop in amplitude, and the Vented box (Malyunok Vishche) has a lower amplitude.
As soon as the screen is in the optimal variant of the power, then you can encourage the screen with such a contract and enjoy the sound of the subwoofer. If not (with the need for great obligations), then it is necessary to set your own obligations (the closer to the optimal obligation, the shorter) and to develop the optimal frequency for adjusting the phase inverter.

For which one in the Vented box area, we press "Custom", we write our own box in the window, we press "Optimum Fb" (when the program opens the optimal frequency for adjusting the phase inverter, with which frequency response of the acoustic design it will be the most linear) and then "Accept".

Press “Box” and select “Vent…”, at the window in the field “Custom” we write the diameter of the pipe (Dv), which will be used as a phase inverter. If you want to win two phase inverters, then put a dot on “Area” and write the total area of the pipe cut.


Click "Accept" and in the field "Custom" on the row Lv there will be a phase inverter tube. Now, if we know the internal dimensions of the box, the diameter and length of the phase inverter pipe, then you can safely go to the design of acoustic design, but you also want to know the optimal width of the side of the box, then you can press "Box", select "Dimensions ...".

1.3.Construction of the subwoofer case (box)
In order to get a high-pitched sound, it is necessary to properly open and resolutely prepare the body of the acoustic design. After the designation of the internal wiring of the box, the increase in that diameter of the phase inverter pipe, you can boldly go to the preparation of the subwoofer case. The material of the box can be made even more difficult and harsh. The most suitable material for acoustic cabinets with great tightness is twenty-millimeter MDF. The drawer walls are fastened one to one with screws, and the gaps between them are smeared with sealant or silicone. After preparing the box, open it for handles and proceed until the outer surface is finished. Any unevenness is caused by additional putty or epoxy resin (I add crumbs of PVA glue to the putty, which avoids the appearance of cracks over time and reduces the level of vibrations). After hanging the putty on the surface, it is necessary to sand until the smooth walls are finished. The finished box can be tinted, so it can be covered with a self-adhesive decorative tile, or simply glue the fabric on. From the middle to the walls of the box, a sound-proofing material is glued, which is folded from cotton wool and gauze (I glued the batting to my hip). Like a phase inverter, you can win a plastic sewer pipe or a paper shear in various rolls, and you can also buy a ready-made phase inverter in any music store.
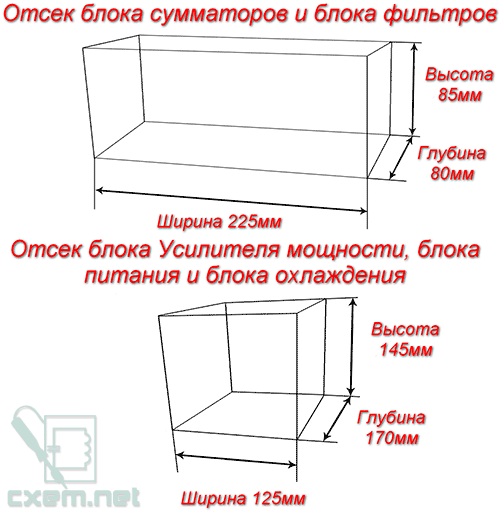
The body of the active subwoofer is folded out of two pipes. The first one has a fluffy guchnomovets, then the other one has all the electrical parts (signal shaping, power supply, life block ......). In my opinion, I have expanded the sumator block and the filter block into a cool air in the block of the suppression of tension, the block of resuscitation and the block of cooling. In the middle to the wall, the sumator block and the filter block were glued with foil, as if connected to the ground (GND). Foil zapobіgaє vplyu ovnіshnіh polіv i zmenshuє rіven іvіv.


As soon as you honor my friend, pay, then you must forgive your mother.


2. Electrical part of active subwoofer
Let's move on to the electrical part of the active subwoofer. Zagalna scheme, that principle of work, and I will add it to the scheme.

Attachments are made up of several blocks, selected on other boards.
- Summators block,
- Filter block (Subwoofer driver),
- The block of a podsilyuvacha of a preduzhnosti (Power amplifier),
- Power supply and Heatsink fun.
On the back of the head, a sound signal should be placed at the Summators block, de-energizing the summation of the signals of the right and left channels. Then go to the filter block (Subwoofer driver), where the subwoofer signal is formed, which turns on the loudness control, subsonic filter (low-pass filter), bass booster (increased loudness at the singing frequency) and Crossover (low-pass filter). After the formation of the signal, it should be at the power amplifier unit (Power amplifier), and then at the Guchnomovets.
Let's discuss qi blocks okremo.
2.1.Summators block
2.1.1.
Let's take a look at the scheme of the sumators on the back, I'll point the little one lower.

The audio signal from the outside devices (computer, CD-player...) goes to the adder block, which can have 6 stereo inputs. 5 of them are distinguished by linear inputs, which are one type of one only type of rose. And the sostium is the high-voltage input, to which it is possible to turn on the output of the speakers (for example, the music center or the car radio, so as not to have a linear output). A leather input may be an okremiya sumator on the operating subwoofers, which replaces the signals of the right and left channels, which prevents the proper sound signal from one outside building to another, with which it is possible to immediately connect to the subwoofer of the call. And also outputs (five outputs, six simply did not fit on the board, I did not put it), as they allow you to send the same signal that goes to the subwoofer to the input of the wide stereo system. It’s even more convenient, if the sound could only have one breath.


2.1.2.Components
Yak operational pіdsiluvаchі vikoristani TL074 (5 pcs.). Resistors are insured at a voltage of 0.25 W or more (the ratings of the supports are shown on the diagram). All electrolytic capacitors can have a nominal voltage of 25 V or more (capacity ratings are shown on the diagram). As non-polar capacitors, you can use ceramic or polyurethane capacitors (rather than polyurethane), or if you want, you can put special audio capacitors (capacitors that are designed for victorization in high-amp audio systems). Throttles in the living quarters of the operating room are used to suppress the noise that comes from the living quarters. Coils L1-L4 have 20 turns, wound with a medium dart with a diameter of 0.7 mm, on a sheared gel pen (3 mm). There are also different types of RCA, 3.5mm audio jack, 6.35mm audio jack, XLR, WP-8.

2.1.3.Drukovany fee


A fee has been prepared for . After soldering the details, the next board is coated for unique oxidation of midi.
2.1.4. Photo of the finished sumator block


To live the block of sumators with a bipolar dzherel of a living voltage of ± 12V. The input opir becomes 33 kOhm.
2.2 Block filters (Subwoofer driver)
2.2.1.Scheme
Let's take a look at the subwoofer driver circuit, point the little one below.

The summing signal from the sumator block is located at the filter block, which is formed from the advancing parts:
- Volume regulator,
- Low pass filter (subsonic filter),
- Pіdsilyuvach bass singing frequency (bass booster),
- Low pass filter (crossover).
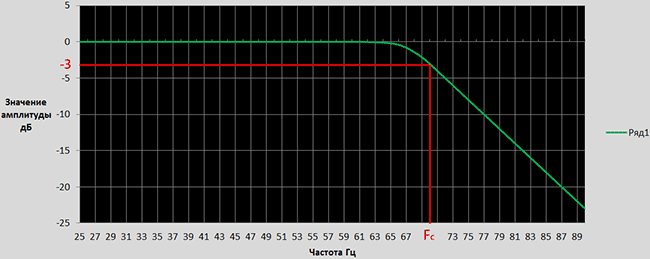
The regulation of density is observed on two levels. The first one when a signal enters the filter block, which changes the level of ambient noise in the sumator block, the other when the signal enters the filter block, which changes the level of ambient noise in the filter block. Adjusting the thickness for the help of a changeable resistor VR3. After the first equal adjustment of the loudness, the signal should be given to the so-called "bass booster", which is attached, which increases the amplitude of the signal in the singing frequency. So, if the frequency of the bass booster inserts is adjusted, for example, at 44Hz, and the gain is increased by 14dB, then the frequency response may look like this ( Row1).

Row2- tuning frequency = 44Hz, gain level = 9dB,
Row3- Adjustment frequency = 44Hz, gain level = 2dB,
Row4- tuning frequency = 33Hz, gain level = 3dB,
Row5- Tuning frequency = 61Hz, gain level = 6dB.
The frequency of the adjusted bass booster is inserted behind the additional variable resistor VR5 (not more than 25...125Hz), and the frequency is increased by the resistor VR4 (not more than 0...+14dB). After the bass booster, the signal should be at the infrared frequency filter (subsonic filter), which is a filter that detects negligible, ultra-low signals, which you can’t smell for a person anymore, but they can greatly overwhelm the subsonic, thereby changing the system’s exhaustion. The frequency of the filter is regulated by the help of a changeable resistor VR2 at a range of 10 ... 80 Hz. If, for example, the frequency is set to 25 Hz, then the frequency response may look like this.

After the filter of infra-frequencies, the signal should be at the low-pass filter (crossover), which is high, not necessary for the subwoofer (mid + high) frequencies. The frequency is regulated with an additional changeable resistor VR1 no more than 30 ... 250 Hz. The steepness of the decay becomes 12dB / octave. The frequency response may look like this (at a frequency of 70 Hz).
2.2.2.Components
As operational subsidiaries vikoristan TL074 (2 pcs.), TL072 (1 pc.) and NE5532 (1 pc.). Resistors are insured at a voltage of 0.25 W or more (the ratings of the supports are shown on the diagram). All electrolytic capacitors can have a nominal voltage of 25 V or more (capacity ratings are shown on the diagram). As non-polar capacitors, ceramic or fused capacitors can be vicorated (or rather fused). Throttles in the living quarters of the operating room are used to suppress the noise that comes from the living quarters. Also, there are three links (50kOhm-2pcs, 20kOhm-1pcs) and two smaller replacement (50kOhm-6pcs) resistors. Like four replacement resistors, you can beat two doubles.
2.2.3.Drukovany fee

Files of other payments in *.lay and *.pdf formats can be downloaded for example statistics.
2.2.4. Photo of the finished filter block


The block of filters is powered by a bipolar dzherel live voltage of ± 12V.
2.3.Blok podsilyuvacha natuzhnostі (Power amplifier).
2.3.1.Scheme
As a pіdsilyuvаch of sweatiness vikoristovuєtsya pіdsilyuvach of Enton Holton with half transistors at the exit cascade. There are a lot of articles that describe the principle of robotics, folded and created on the Internet. Therefore, I will share the scheme attachments and my version of the drafted board.

2.3.2.Drukovany fee
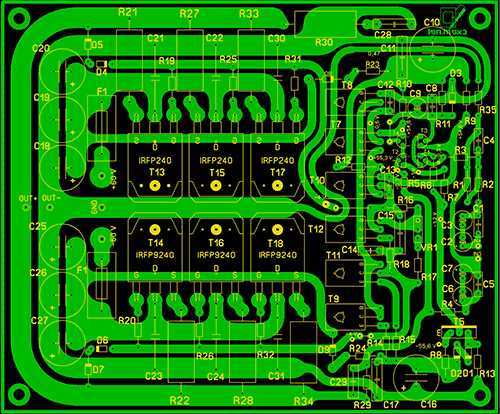


Files of other payments in *.lay and *.pdf formats can be downloaded for example statistics. To live the block of a podsilyuvacha of tension in a bipolar dzherel of zhivlennya with a voltage of ±50…63V. The output voltage of the power supply is dependent on the voltage of life and the number of pairs of field-operated transistors (IRFP240 + IRFP9240) at the output stage.
2.4. Living unit and cooling unit (Power supply)
2.4.1.Scheme
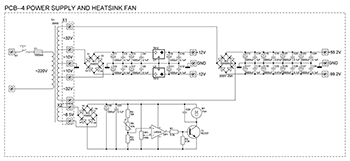
2.4.2.Components
Like a live transformer, you can twist it like a ready one, so a self-contained transformer has an output of approximately 200W. The voltage of the secondary windings is shown in the diagram.


Diodniy place Br2 for insurance on strum 25А. Capacitors C1 ... C12, C29 ... C31 are responsible for the nominal voltage of 25V. Capacitors C13…C28 are responsible for the nominal voltage of 63V (when the voltage is lower than 60V), or 100V (when the voltage is higher than 60V). Like non-polar capacitors, it is better to vikoristovuvat plіvkovі capacitors. All resistors are protected for an intensity of 0.25W. Thermistor R5 is smeared with thermal paste and attached to the radiator of the power supply. Working voltage of the fan is 12V.
2.4.3.Drukovany fee

Files of other payments in *.lay and *.pdf formats can be downloaded for example statistics.
3. The final step of folding the subwoofer


List of radio elements
| Appointment | Type | Denomination | Kіlkіst | Note | Shop | My notepad | |
|---|---|---|---|---|---|---|---|
| U1-U5 | Operational pidsiluvach | TL074 | 5 | Do notepad | |||
| C1-C4, C15, C16, C25-C27, C29, C39-C42 | 10 uF | 14 | Do notepad | ||||
| C5-C10, C23, C24, C28, C30, C35-C38 | Capacitor | 33 pF | 14 | Do notepad | |||
| C11-C14, C19-C22, C31-C34 | Capacitor | 0.1uF | 12 | Do notepad | |||
| C17, C18 | electrolytic capacitor | 470uF | 2 | Do notepad | |||
| R1, R2 | Resistor | 390 ohm | 2 | Do notepad | |||
| R3, R12 | Resistor | 15 room | 2 | Do notepad | |||
| R4, R16-R18 | Resistor | 20 room | 4 | Do notepad | |||
| R5, R13-R15 | Resistor | 13 room | 4 | Do notepad | |||
| R6, R10, R23, R24, R31, R33, R40, R41, R46, R47 | Resistor | 68 room | 10 | Do notepad | |||
| R7, R11, R21, R22, R32, R34, R37, R38, R45, R48 | Resistor | 22 room | 10 | Do notepad | |||
| R8, R9, R25, R26, R29, R30, R39, R42, R49, R50 | Resistor | 10 room | 10 | Do notepad | |||
| R19, R20, R27, R28, R35, R36, R43, R44 | Resistor | 22 ohm | 8 | Do notepad | |||
| L1-L4 | Inductance coil | 20x3mm | 4 | 20 turns, wire 0.7mm, frame 3mm | Do notepad | ||
| L5-L13 | Inductance coil | 100 mH | 10 | Do notepad | |||
| Block of filters | |||||||
| U1 | Operational pidsiluvach | TL072 | 1 | Do notepad | |||
| U2, U4 | Operational pidsiluvach | TL074 | 2 | Do notepad | |||
| U3 | Operational pidsiluvach | NE5532 | 1 | Do notepad | |||
| C1-C5, C7-C10, C15-C17, C20, C23 | Capacitor | 0.1uF | 14 | Do notepad | |||
| C6 | Capacitor | 15 nF | 1 | Do notepad | |||
| C11-C14 | Capacitor | 0.33uF | 4 | Do notepad | |||
| C21, C22 | Capacitor | 82 nF | 2 | Do notepad | |||
| VR1-VR3, VR5 | Replacement resistor | 50 room | 4 | Do notepad | |||
| VR4 | Replacement resistor | 20 room | 1 | Do notepad | |||
| R1, R3, R4, R6 | Resistor | 6.8 com | 4 | Do notepad | |||
| R2, R10, R11, R13, R14 | Resistor | 4.7 room | 5 | Do notepad | |||
| R5, R8 | Resistor | 10 room | 2 | Do notepad | |||
| R7, R9 | Resistor | 18 room | 2 | Do notepad | |||
| R12, R15-R17, R20, R22, R26, R27 | Resistor | 2 room | 8 | Do notepad | |||
| R18, R25 | Resistor | 3.6 com | 2 | Do notepad | |||
| R19, R21 | Resistor | 1.5 room | 2 | Do notepad | |||
| R23, R24, R30, R31, R33 | Resistor | 20 room | 5 | Do notepad | |||
| R28 | Resistor | 13 room | 1 | Do notepad | |||
| R29 | Resistor | 36 room | 1 | Do notepad | |||
| R32 | Resistor | 75 room | 1 | Do notepad | |||
| R34, R35 | Resistor | 15 room | 2 | Do notepad | |||
| L1-L8 | Inductance coil | 100 mH | 1 | Do notepad | |||
| Block of the patient's pressure | |||||||
| T1-T4 | bipolar transistor | 2N5551 | 4 | Do notepad | |||
| T5, T9, T11, T12 | bipolar transistor | MJE340 | 4 | Do notepad | |||
| T7, T8, T10 | bipolar transistor | MJE350 | 3 | Do notepad | |||
| T13, T15, T17 | MOSFET transistor | IRFP240 | 3 | Do notepad | |||
| T14, T16, T18 | MOSFET transistor | IRFP9240 | 3 | Do notepad | |||
| D1, D2, D5, D7 | DC diode | 1N4148 | 4 | Do notepad | |||
| D3, D4, D6 | stabilitron | 1N4742 | 3 | Do notepad | |||
| D8, D9 | DC diode | 1N4007 | 2 | ||||
Subwoofer, also known as a "bass speaker", is an acoustical element that produces sound frequencies in the range of 20...120 Hz. To put it figuratively, within the framework of the acoustical layout, the subwoofer occupies the range of low frequencies, while the entire acoustic system responds to the middle and high frequencies.
The subwoofers are divided into active and passive ones, the first subwoofers have a live block with a subwoofer installed in the case, the other subwoofers have a call.
Subwoofer available
This instruction was written specifically for those who think that a 5 1 subwoofer was installed in a new car, but for other reasons, adding a subwoofer is not possible. It is not easy to install an acoustic subwoofer on its own, but if the human ear does not directly recognize low-frequency winds, you can install a subwoofer in a car in any accessible place.
Toolkit
In order for your thought to be materialized in the image of a subwoofer, the cream of the wild bazhanna and "stubbornness" we need a couple more dribnitsa:
- Knife on wood;
- Chisel;
- Nabіr napilkіv (tricky, round, flat ... yakі there more є ...);
- Emery paper of different caliber (grain size);
- Screwdriver, or a set of twists
- Electrodrill;
- Jigsaw, bagzhano with "non-manual drive";
- A set of office supplies, de compasses maє “range” is not less than the diameter of the reversed speaker (20 ... 25 centimeters);
- Glue for wood;
- Budіvelny material for the body (plywood, chipboard, MDF curtains 10...20 mm);
- Wooden blocks (under the ribs of the hardness) with a retina 20x20 ... 40x40 mm;
- Purchase of screws (vіd 10 to 50 mm);
- Subwoofer parameterization program (JBLSpeakerShop, WinISD 0.44 and other).
Again, let's start with the combination of the low-frequency speaker with the choice of speaker (div.).
Select dynamics
So, as you are no longer the first music lover on this earth, you need to think that the tired canons of the world of music are already aware, it was said that there should be a stoppage of speakers:
- Six inches zastosovuyutsya like dodatkove dzherelo mid - bass;
- Eight inch speakers for frontal basses;
- Yakіsna acoustics on a car come out of ten inch speakers installed in a 15 ... 20 liter case;
- The best option is a twelve-inch speaker in a 25..35 liter case;
- Well, a fifteen-inch space in a 60..90 liter case, as a rule, is in the hands of the right "maniacs" and is put on the lookout of a highly important public in the process of smashing from SPL.
Before speech, like the middle of amateurs, so the middle of the professional do not have any problems with the drive of tightness of the dynamics. But for the moment it is possible to confirm that the speaker is unequivocally guilty of the tighter sounding, since the system is not able to work for a long time, at the maximum frequency, to produce an audio signal without the appearance of a non-linear effect and a significant decrease in the brightness of the sound, everything is balanced here.
We select a speaker that has ruled us, obviously, the stronger the wines, the louder the sound will be. It doesn't matter how far you've gone, how you've spent your time, we need to know its technical characteristics, even if it's an important step - designing the hull.
Razrahunok parameters
Since you have daily supporting documentation with technical data on dynamics, and there is no possibility of knowing these parameters from a forester, we have the opportunity to calculate them with our own hands.
We happen to know data about:
- Nominal pressure of the speaker (sound in the marking head - 75GDN-1 75 W) - Pnom;
- Wet frequency resonance - Fs;
- its frequency resonance in a closed space - Fc;
- Equivalent obsjag dynamics - Vas;
- Largest diffuser sound - Xmax
- The effective diameter of the diffuser is D;
Well, about the quality factor of resonant frequencies:
- Povna - Qts
- Electric - Qes;
- Mechanical - Qms.
For the selection of the necessary parameters, we need:
- Digital multimeter (voltmeter);
- Calculator;
- Whether it be a low-frequency generator, for example, GZ - 109 (you can replace it with a program of a low-frequency generator on a computer, since they are impersonal);
- 20 liter, hermetically sealed box.
Then, to the sound card, through the line output, the “amp” is connected, and from the third output, through a resistor with a nominal value of 1 KOM, the speaker is connected (div. photo):
- In order to hide the infusion of third-party objects on the brightness of the room, move the dynamics of the middle of the room to the chandelier. Next, start the “program” of the LFO, set the frequency to 1000 Hz and set the middle position of the volume control on the computer;
- To turn off the signal, connect a multimeter to the output of the "amp" i, adjusting to a new level, set the voltage to 20 Volts;
- Connect a multimeter to the speaker;
- We move the frequency of the generator (starting at a frequency of 5 ... 10 Hz), following the data of the voltmeter until the hour when the frequency of the speaker at maximum voltage (Umax) reaches its maximum, after which it decreases more and more. The display of the generator, when Umax reached its maximum on the voltmeter, is recorded as a data of Fs;
- Smoothly move the frequency until Fs doti, the display docks do not stop changing. The value of Umin is recorded (the frequency shift is farther away, obviously, it means the amplitude shift, but the data is no longer important);
Withdrawal of data can already be seen as a graph of the amplitude-frequency characteristic of the speaker:
When reviewing the graph, you can look for new entries Ucp, F1 і F2, ce frequencies, for the help of which the quality factor of the dynamics is significant for the formulas Qes, Qts, Qms і Uср.
Previously, the calculations were calculated manually, at the same time everything is extremely simple - we take the “program” TSCalc, insert the given values and take the result:
- Rmax value = Umax * 1000;
- The value of Re = the value of supporting the speaker with a constant stream;
- Submitting these values to the program will take Rx;
- Usr = Rx/1000
- F1 it is possible to change the frequency down by Fs until quiet pіr, until the voltmeter shows the value Uср;
- F2 joking similarly, if the frequency is raised uphill;
- By substituting the values of F1, F2 and Fs, it is necessary to take data on the quality factor of resonant frequencies.
- We then need to know the resonant frequency of the speaker in a closed space - Fc. For whom we fix the speaker with a magnet (not important, it’s just more convenient) in the back of the prepared box, and it’s similar to the value of Fs.
- Substituting the value of the already known to us obligatory screen, and the self-known data of Fc and Fs, the value of the equivalent obyazh - Vas;
- The effective diameter and the maximum displacement of the diffuser are known for the additional line.
Select screens
Now, if we know all the necessary parameters, we can choose the type of subwoofer enclosure.
Respect! I didn’t want to embarrass you, but only take away the parameters (and not your needs) - the main factors that determine the type of case. Don't talk about those that you can't choose the body type you choose, otherwise you'll see the sound we need, feed.
Free air (vіlny vipromіnyuvach)
The Danish type of dynamics is suitable for times, if Fs > 100 Hz. How can you guess if the subwoofer is not visible, because the new one may have a lower frequency spectrum.
The maximum kudi yogo can be determined by the rear car, and the best option would be to look for a different speaker.
Closed Box
We choose this type, so that the Qts value is less than 0.8-1.0 (0.7 is optimal), and Fs / Qts is more than 50. It is even easier to unravel it.
Vented Box (phase inverter)
Optimal when Qts is less than 0.6 (optimal indicator is 0.39), and Fs / Qts is more than 85. More folding in the design.
Band Pass
May be the most effective, and at the same time, the most convenient in preparation. Optimal at Fs/Qts value, which is 105.
PassiveRadiator (passive vibration monitor)
The very same phase inverter, only on the pipe floor, a membrane viprominuvach is installed. Rozrahunok yogo parametr_v analogous phase inverter, but at the prepared troch folded.
If you want to take an old speaker, dismantle a magnet, a diffuser and a cat from the th case, glue a plate from orgskla (getinax, etc.) to the gum clip, and screw the vantage (bolt with nut) into the center її, so you can adjust Fc, then You will see more disgrace and not expensive PassiveRadiator.
Whether any of the presentations of options can be prepared with both one and two speakers. Later, the parameters were given to us, they appointed the type of the hull, the time had come for the hull to be rebuilt.
Rozrahunok box
In my opinion, I have learned how to speed up with the JBLSpeakerShop program.
Do not check for details, this program is even simpler and understandable (before speech, on the Internet, video instructions for your services).
Ale, I’ll tell you the order of the day:
- The program is loaded and launched through the "setup.exe" file, which is located on the first disk, after which it is possible to go to the other part of the installation file;
- Run the program and go to the "Loadspeaker" menu and enter the parameters of the head;
- We select the type of screen and go to “Box - Parameters”, where we enter the frequency and the frequency of the bag resonance on the selected option (if you enter these parameters, you can improvise and post the result on the graphs);
- Then, after that, as the parameters are selected, for the presence of a phase inverter in your subwoofer, activate the “Vent” key and enter the parameters of the pipe;
- At the “Dimensions” submenu, select the shape and size of the box;
- At the “Grafs” menu, you can choose to display a graph;
- The resulting result is “Ctrl+P”.
Subwoofer box preparation
Preparation
Yak vіdomo - practice, tse criterion of truth, and the oskіlki rozrahunok completed, proceed to the most part of our instructions, de panuє one rule - this time vіdmіryay, one vіdіzh.
Please! When choosing a material for the case, it is necessary to protect it, that the dynamics are more tight, while the comrades can use the same wall, and the reinforcement is thicker.
Father:
- We take the preparation of a sheet of yak_snoy (not dried and not old) plywood, like an order of magnitude mіtsnіsha for chipboard, and rozkreslyuєmo on the new all sides of the box.
- Save on this stage is not varto - then we will not correct mistakes.
- If you have a hacksaw with a “manual drive”, then it’s better to choose one with small teeth and a guide. To avoid rozsharuvannya and viniknennya cracks, slid sawing properly, under the cut, the above words are relevant even when working with an electric jigsaw.
- We cut all the plywood with sawdust, which is washed, and equally removed when we cut the hump and the depression.
- Vimiryuєmo small blocks and vіdpilyuєmo їх for the size for which of the vipilanih elements "prikinemo" the body and zrobimo vimіri.
One of the most important moments is the preparation of the opening of the loudspeaker.
Shards of a drill with a diameter of 150 ... 300 mm to know that it is problematic to think with your head:
- Vymiryuyemo diffuser with a gum clip and, taking trochs of more value, with compasses on plywood colo. Dalі vіdstupaєmo vіd tsієї іnії in the middle by the value of the radius of the vibrated drill bit (adding a couple of millimeters) probably about a smaller diameter.
First way
It is drilled with a drill for 10 ... 15 mm on the line of a small stake, we insert a jigsaw file into the opening, which is viishov, and we swipe the opening, passing the saw along the large stake.
Please! Put the plywood in front of the cob of drilling on a hard surface - in such a way, at the exit, the drill does not hurt the back wall.
Other way
The other side of the armchair is not obov'yazkovo - it's hard to open at any place in the middle of the stake, we push the jigsaw file and smoothly move it onto the line of the crossed stake.
Third way
According to the entire diameter of a small stake, it is drilled near one open one, after which we break through the jumpers between them, and then turn it around with a saw.
Estimate the speaker on the opening, and as you are all in power, drill open the mounting nuts, as you can fit into any kind of furniture fittings.
Please! Roznіmannya, scho zastosovuetsya in concert acoustics even more practical and nadіyni, koristuvatisya best of them.
Folding box
Otzhe, open the loudspeaker and the phase inverter are broken, the bars are filed, we move on to the folding robots:
- We take a drill with a diameter of two times smaller, a lower diameter of a self-tapping screw and drill plywood sheets in quiet places, de stinks sticking with the bars of those other walls;
- Before sticking the parts with a thick ball, we smear the space between the walls and the bars. Tovsty ball of glue in our vapadku vikonu two functions at once - zbіshuє mіtsnіst konstruktsії and sealing;
Please! Screw the back wall on the remaining folding stage.
- We install a speaker, at any place the diffuser and plywood are sealed with an automotive, water-based sealant (good sealing of the seam + easy to see if necessary);
- From the handy materials of a round shape (cream metal pipes, shmatkov water pipes and sewers) we prepare a phase inverter, having introduced the diameter of the pipe into the program and taking the value of її dovzhini. Close it tightly until it’s varto, we still have a chance to yogo fasten it.
Before speech, the phase inverter can be square in shape, in which case, in the process of preparation, you can dream up a little:
As a damping material, it can be victorious, whether it be some kind of noise-reducing material, for example, a thick ball of lint, wool, cotton wool, thick foam rubber, etc.
- For an hour, we fix the back cover of the box;
- The unit is connected through the power supply to the low-frequency generator, and the speaker is connected to a voltmeter;
- By changing the frequency of the generator, the value of Fc is known for the above described method;
- As far as the significance is considered in the case of a rosewood one, then changing the parameters of the phase inverter and the amount of damping material in the middle of the subwoofer box, the experimental path is known to the very moment, if the resonant frequency is in our power.
- In case of rozrahunkov dozhina tubes of the phase inverter, I change the dozhina of the subwoofer itself, then change its diameter;
- Finishing the folding robots, closing all the details "tightly".
For this, the instruction for preparing a car subwoofer with your own hands reaches the end. You are left with less to turn over your work to the right.
We include the highest version of the musical composition for all its fullness and audible sounding for the appearance of third-party noises, rustling, whistling:
- The whistle indicates a gap in the gap, which is filled in the middle, open any trace to cover with sealant, putty or glue;
- Rustle means that the damper is collapsing, the dynamics are sticking with the yoga diffuser.
Finishing the subwoofer’s work: round off the edge, sand it, cover the pits and the cracks with putty or mastic, after which it is pasted over with material and installed decoratively on the speaker diffuser and phase inverter pipe.
On whom everything. I am sure, you will be pleased not only with the price of your “baby”, but with the miraculous quality of its sound.
Even if you all smashed it as needed, then without your suggestion, it’s unlikely that you can guess that the tight and clear bass that comes from the interior of your car sounds like a self-contained subwoofer. Chim, to the point, and do not shamefully boast)))
Dedicating the subwoofer to the offensive tizhnya. Having taken a small amount of software for the development of subwoofer enclosures (DLSBox2000, JBL-Speakershop, WinISD ...), the DLSBox2000 program was best for me. Z її with the help of rozrahuvav sub. The first axis is what happened - the efficiency of this design (FI) for my speaker is 76%, the total is 37 lire (with external dimensions 45x35x35cm.), phase inverter 75x100mm. (Diameter / length).
Then we painted sketches on paper and started preparing yoga.

The mustache of the walls was twisted with screws with a length of 50 mm. Mustaches are planted on PVA glue (I'm glad - glue is not required, it's easy to get used to). Use the middle for greater durability of the seam by smearing it with silicone sealant. In principle, it’s not obov’yazkovo, but rather smear it and forget it, then we’ll sort it out again.


Then proceeded to puttying. The car putty was putty, two-component (You can prepare the putty yourself, having mixed the wood thyrsus and PVA glue, as an option). If the putty was dry, I sanded the body to the ideal plane.


Potim virіzav open the phase inverter, the socket, the handle-kishenі.


Choose a subwoofer to wonder how it sounds.

All my doubts about the correctness of the rozrahunka obliging the screens to mit rose - a self-contained subwoofer gravel m'yaky equal bass. After chatting with the one who couldn’t whistle anywhere, I took the “fittings” and proceeded to glue the case with self-adhesive paper with the texture of the shkiri. Zibrav.


Vitrati subwoofer preparation:
Woofer Semtoni 10 "(25 cm) 350w (rms, max) - 1100 rubles.
Chipboard 20mm. - no cost, found on the mountains
PVA glue - without cost, even if it is obvious
Samnarizi 50mm. 100 pieces. - 26 rubles
Silicone sealant, prozory - 59 rubles
Gun for sealant - 40 rubles
Socket with terminals - 65 rubles
Acoustic wire 1m. - 60 rubles
Phase inverter 75x100mm. - 40 rubles
Pens "Kisheni" 2 pcs. - 100 rubles
At once close to 1800 rubles.