Installing Windows 7 from a flash drive. Dialing Windows from a flash drive via BIOS. Installation of additional utilities
If you are the owner of a compact netbook, and you greatly appreciate that CDs and DVDs will occupy a place in the museum of data media (including cassettes and floppy disks), you will definitely need to know the power supply and how to install Windows 7 from flash drive? “And not less so! The motivation for learning this computer wisdom is rowing.
The installation distribution on a USB stick is, at a minimum, manual and compact. And most importantly, it’s reliable: you don’t need to worry about ruining a lot of bits through any rags or powders, and the OS installer will come out fine (again, as it often goes wrong with disks).
This article provides a detailed overview of all the steps involved in installing Windows 7 from a flash drive: from choosing a host to setting up a distribution kit.
Preparing a portable USB device
The volume of the installed flash drive is over 4GB. Some of the collection activities of the “Simka” under the standard distribution include direct updates, patches, applets, integrated components (Framework, WinRAR, DirectX, etc.) They are large and large in size .
1. Connect the flash drive to the computer.
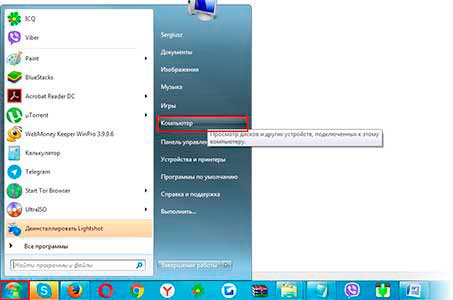
2. Open the "Start" menu (the first icon on the taskbar).
3. On the right side of the menu, click “Computer”.
4. In the section “Devices with significant wear”, click on the flash drive label.
5. Select the “Format…” command from the contextual submenu.
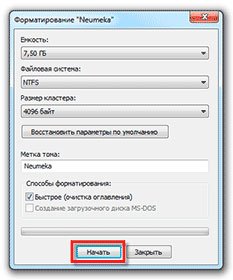
6. In the formatting parameters window, in the "File system:" option, set "NTFS". Obov'yazkovo! Installing Windows 7 from a flash drive is the most stable and works correctly on the system itself.
7. Click the "Start" button.
8. Check that the formatting is complete.
Select and download Windows 7 distribution
To create a flash drive, you will need a distribution image in ISO format. You can download it on specialized sites or popular torrent trackers (nnm-club.me, torrent-windows.net, etc.)
Please! Installing windows from a flash drive is quite impressive and even serious. A successful entry guarantees a comfortable and safe robot on your PC. Therefore, before you download any ISO image of the system, or simply seem to assemble it on your computer, find out what other investors think about it. And even better, rejoice at the IT fachs (because, of course, they are so capable).
Creation of a vandalized flash drive
In addition to a formatted 6-8 GB flash drive and a Windows 7 distribution in ISO format, you will still need the UltraISO program to burn the installation USB media. And don’t let me berate you, because this digital product is paid – you don’t need to buy anything. To prepare a new vanity wear, the demo version of UltraISO is useful. Download it on the retailer's official website - ezbsystems.com/ultraiso/.
After installing and installing the utility, click on the following:
1. Launch UltraISO.
2. In the “File” menu, activate the “Unlock...” function.

3. Enter the route to the OS image:
- go to the section/folder where it is saved;
- see your bear clicking;
- Click the “Open” button.
4. Open “Self-imaging” (the third section of the UltraISO main menu) and click “Burn hard disk image...”.

5. In the settings window, in the “Recording method:” menu, set the value to “USB-HDD+”, and then click the “Record” button.

6. After finishing recording, close the program. Check out the installation distribution on the flash drive (look at it visually; don’t edit or change anything!)
Installing Windows 7 from a flash drive
Before that, how to install windows from a flash drive , transfer from the system partition (drive C, on which the OS is installed) data that is valuable to you (photos, videos, saved igors) to a logical partition (to drive D or E). Otherwise, the smell will be reduced during the installation process.
So, to install Windows 7 from the flash drive:
1. Reboot your PC and press the F8 key; the docks on the display will not show the Select boot device option.

Respect! On a PC, this function can be activated using another key (for example, F12, F2). Check this characteristic with the technical data sheet of the manufacturer.
2. In addition to the buttons, use the cursor to see the “USB” item in the menu (using flash drives). Press the ENTER key.

4. In the “Windows Installation” window, select the system partition (on which the OS will be installed). This column, the “Type” column, has the value “System”.
5. Once again, check the correctness of the setup! And then run the “Format” function.
After the installation is completed - after the PC has automatically restarted - you can proceed to install the software.
The axle and all the instructions, dear reader! As a result of minor efforts, you will be able to prepare a new flash drive and “fresh” Windows 7 on your PC. Why is it bad?
Did you end up installing Windows 7 from a flash drive on your laptop? This means that your computer does not have a drive or it is malfunctioning.
What is there to do in a situation where it is impossible to obtain attraction from a CD? Solution: you can install the operating system from a flash drive.
First of all, we will describe the process of installing Windows from a Flash card, we will cover all the main stages of the process, and then we will look at them in more detail:
- First: preparing the laptop before installing the operating system (in this version Windows 7)
- Other: preparing a flash drive
- Third: setting up UEFI to enable “operations” from a Flash card.
- Fourth: the installation itself.
Note: UEFI – replacing an outdated BIOS.
Preparing a laptop before installing Windows 7
To begin with, you need to transfer all the necessary files and documents from drive C to drive D. Cause problems to occur in the “My Documents” and “Desktop” folders.
Installation files of your programs can be found in the Program Files folder.
As an option, you can transfer all the important information to another flash drive (not the one on which installation is being performed).
Preparing a flash drive for installing an operating system
Delete or copy all necessary information from the flash card, and files and folders will be deleted from it automatically during preparation before installation.
The flash card must be at least 4 GB.
Then you will need Windows 7 installation files and folders, a disk image in iso format, and the UltralSO utility for installation (you can download it by typing the same command in search).
All is ready? So let's get started:
Please install and run the utility. What do you need to know about the axis:
Click “Trial Period”. A new window will open in which you need to select “File” - “Open” and point to the image from which you will install the operating system.


Then insert the flash drive into the computer and select Format. After completing the process, click “Record”.

The process will end and you will have a flash drive with the Windows 7 operating system downloaded onto it. Now you can move on to the next stage, finally, the installation itself.
Porada: It is not necessary to use the very same utility that is described in the statistics. There are just one of the many programs that you can use to create an installation flash drive.
Setting up UEFI for importing “operations” from flash drives
You won’t be able to simply insert a flash drive into the computer; you need the computer to be connected to it when it’s turned on. How can you earn money? For more help UEFI. Vaughn is for the skin computer.
It’s important to apply all the important things in life. One of them is the order of attraction. We're stuck on it.
To access UEFI, press the key on the keyboard at the time of system activation. (This key on most laptops is solid and appears on the screen. Call it F2 or Esc).
When you leave, you will see a menu, which you will immediately recognize by its blue or gray color.

Most people don’t immediately manage to press the login key to Windows and the computer just gets stuck. In such a situation, you need to re-introduce yourself and try again.
After logging in, go to the menu and find out in the settings the order of installation of devices. Axle of screenshots for the butt:


Use the arrows to select the device you want to use first. For beginners, there is a special tip for navigating to UEFI. There you go again in a big way.
Choose USB-HDD. Then exit UEFI using the Save and Exit button. All changed information will be saved. The computer will automatically restart.
Now let's move on to the next step, the ending one.
Installation of Windows 7
If you have done everything correctly and configured the settings correctly in UEFI, you will see the message “Press any key to download CDs or DVDs.”
In English, the screenshot appears:

Porada: It often happens that there is no way to write. Let's talk about those who have shown mercy. Next, go to UEFI again and make sure that everything you have saved is fully configured for downloading from the flash drive. If everything is correct, it means your flash card is not secure at all, and for the operation you need to find another image of the operating system and run its record.
You can also find that on the installation image, in addition to Windows 7, there are also utilities. In this box you will need to select the item that is suitable to start the installation.
Good news: All operations listed below can be performed automatically by the computer.
And all the parameters that you don’t like can be changed to your liking after the installation is complete.

A window will open in which you need to select which version of Windows 7 you are installing. Click on the one that you have a dry key.
Often they are glued to writing on the bottom of the laptop. The system will prompt you until the installation is completed.
The key is not required to be entered immediately. You can earn money by stretching out a month.

Jump up to the end of the license, put a tick on “Wait” and move on.

Then we select an external installation.

Embossed “Adjusting the disk”. If newcomers have difficulties here, we will look at this point in the report.

Adjusting the disk
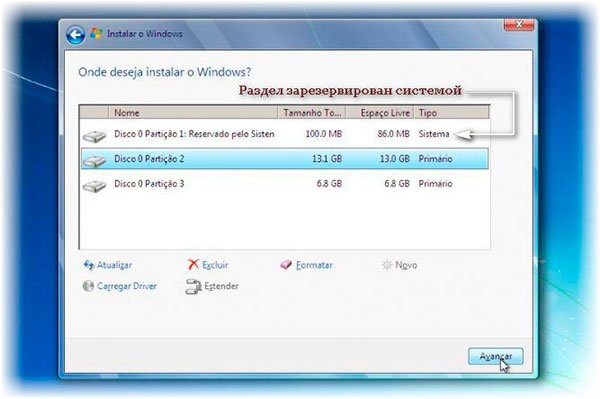
It turns out that on the hard drive, in addition to the standard partitions (C, D, E), there is also a small partition.
This is due to the fact that with the updated system it would be possible to bring the computer back to standard settings.
Data can be collected up to 100 megabytes in size. The operating system itself is unique. The section contains the system encryption function.
This section has a program that can unzip it.
Ale yogo slid wake up. Before installing Windows, it is necessary to prepare the hard drive before the operation. You can use additional Acronis Disk software.
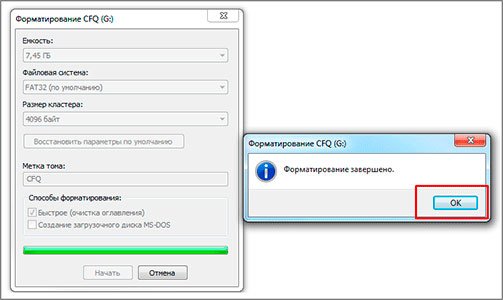
The window presses “Format”.
Please note that all data will be deleted, but now it does not matter, and we can also make a backup copy of all data. Embossed "OK".
Once the formatting is completed, it will be happily embossed.

Installation will take about an hour. After that, jump up at the end, in which type of account you need to enter the names: your and computer.
You can create a password for the password. So that you don’t forget him, you need to give him a hint.

Select the security mode, date and hour.


If the network driver is installed, then select the connection type.

You can install the drivers and programs you need
After installing Windows, before starting the laptop, start using a hard drive rather than a flash drive, then turn on the UEFI settings at the output stage.
The installation of Windows 7 on the laptop is now complete!
As a matter of fact, there is nothing complicated about installing an operating system from a flash drive. Golovny, it’s important to mark these points, and everything will work out for you.
Once is enough, just remember the whole process.
Now, if you need to install the operating system from a Flash card, you will do it automatically.
Video instructions on how to install WINDOWS 7 from a flash drive on a laptop using a DELL book
Installing Windows 7 from a flash drive on a laptop: Guide to the day
Good health to my fellow readers and computer lovers!
Yesterday, while looking through a friend’s laptop, he asked me to bring in ten minutes and turn it over to him. I didn’t have a real problem, and I was stuck with the task of installing Windows 7 from a flash drive. Well, following the tradition myself, sharing with friends! Today I will tell you all the secrets of installing this operating system from a USB drive.
When do you need to reinstall the OS?

Find out that you have installed the operating system, are running, installing various programs, month, second, third. And you understand that the visual shell is starting to get very clunky, especially in powerful games or software for Photoshop. It is practically impossible to fix the problem automatically. Continuously cleaning the registry will not permanently change the position.
Professional system administrators will reinstall the OS quickly. The stench is insistent that it is necessary to monitor the shell of Microsoft with the correct methods, if it is still cluttered with spoils that sound like other non-seniors.
And this all means reducing productivity. Check the updates that the graphical platform downloads from official sites, you can also update the hidden registry with bugs, for example, in case of a crooked installation or a broken package of files.
What do you need to prepare for the cob?

First of all, you need to know about the files you need. Don't you want to spend it? So I’ll give you a few options. If your hard drive is split into logical drives, then you need to transfer everything to a hard drive that does not have a system. These disks are designated by letters. D"ta" H" Just copy all the archives, photos and music with films on them. Of course, it’s better to finish the place.
If you can’t get rid of it, because the hard is not divided, don’t hesitate to come to the rescue monster from Yandex. Come here, register or press here and get information.
Or you are downloading the client.

Once installed, you will see such a shortcut.

Open it and use it the same way as with a laptop and disk drive. Increase your respect by becoming a part of the software on your computer.

And if you love Google more, then come here.

Everything is as simple as it gets, you either download the client or download it through the drop form on the site itself.

Well, if you didn’t know this option, then you can rewrite everything on a blank.
Before the speech, on the HP laptop, which I was working on, I burned out the bitterness of virtual feelings. There were a countless number of files in there.
Now take the flash drive and insert it into the port. Now it needs to be formatted. To fight like this. Open my computer and right-click on the flash drive.
I click the word “ format».

And now it’s so easy for you to submit a photo.

You need to change the file system to NTFS to start the process of clicking on the single button.
On this table press “ So».

As soon as everything is over, the sign will automatically come down.
That's it, now you can delete the device without worry and switch to the software.
The steering axis is working torrent program. A steering axis system distribution. Then take the axle here Ultraiso program – and install it.
Now we move on to the preparatory work from the system recording.
Performing operations on a flash drive
Well, the time has come for the most significant aspect. Open the Ultra ISO program. Then open the system image.

Jump up again. Please format the flash drive again.

Now write it down.

Setting up BIOS
Another important aspect. Bios is a set of microprograms that control your laptop. If you do it wrong, you'll end up with problems, or you'll end up burning your laptop. Read the article carefully and work as I show.
We will need to take care of both the hard drive and our flash drive. It’s not easy, you don’t need to be careful. BIOS can have different configurations. We are amazed at the different versions and the principles of adjustment.
Award BIOS
The simplest and the oldest. The bottom of the screen appears blue. To use it, you must immediately press RIGHT or F2 on the keyboard after rebooting the computer. You will see such an image.

Now go to the First Boot Device tab. And in this row, place the USB HDD in the first place. Then the computer will initially use external devices, and then the hard drive, which is what we need.
AMI BIOS
Now the same, but in a different edition of the bios. I'll hurry up and come here.

Then we select the third row and move it to the very top. Axis like this

That's it. Now we are under pressure F10 but apparently. We adjusted everything we needed through the bios.
System installation
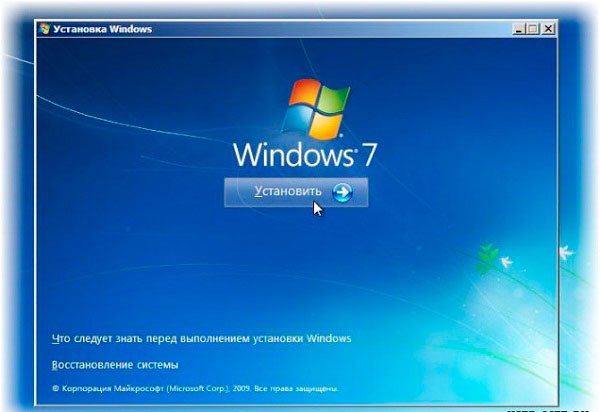
Well, now is the time to begin installation. As soon as the laptop gets wet, you will weaken the axis of the image.

As soon as the scale reaches the end, the interface itself will open.

You need to select Russian language (as you are not a foreigner) and press on.
And now " install" There's only one button, don't worry about it.
Because you have those plans, because I gave you this information. You will then be prompted to select the edition of the operating system. Choose the one that suits you. If you have a double computer with more cores, then the capacity is 64 bits, if not, then 32.

Now you need to select the bottom row. Upper - new. It’s easy to automatically update the system, but do we want to install it from scratch? Well, we need more installation.

The hard drive interface opens. If you don't have any divisions, just format it. If there is a cloth, wash it on the same surface as the system. You can also share them later, for example, with the help of the Acronis program. Ale pro tse zgodom. Once everything is ready, select a new clean section and press far.


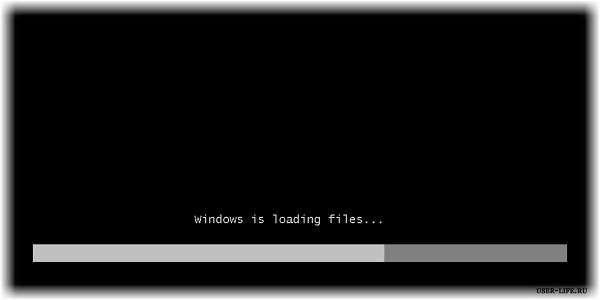
The installation process is now underway. The files will initially be copied and then unpacked. Further – installation. In general, you will have a good time to have lunch or if you would like to drink tea, it will take a long time. Check out the first re-invitation.

As soon as the computer has rebooted, immediately remove the flash drive. Once you get used to the hard drive, you will get such an interface.

Complete the rows and proceed to the next crop.

You can skip everything here; we install the OS without activation. Emboss far.
Now the safety has been adjusted. If you are not a secret agent and your computer is special, choose the first row.

Adjust your time zone.

Choose a home measure.

That's it, you installed Windows yourself. I see, that’s not all.
Final entries
So, we already have Windows, we already have the Internet. But we can’t do without drivers. Let's climb here- I download driver booster.

Install and press the scan button.

As soon as everything is known, we press “ update everything" With the software everything will be automatic.
Now you will re-enchant your computer. Everything becomes more beautiful, smoother, brighter, more juicy.
So, since you, who have done everything for everything, happen to be on the right with ISO images, you will need the Alcohol 120% program. Take її you can here.
Winchester floor
I have already said that it is better to divide your hard drive into a few parts. Just so you don’t waste files, you need to do it more handily. The section under Windows will be lost under it itself, so there will be no impact on anything (well, except for system cleanups). We need a program Acronis Disk Director. The software is really cute and really cool. Not cost-free, but that is the real term, so everything needs to be done quickly and immediately.
Launch the security program.

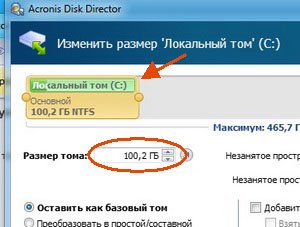
Now select your hard drive and click change volume size.

Or drag the bar and indicate how much space there is on the skin drive, or write down how much space there is on the local HDD you are creating.
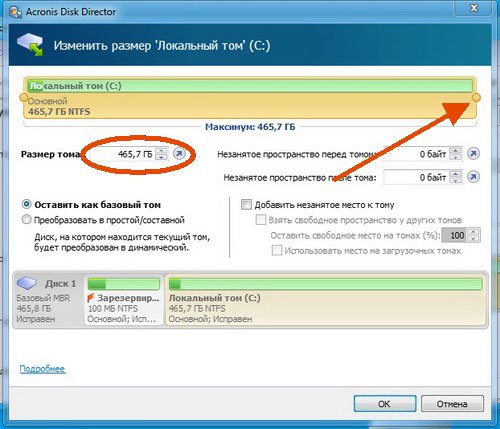
For your sake, you will deprive your operating system of a hundred gigs of water. Not a little, but not a lot. Completely grind for normal operation.
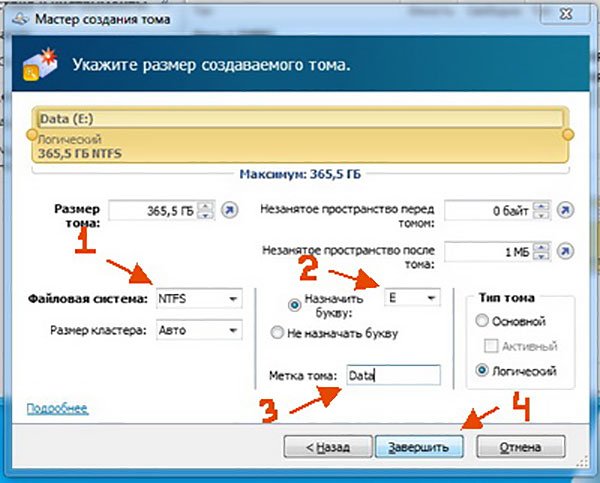
Now click on the section that has just appeared and click on the tab “ create volume».

Now select " basic And you will go further.


Now we install the file system, name the volume letters and emboss them on the folder “ complete.
Go to the top part of the interface and click on the axis here.

Click to continue.
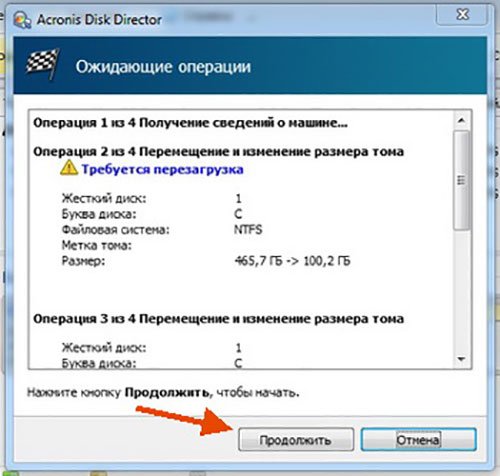
I'm OK now.

That's it, the computer will be re-engineered, and then your new hard will appear. Before speaking, the video axis will help you.
Visnovok
Axis and everything, my beloved readers! Now you can independently earn everything and learn from your friends. Before speaking, share this article with them on social media and messengers, it will be beneficial to everyone.
I would like to remind you that all programs need to be run as administrator. You can install anti-virus programs that will help you prevent your machine from becoming infected. So I say goodbye to you! Subscribe to my blog to stay up to date with new colorful materials that I write especially for you. All the best to you and see you soon!
Let's look at two methods and write down the image Windows 7 to flash storage
- Write the image to a flash drive for further help Ultra ISO.
- Recording the image on a flash drive behind the additional command row.
The article just looks at how to write the image to a flash drive.
- Additional installation instructions in this article: Installing Windows 7.
- How and how to acquire an image is legally described in this article, in the section on how and how to acquire an original image of Windows 7 64 or 32 bits.
Please note that the version of Windows 7 (32-bit) is x86) or 64-bit ( x64)) you need for a new installation, then you can learn more about the difference between Windows 7 x32 and Windows 7 x64.
Before printing the installed operating system, it is necessary to determine what type of wearable device will be installed. Nowadays, power supply is becoming especially relevant, as the market for wide-ranging computer technology has become more compact. Netbook"i, are not equipped with optical drives, and also flash-We have accumulated a great deal of knowledge that desktops have become popular and we can quickly cope with the lost storage disk for the operating system.
What is it under your hand? flash- storage device (4 GB capacity) , because the instructional image takes close 2.5 GB), then by carefully following the steps described in this article, you can install the operating system using flash- kokopuchuvach yak zavantazhuvalny disk. For this, you don’t need a lot of additional software security: everything will be connected to the command line wiki and mounted image Windows 7. Zagali Installing Windows 7 from a flash drive- Shvidshiy (even a little and a folded version).
Recording an image in UltraIso on Flash
After that, as you took the image into your hands Windows 7 it is necessary to write it down anyway. The food is coming "How do you earn money?".The article has given you information on how to write an image to a flash drive ( USB-Flash or else HDD-Flash) for additional help UltraIso.
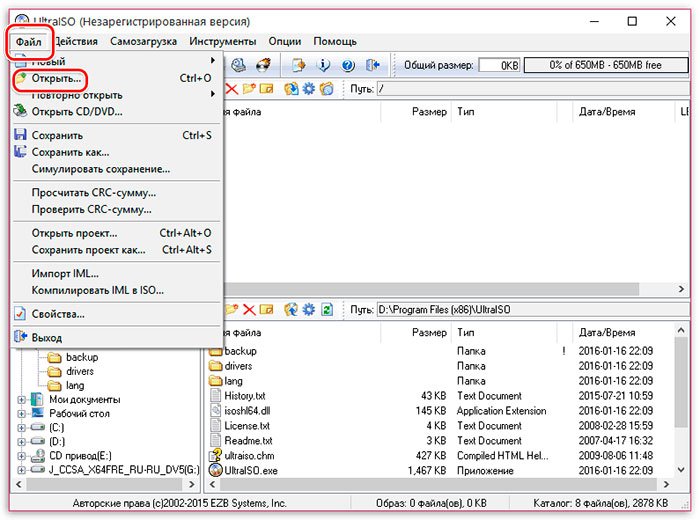
Krok 1. Let's install the program Ultra ISO(in this lesson we look at the version 9.31
, although there is no fundamental difference in other versions).
to be found in the statistics, at the bloc Attached files.
 Malyunok 1. UltraISO installation master
Tisnemo "Dali", please indicate the necessary installation parameters.
For the rest of the week NOT uncheck the boxes "Associated.iso file with UltraIso"і "Install ISO CD/DVD emulator (ISO Drive)".
 Figure 2. Additional data for the UltraISO program
Croc 2 After installation, the program is launched and in the option to register the product is selected "Trial period", which will give us the opportunity to complete this program for 30 days (to complete the entire process in order to record our image).
 Figure 3. UltraISO installation completed
Croc 3. Before we begin to manipulate our rank, it is necessary to insert USB-Exit a flash drive or external hard drive on which recording will be made.
Krok 4. Let's twist our image for help "File - Open". Let's move on to the point "Samozavantazhennya - Write Disk Image (write a disk image)".
 Figure 4. Burning a Windows 7 image to a USB flash drive
Krok 5. In the field Disk Drive It is necessary to select a device (if you have a flash drive inserted into your computer). Also check the correctness of the selected image in the row "Image file". In a row "Write method" we collect USB-HDD. If everything is selected correctly, you need to press the button "Record". Before the process begins, I will feed you: “Do you really want to continue the process? All information on the flash drive will be deleted.". Turn over your flash drive, and since there is nothing important on it, you kindly press "So". After completing the recording, I will notify you about those that the recording was successful: "Burn successful!". Your flash drive is ready for acquisition.
Burning a Windows 7 image to a flash drive using the additional command line.
- Now, to prepare the image, connect flash-disc up usb-to the port of your computer. Re-convert to flash- There is no accumulated data necessary for you, so flash- the disk will be formatted.
- Now launch the command row Windows. The launch label can be found at the following address:
Start -> Programs -> Standard -> Command Row.
You can also press a key combination "Windows + R", after what at the window "start program" you need to enter the name of the program "Сmd" then press "Enter". - Now at the command row window, select the team "diskpart". After this, the system utility for disk management will start. For additional programs, we will clear the disk space and create a new partition. After which we can make it active, format it and write it to a new image instead. Then we will only have to place the downloader files on the disk: after which, with the downloaded operating system, our flash- The disk will appear as a significant part - we can print from the new installation Windows 7.
After that, how to become interested in the system utility diskpart, you will receive the request from the viewer of the row DISKPART>.
Now you can go to the wiki teams.
Command for help "list disk" You can view a list of all available disks on your computer (Figure 5).
 Figure 5. Preparation before installing Windows 7 from a flash drive: creating a private flash drive
Now I'm victorious over the team "select disk number» , de "number"- this is the disk number, which is flash- accumulate, then we select this disk to save all the upcoming commands that we will enter during the hour of working with the utility diskpart.
As you can see from baby 1, our vipadka will have a team "select disk 3".
But be very careful - you can select any hard drive and delete all data on it.
- Then we can see all the data and share it on our flash- hoarders. Why join the team? clean.
- In the offensive action I will be behind the help of the team create partition primary create on flash- accumulate new section.
- Vibermo this section for further congestion of commands until the next one for additional commands select partition 1.
- We are very active, for additional help active.
 Figure 6. To format the disk, enter the format fs=NTFS command.
It is now impossible to initialize disk connections using additional commands assign(the autorun window will open, we have carefully connected to the computer flash- disk) and exit the utility using additional commands exit(Mal. 7).
 Figure 7. Initialization of disk connection using the assign command.
The final term will be forfeited - it is our fault to copy the license to flash- accumulated
For this purpose, mount the image Windows 7, which you want to install on your computer.
Now follow the command line and go to this (mounted) disk. Then go to the folder boot and sign the team bootsect /nt60 K:.
Regain respect for those who instead of letters "K" This command has the letter assigned to it to your flash memory with the command assign.
This is the command to run the system utility bootsect with two parameters:
- The first one points to the version of the owner OS (/nt60– parameter required for creation of a vantage device OS Windows Vistaі Windows 7).
- another parameter is the letter assigned to our flash- I'll save up.
How do you mount a 64-bit image? Windows 7, then you won’t be able to launch bootsect if your operating system is 32 bit - because version given bootsectє 64 bit.
Copying files to a prepared flash drive.
Once the flash drive is prepared, the files are copied to the image:You can mount the image you have with the program DAEMON Tools Lite, then copy all the files from the mounted disk to a flash drive.
Installed
Now if you restart your computer, then go to Bios, you can insert your flash drive for downloading and installation with it Windows 7 (first boot device).Now you can move on to the offensive section, in which the report will tell you about further Windows 7 installations.
Detailed instructions for installing Windows 7 in this article: Installing Windows 7.
You can also turn your attention to recording an image using an additional utility
How to reinstall Windows 7 from a flash drive?


Window OS is the most popular operating system for personal computers in the world. Its interface is simple and intuitive for all users, which provides a wide range of possibilities for managing all processes in hardware and software. From time to time it becomes necessary to reinstall the operating system. This article shows how to reinstall Windows 7 from a flash drive.
As a rule, the installed OS is installed on the disk. But what about those who do not have a disk drive or who are not working? Here our instructions will help you on how to reinstall Windows 7 using a flash drive.
Advance preparation
First, reinstall the OS on your computer, go to what you have copied and saved all the files and folders that are important to you.
Next, find drivers for all devices that are connected to your computer. They come complete with similar devices, but if you have spent them, you can find them and buy them on the Internet.
We invite you to familiarize yourself with 2 options for recording the OS on a flash drive.
For help with special utilities
First of all, you will need the flash drive itself in order to download Windows, the operating system distribution and a set of additional utilities.
- Copy the Windows 7 image from extensions.iso to your computer.
- Launch a special utility for reading disk images (use a program like Daemon Tools).
- Open the required file containing the operating system image.
- Go to the Self-imaging menu and select Burn hard disk image.
- Insert the flash drive and format it.
- Once formatting is complete, click the Record button.
- Confirm this and check for the process to be completed.
Without special utilities
With this method of installing additional programs, you do not need just a distribution kit of the operating system or a flash drive.
- Select the Windows Command Row (Start - Search for “Command Row” in the window).
- Type "diskpart" and press "Enter".
- Type "list disk" and press "Enter".
- You will see a list of connected devices.
- Find the flash drive on the list for which you plan to make a recording.
- Enter the command “select *name of flash drive*” and press “Enter”.
- Enter "clean" - "Enter".
- Then type "create partition primary".
- The system will notify that this section has been successfully created. Now you need to break it up. For this, enter “select partition 1” – “activate”.
- Format the partition with the command "format fs=NTFS".
- And choose to enter “assign letter=Z” to assign a flash letter to the flash drive.
- At the end, enter “Exit” and press “Enter”.
- All you have to do is copy the distribution onto a flash drive.
Initialization of attraction
Determine the offensive order of actions:
- Unplug the device.
- Insert the flash drive into the USB port and turn off the device.
- When you turn on your computer, press a special key (the most advanced ones are DEL and ESC) to enter BIOS mode.
- Insert the flash drive into the first position in the Boot priority order list.
- Save setup and exit BIOS mode.
In another process, installing Windows 7 from a flash drive is completely different from installing from a disk.

After installing Win7, you will need to install all drivers for the devices you plan to use. In addition, you will need to install the programs that you use in your work.