Creation of a fancy flash drive Win. We create a fancy USB storage device. We create a flash drive for accessing additional UltraISO programs
The hours have already passed when installing a system requires a DVD disc, which can become dirty and freeze when installed. A great flash drive for Windows 10, Windows 7, Windows XP for installing the system on your computer will be faster and easier. Let's get a flash drive for help Rufus ta . When installing the system, I recommend inserting the storage device into the rear USB port of the computer.
Let's go over the procedure for a PC with a UEFI bios (you can read the bios) because For older computers and laptops, the smell may not be suitable, for older PCs we will look at it below. For additional help, visit Microsoft. Zavantazhuemo Windows 10 Installation Media Creation Tool, launch the desired program and select “Create new accumulators”.

- If you check the box, it will automatically adapt to your system.
- You can manually select what you need by checking the box in step 1.


- It is indicated that the device will be a USB device.


- You indicate (choose) the route to the building. It is clear that the recording and recording have been completed. That's it!!!


Installation storage device Windows 8.1
Zavantazhuemo Windows 8 Installation Media Creation Tool similar situation. Robimo, as described above in the tenth version.
Get a Windows 10 flash drive without software
Let's choose the option without programs (only suitable for UEFI bios). You will need a distribution kit for ISO and USB media formats, and FAT32 formats.
- Select the windows image and click on it with the right mouse button.
- In the context menu, click “connect”.
- Such a disk will appear as in the picture with files and folders in Windows.


- We circle (visible) everything and press the right mouse button on the file or folder.
- Click "send" in the context menu.
- Select a USB device.

Create a custom USB flash drive for Windows 10, 7, XP using Ultraiso
This version is old, so you can install Windows 7 using the additional UltraISO program. For additional programs you can write to a flash drive for Windows 10 and XP. We download the program and install it.
- We reveal our favorite image from the Windows 7, 8, 10, xp system.
- It’s amazing that we saw a disk icon.
- Select "Burn hard disk image".
- We admire respectfully, while standing USB storage so as not to format your hard drive.
- Select the recording method "USB-HDD+". (When the computer is installed, select USB-HDD+ in the BootMenu).
- We press “record”.

Get a flash drive for windows 7, 10, XP for help Rufus
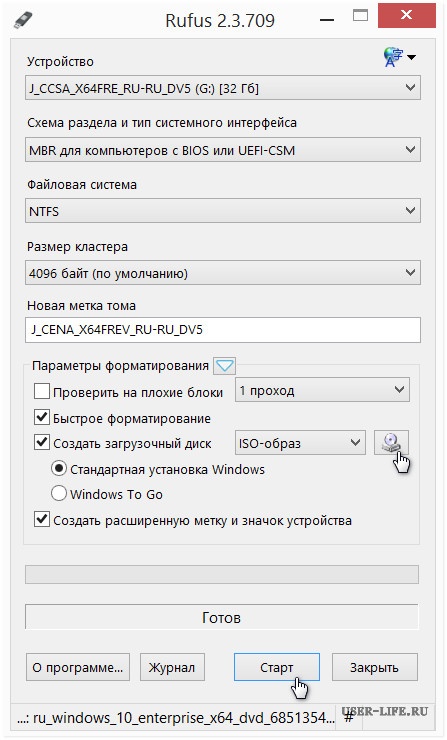
If your bios is old, not uefi, Rufus creations for this. Go to all versions of windows. Select from the column "Partition scheme and type of system interface": For older BIOS select MBR. For today's UEFI. Vanquish and install the rufus program.

Get a Windows 7 flash drive for extra help USB/DVD Download Tool
The Microsoft utility has been created for a long time and is still relevant to this day to create a Windows 7 installation using the Windows USB/DVD Download Tool. Vanquish and install the computer.
- Vibrati USB storage device.


- Embossed "Erase".

- We press “So”, format the storage device, write it down, and you’re done.


I will show you 4 ways to help you create a valuable flash drive. This is required for installing Windows OS or programs that require installation of the system.
You need a simple program for this purpose, otherwise you can get by with the system. I will provide instructions to help you create a flash drive to download any version of Windows or program. 4 methods, 2 universal and 2 for specific OS.
But before this you need to prepare. You will need:
- Flash storage with a capacity of 4 GB or more.
- Image ( iso) operating system or program for which the flash drive will be created.
Before creating a new flash drive, be sure to format it to remove any damage.
Preserving a flash drive in Windows
You can do without third-party programs and do everything on Windows. For this you will have to quickly meet a number of teams. I will demonstrate the most important of them.
Empty the device of all files first. For whom should I go to the Vikonanny row ( Win+R) from the Start menu >> Vikonati, and then enter the command diskpart as shown below.
At the window, enter list disk to install all devices for further work with them.

My butt has 2 devices:
- 0 – hard disk.
- 1 - flash drive.
Remove a flash drive from hard drives just by size. Select with this command select disk 1.
Be respectful, the replacement of one may be another number.


After this, you need to create the first section. For whom enter create partition primary.

Select section enter select partition 1 then activate yogo with the command active.


Then set the letter to nose ( automatically) vvіvshi assign and finish the job Exit.

Now quickly download the files onto the flash drive at the unpacked view. If you simply copy the iso file, you are not gaining anything.
If you still don’t understand, you can marvel at the video of how it works on a real application.
Zavantazhuvalnaya flash drive for Windows 7 USB/DVD Download Tool
Please install the USB/DVD Download Tool. It was specially designed for working with Windows 7 files and is absolutely cost-free. We don’t pay for everything from others. Usyogo 4 simple crumbs for the creation.
I appreciate that if you are vikoristing an image not from the official Microsoft website, you may encounter problems or problems.

Select the path to the iso file and go to the next step.

Then select a USB device for a flash drive or DVD.

Select the flash drive and proceed to copy. It has at least 4 GB of free space.

Then wait until you sign up for the device and remove the ready-made flash drive.

The same instructions apply to the video format.
A unique flash drive for all images from UltraIso
This is a paid program because it has a cost-free trial period. Download it from the official website and install it. It is richly functional and Russian. Suitable for Windows XP, Vista, 7, 8 and 10.
You can watch the example of installing Windows XP in the video. With other versions of systems, everything works in the same way.
After launch, complete the trial period.

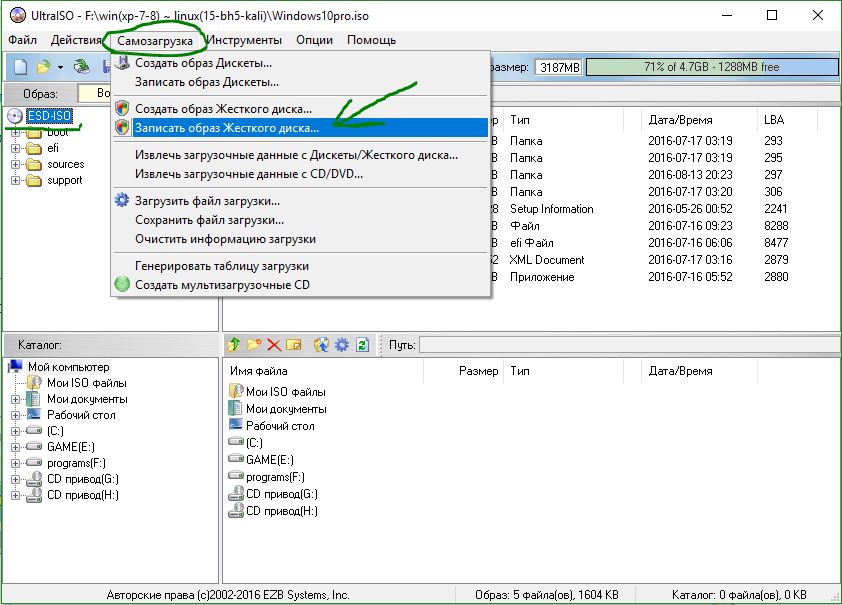
Then open the image in the program.

Now, in the “Self-Vantation” tab, select the image entry as shown in the example below.

This is where we start to get things done.
- Disk drive- Flash drive.
- Image file- here, turn it around and the way is indicated correctly.
- Recording method- Obviously vikorize USB-HDD+. Otherwise, in such situations, you won’t be able to handle it.
After checking everything, proceed to recording.

Wait for it to finish. The hour before the end is displayed right-handed.
Always do not remove the flash drive until the process is completed.

Once completed successfully, you will receive a note about completion. After this the flash drive will be ready. Just close the window and grumble.

Additional method for Windows XP
Download the free DirectGrub utility and unpack the archives. No installation required. Select the iso file, flash drive and press “Start” as shown below.

Check while the files are being copied. After successful completion, show up at the end.

I hope your food supply has failed and everything has gone well.
What did you use to create a fancy flash drive?
I don’t remember anymore if there is a vikory disk to install Windows or else Ubuntu on PC. I'll be glad to create a flash drive or install it for anyone who cares, I'm going to use the same method that I want to talk about in this post, giving instructions with screenshots.
I have to install Windows from flash storage often! I'll always use the same flash drive. I can’t tell you the exact number of computers on which I had to install Windows from a flash drive, there were about a few of them, more than 20 for sure!
For the entire hour, installing Windows from a flash drive, I did not run into the same problem every time, which is what I hope you do!!!
A Vikorist flash drive is quite simple. That flash drive itself is already old, only God knows how old it is.
By the way, the simplest thing is a 4 GB flash drive.
Preparing a flash card.
Preparing a flash card consists of one simple speech. It is necessary to format the file system NTFS. This can be done without any problems using standard Windows tools. Go to my computer and RMB for the flash drive icon, from the context menu select “Format...”
In the section " File system"you take it NTFS Then press the “Start” button in the window first and wait until you press the “ok” button.
Now that the preparation of the flash card is completed, it is now impossible to prepare the image from Windows.
Preparing a disk image from Windows.
Preparing Windows means you need to unzip all files into a separate folder ISO» Image from Windows. You can earn money in this way.
1 – Unzip with the original archiver Win RARom for which open the iso image file using Win RAR
І unpack all the files in the previously created folder, for example “win7”.
2- Use the “Ultra ISO” program quickly and the principle is the same.
Open the image, see all the files and drag it to the “win 7” folder, whatever they were called there!
The windows files have been unpacked and from there you can proceed to create your own flash drive.
Creation of a fancy flash drive from Windows.
The flash drive is ready, the Windows files extracted from the ISO image are missing a few more, and the original flash drive will be ready before work.
We are looking forward to the program WinSetupFromUSB (See below for this post). I start.
At the main window of the program, press the button “ Bootice»
At the next window, go to the one where the flash drive you need is selected from the list and press the button “ PerformFormat»
Here you need to select USBHDDmode (SinglePartiton) » I press the button « NextStep»
At the next window, select the NTFS file system and click the “ok” button
After pressing the ok button, respond positively to all advances. After this, close all windows and go to the main program window.
Check the box next to " Vista / 7/ Server 2008…… » And select the same “win7” folder where you previously unpacked the Windows files from the iso image.
All I had to do was press the “GO” button and click for about 10 minutes until the program finished working.
This means that the program may not respond and may simply freeze, in which case you do not need to cancel it. It really works, you just need to check. After an hour, the program will sound and you can monitor the progress of the robot.

One of the most important foods for home cooks is no less. An attractive flash drive or USB hard drive will help bypass the optical drive, and can also be carried with you if you often install a system or repair your computer. In fact, video game manufacturers have already stopped equipping their devices – netbooks and ultrabooks – with optical drives. Without a disk drive, you can reinstall the system without any hassle of using a flash drive. To create such a device, the easiest way is to quickly use a special utility. You can record anything you want on such a USB device: ERD Commander, a program for working with a Paragon or Acronis hard drive, as well as an image for Windows, MacOS, etc.
In order to get a flash drive with an ISO image necessary (ISO image is a copy of the installation disk from a special container with extended ISO):

The program will automatically extract the ISO image and extract it I'll get a flash drive, with additional help, you can install the OS on your computer without using a CD/DVD-ROM, or download an image of a portable version of your favorite OS and install it so that it will always be at hand. The YUMI utility, which is an analogue of UNetBootin, also copes well with recording images.
How to create/burn an ISO image
You can find out how to create an ISO image from a finished DVD or CD to install a Windows distribution or other necessary program using the additional program CDBurnerXP. Launch the program and select the item from the main menu "Copy disk". Indicate your drive in the drive as a drive, and to save the finished ISO image to a folder on your hard drive. Click on the button "Copy disk". For additional programs, you can burn previously saved images to optical discs. Having created the image, you can use it to transfer it to a flash drive or memory card to help you with fortune-telling programs.
Preventive flash drive with antivirus
You can check the system for the presence of a bad software using additional anti-virus programs and other devices (flash cards, portable hard drives, etc.), since Windows has stopped protecting itself. I recommend vikorystuvati nastupne PZ as a portable antivirus for fancy flash drive: Kaspersky Rescue Disk and Dr.Web LiveUSB These antiviruses have been tested many times, are practical and have proven themselves well. Having followed these instructions, you can install a program to record the antivirus, so you will need a flash drive with a capacity of at least 512 MB. If you want to download from a flash drive or USB HDD any other antivirus or scanner program, containing an ISO image, then vikorist.
Windows emergency mode
Perhaps Windows does not start, and you need to save your personal data. If nothing helps to ensure the efficiency of the system, then the fastest way is to use the ERD Commander distribution kit (for Windows 7 32bit, Windows 7 64bit and Windows XP 32bit) and an external HDD. ERD Commander is a set of programs that allow you to control the system for a long time, which makes it possible to start the computer once the OS files are completely corrupted. Burn the ISO file using UNetBootin to a flash drive or any program for burning images to disk (ImgBurn, Ashampoo Burning Studio or Nero Burning Rom) at minimum speed and restore the system. The interface of this interesting Russian language is intuitively intelligent. Click on the file manager and deny access to the hard drive. It identifies all the files that need to be saved and opens the external HDD to back up the data. It is clear that you copied the virus to your hard drive. Before you transfer your data to a new Windows system, you must install an antivirus and convert the files on your portable HDD.
How to write Windows to a flash drive or USB disk (ISO image of Windows on a flash drive)
Hello, the Windows 7 USB/DVD Download Tool works seamlessly with both Windows 7 and Windows 8 images.
1. Pretend the utility Windows 7 USB/DVD Download Tool.
2. Run the import file as administrator and install.
How to burn Windows to a USB flash drive with Windows USB/DVD Download Tool(analogous to UNetBootin from Microsoft) .
1. Select the ISO image file of Windows 7 or 8 by pressing Browse
2. Press Next. Select the device on which the image will be created. Press USB device(if you want to create a flash drive installer) or DVD(You want to create an exciting DVD disc). Before inserting the device into the device, insert the flash drive into the USB port or the DVD into the connection.
3. Insert the flash drive, on which the image of the owner will be recorded. To start creating a flash drive, press Begin copying.
4. Now check for the completion of the creation process of the flash drive. After the process is completely completed, you remove the finished product before installation. USB flash drive with Windows 7 or 8.
* Before installing Windows 7 from a flash drive, don’t forget to enable the computer’s USB device in the BIOS!* The minimum size (volume) of a flash drive must be no less than 4GB!
Pre-owned flash drive with Acronis Disk Director 11, True Image 2012, Paragon Partition Manager 11
This collection includes universal solutions for fancy flash drive With the ability to choose from the most popular data update programs, OS and hard disk drives. You just need to write the downloaded archives onto a flash drive and then delete it universal and attractive USB drive. You can also burn this collection to disk.
Supported OS capacity: 32bit + 64bit
Madness with OS Vista and Windows 7: again
Interface language: Ukrainian
System features: Processor: Intel Pentium or its equivalent, with a frequency of 1000 MHz or higher; RAM: 512 MB and more; Misha; SVGA video adapter and monitor;
Flash drive larger than 2 GB (for all valuable images)
Flash drive based on Windows Preinstallation Environment 3.1 (WinPE) includes:
- Acronis Disk Director 11
- Acronis True Image Home 2012
- Paragon Hard Disk Manager 11
- Paragon Partition Manager 11 Professional
- Paragon Home Expert 11
- The crowning glory of Windows 7 x86
- The centerpiece of Windows 7 x64 update
Instructions for installing the device on a flash drive
Securing a computer from a USB flash drive or other significant storage device
To start the computer before rebooting or rebooting the computer from a CD, DVD, flash drive or external USB drive, you need to make changes to the BIOS settings. Most current motherboards are capable fascination with USB flash drives, but on older inode models you can turn on the option to disable optical drives. This problem in some cases occurs when the remaining BIOS version is installed, and for older motherboards such updates may not be released.
After shutting down the PC, go to the BIOS by pressing the key "Del" or else "F2". Then find other menu items that indicate the need for your device. Depending on the manufacturer, the BIOS version can be obtained from the sections "Boot" or else "Advanced BIOS features". In addition, modern motherboards allow you, without reconfiguring the BIOS, to specify devices for which the system is configured. For what time do you need to start your PC? "boot menu". As a rule, you can earn money using the button "F12".
This installation method is suitable if you have a netbook or your CD/DVD drive is in order and you need to install Windows 7. This method is also good because the process of installing Windows 7 from a flash card is completed many times more bottom of CD or DVD disc .
Before you start writing Windows 7 to a flash drive, copy all the important data from the flash drive to other media (hard drive where Windows will not be installed, another flash card, disk, etc.), scraps in the formatting process I'll write down the image Windows 7 on a flash drive, all data will be on it poor.
First method
If you are creating a new flash drive using the Windows 7 operating system, then you will need a program Windows 7 USB/DVD Download Tool, Yaku Vi can enchant with Of. Microsoft website for assistance.
If you are creating a private flash drive under the Windows XP operating system, you will need to install Microsoft.NET Framework 2.0і Microsoft Image Mastering API 2.0. Obviously, since you already have them installed (the first programs often fail), you don’t need to install them again.
1) Insert the flash drive into the laptop.
2) Launch the program. Press button Browse.
3) Select ISO image of Windows 7 and press the button Vidkriti.

4) After you have specified the ISO image of Windows 7, press the button Next.

5) Press the button USB device.

6) At whose window your flash drive may appear. Press button Begin copying

7) Press the button Erase USB Device

8) Press So.
9) The process of writing the Windows 7 image to a USB flash drive will begin

10) After the recording is completed, the status will change to Backup completed. Close the program

Another way
For another method you need a program Ultra ISO.
1) Insert the flash drive into the laptop.
2) Launch the program. For Windows 7 and Windows Vista, it is recommended to run the program as an administrator.
The UltraISO program is paid, but you can get a quick trial period, let's take a look at this option. Click the "Trial period..." button

3) Select menu item File ->Vidkriti...

4) Select ISO image of Windows 7 and press the button Vidkriti.


6) In the field Recording method: Select USB-HDD. Press button Format.

7) The formatting utility will launch. Press button Get started.

8) Press OK.

9) After formatting, you will finally hear about success. Press OK.

10) Close the program.

11) Press the button Write down.

12) Press So.

13) The process of burning the Windows 7 image to a USB flash drive begins.

14) After completing the entry in the column Podia the message “Recording completed!” will appear. Close the program.

Third method
For the third method, we need the WinSetupFromUSB 1.0 Beta 7 - program.
Note: the version sent is new, but the principle is no longer the same.
1) Insert the flash drive into the laptop.
2) Launch the program. For Windows 7 and Windows Vista, the program must be run as an administrator.

In the field USB drive selection and format Your flash drive is at fault.
Note: If the flash drive is not recognized, format it using the PeToUSB or HPUSBFW utility.
Also, the flash drive may not appear if it is inserted into the laptop after the Winsetupfromusb 1.0 Beta7 program has been launched, and in order for it to appear, just press the button Refresh.
3) Press the button RMPrepUSB.

4) The following rows are designated: WinPEv2/WinPEv3/Vista/Win7 bootable (CC4), NTFS. Check the box opposite Boot as HDD (C: 2PTNS). Press button 6 Prepare Drive.

5) Press the button OK.

6) Press the button OK.

7) Whose name is to show up like this Dos vikno.
In advance: Do not close this window. It may close automatically.

8) After that Dos window close press button Exit.

9) Check the box next to it Vista/7/Server 2008 - Setup/PE/RecoveryISO. Press right-handed onto the square.

10) Show up regularly Looking at the folders In which case you need to select a virtual drive to mount the ISO image of Windows 7.
After you have finished, we press the button OK.

11) Press the button GO. The process of writing Windows 7 to a USB flash drive begins.

12) After completing the recording, a small window will appear. Press OK.

13) Close the program.

Fourth method
The method of setting up the dosit is simple, so that you can victize him if you want! For what do we need:
1) Windows 7 image
2) Flash storage with a volume of at least 4GB
3) A program for creating and editing ISO images, ultraISO using the previously written method or the costless MagicDisk
You can take any type of flash drive up to an SD card, but not less than 4GB!
4) Launch the command row (for Windows XP there is no standard->command row. For Windows Vista/Windows 7, open Start, search at the very bottom, enter cmd then open it as administrator).
5) Enter further in the command line diskpart, the Disk Management utility will open.

6) Next, in the diskpart utility itself, enter: list disk, which displays all the physical disks of the PC, the disks themselves, and not the partitions.
Among them, our flash accumulator looks like.

7) After which we end the command select disk #, de # This is the number of our flash drive.
In this case, the flash drive on the screen is numbered 1, also s elect disk 1. All further manipulations are carried out with this disk.
8) We sign the team clean, clear the accumulation, then command create partition primary- We create a new partition on the disk.
9) After creating a new section, register select partition 1, select this section for manipulation, enter active Thus the boys themselves became active.
10) Now, for the flash drive to be visible in bios, you need to format it in the NTFS format, which we need to do with the command format fs=NTFS.
11) Next, it is necessary to activate the connection process for the device and assign it to the letter you use with the command. assign.
That's it, the preparation process is completed.

Installation of Windows 7
The distribution can be recorded using either a file manager or a cost-free one.
If you need to open an image of the installation disk with the OS, you can use either a disk emulator, Alcohol or MagicDisk, create an image and copy it from a file manager to our prepared flash drive.
That's it, the process of creating the installation flash drive is completed, now we try to install the OS, having previously installed it in bios.
Well, that’s all, which of the four ways to create a vandalized flash drive is vikorist – it’s up to you.
Enablement of flash drives in BIOS
Before you start installing Windows 7 from a flash drive, you need to go into the BIOS and uninstall the software from the flash drive.
To enter the BIOS, you need to press the key when the computer is turned on. On computers there is a Del key. On laptops, the most commonly used key is F2.
When you turn on the laptop, a screen appears with a row at the bottom that says what key you need to press in order to enter the BIOS.
If you do not have such a row, you will need to see information about how to enter the bios Pos_bnik Koristuvach I'm going to get my laptop.
1) We insert the flash drive into the laptop if it is not inserted.
2) We turn on the laptop, if it is turned off, it will be restarted.
3) Go to the BIOS.
In the example, the whole process will look as shown below, if you have a different BIOS, then the principle itself will be lost. What is food - write in the comments.

4) Go to the demo tab Boot. She, in order of importance, needs to put our flash drive in the first place, the vikory keys and arrow keys and keys F5і F6. Then use the arrow keys to select our flash drive, and use the key F6 we are leading to the top.
To find out which keys you need to use to put them in order, watch the right-handed tips.
The name of the flash drive may appear in the row USB HDD.
The flash drive may also appear in the row USB KEY.
To save changes and exit the BIOS, you need to press the key F10. (Please note that the BIOS key may be different. Please see right-handed prompts at the bottom).

5) Show up in which English language to ask Save Changes and Sign Out? You take it Yes.

6) After this, the Windows 7 installation process will start again.
Installing Windows 7 from a flash drive
If the flash drive with Windows 7 was installed using the additional program WinSetupFromUSB 1.0 Beta 7, a green screen immediately appeared. Select Start Vista/Win7/Server 2008 Setup or PE/Recovery ISO in partition 0.

Then the Windows 7 installation program will start.
Write in the comments what you don’t understand and what kind of food you’ve missed.