HTC One X firmware. Unlocking the device, installing recovery, removing root rights, Custom ROM firmware Launch in different modes
Zhovten 27, 2014
Since the MIUI firmware is not stock for NTS smartphones, its installation involves several complications. This can lead to the loss of data on NTS smartphones and other untransferred assets. Neither Xiaomi nor our website miui.com.ua bears responsibility for the results of your activities. Therefore, be respectful and make a new backup of your data, write down the IMEI of your smartphone and find out the address of the nearest service center :)
Hopefully, everything will turn out well, because... The firmware has nothing complicated, it only takes an hour, respect and ease.
The HTC company installs on its smartphones a control over the Android system under the name HTC Sense and even install it until you try to remove root rights, unlock the bootloader and change the shell to something else. So it won’t be an easy road.
You must understand that the borrowing procedure will take place at least once in a while, so you should keep an eye on it so that you don’t rush and do everything consistently and correctly.
Let's see. First of all, it can be unlocked by the owner. We need a computer with the Internet and an HTC One X smartphone.
We first need to install HTC Sync if it is not installed on your computer.
Write to the email address for inquiries, because... Registration confirmation will arrive soon. On the list that is best for you, click the message and confirm that you are a person and want to cancel your account on HTC.
2. Do not unpack it, but place it in the root of the internal memory of the HTC One X smartphone.
3. Enchanted in Bootloader (Gunness of the Live Button)
4. Select the item Recovery, after downloading the recovery, select the item Install zip from sd card
5. It is indicated that the archives are being imported and the choice is confirmed.
6. After installation, select Reboot system now.
Now V is a super user! And before updating MIUI firmware on HTC One X, I lost more than a few dollars.
Now let's flash the firmware itself.
1. I love the current HTC One X
2. Without unpacking the archives, put them in the root of the internal memory of the smartphone.
3. Enchanted in recovery (points 3-4 above)
5. Data is available (you will first need to copy files to your computer, and contacts in Google or HTC, or to a computer using HTC Sync)
– wipe data\factory reset
– wipe cache
– wipe davlic cache
6. We start the firmware from a clean sheet. Select an item Install zip from sd card
7. The archives with the firmware are indicated and the selection is confirmed. The installation can last for about an hour. After the installation is complete, a message about it will appear: Install from sd card successfully installed.
As if you had another smartphone, that’s where everything would end. Ale Vlasniki NTS do not look for easy nobles.
I turn back to the computer. The file is extracted from the archive with the firmware boot.img and put it in the folder C:/Android
Select from the recovery menu Advanced Power Menu and further – Reboot into bootloader
Your Windows console may still be open. If not, open it again (Start-Visconati-cmd-Enter-CD C:\Android)
Dial a command fastboot flash boot boot.img and press Enter
Select the Reboot item on your smartphone, and if you have successfully installed it, then you can use MIUI on it.
Today we will be installing custom firmware on one of the company’s largest phones - HTC One X, which you can read about on our website. In this instruction, I will give you the most popular firmware for your smartphone, as well as instructions so that you can choose the appropriate one yourself. Let's go.
HTC One X firmware- step-by-step instructions
7. Next time, select the item Install zip from sdcard ->Choose zip from sdcard -> find where we put the firmware, select and press (not squeeze!) the live button on the smartphone.
8. Terpinnya. Wait until you get up HTC One X firmware.
9. When the installation is completed, you will now appear on the screen “blah blah blah completed”.
11. You need to restart your phone: go to the bootloader menu: Advanced Power Menu -> Reboot into bootloader
12. Using an additional USB cable, connect One X to your PC, then open the command row (CMD) and write
press "Enter".
13. Then we write there:
And I press “Enter”.
14. That’s it, the re-enablement is gone, in the bootloader we select the “REBOOT” item.
Android application/vnd.android.package-archive Android addon
HTC One X - Unblocking the device, installing recovery, gaining root rights, custom ROM firmware.
Well, you have captured the archives of the *.ZIP file, which you need to use to answer the question about your phone, without unpacking it. Then go to recovery and do the following:
- install zip from sd card;
- Choose zip from sdcard and find the file you want, select it and confirm with “YES”.
- After the installation is complete, select reboot system now.
Now we have root-rights.
If you need to flash custom, you will be able to get the most out of it. We recommend choosing LeeDrOiD One Xtreme V2.2.0 (Description on XDA).
Advantages of this firmware itself:
1. The presence of a blur with three dots at the bottom of the display, for additions written under 2.3 and with support for the hardware menu button. In this firmware, the button to view running programs now functions like a hardware menu button, and to open the list of recently launched programs, you need to press the “alarm box” as before.
2. Select several options for re-arranging the device. The presence of the Russian language without the need for the More Locale installation, full support for the Landscape mode and the ability to customize the status bar.
3. For additional help, Root Uninstaller Pro contains a lot of useful and unnecessary things.
Increase your respect! At the moment, one of the non-working pointsrecoveryє item Mount USB Storage, so do not delete the previous backup from the device’s memory, then copy the firmware you want to install onto the card, or rather, tell a few different ones about any problem.
The latest firmware version is available, instructions for installation:
- Copy the archives you have captured to your phone's memory.
- Change your phone number CWM update.
- Select item wipe data\factory reset.
- Select item wipe cache.
- Select item Install zip from sd card.
- Vibrati paragraph Choose Zip from sd-card And find the file in the memory of your favorites, select it and confirm “YES”.
The Aroma installer menu will appear, with a number of options to choose from: what to do, what to install, what to delete. It’s not complicated at all, you’ll figure it out easily. - After the procedure, you will write on the screen Install from sd-card successfully.
- Now select the item Rebootsystemnow. That's all.
HTC One X - Unblocking the device, installing recovery, gaining root rights, custom ROM firmware.
rating 80 from 80 based on 80 ratings.
A total of 80 vodguki.
Every smartphone owner wants to make his device better, make it more functional and a more practical solution. Since you can’t do anything with the hardware part of the computer, you can upgrade your security software to the fullest extent possible. HTC One X is a high-quality phone with outstanding technical characteristics. There are statistics about how to reinstall or replace the system software on your device.
Looking at the NTS One X based on the capabilities of the firmware, it is clear that the device still “repairs” the software supplied with it. This is the case for those who understand the policy of the printer, so before installing the firmware, pay special attention to understanding the instructions and, after thoroughly understanding the essence of the processes, proceed to direct manipulation of the device.
Skin action carries with it potential dangers for the device! Responsibility for the results of manipulation with a smartphone lies entirely with the operator who operates them!
As with other Android devices, successful procedures with HTC One X firmware largely depend on proper preparation. Vicono Low Office of the PIDGOTOVICHI, and before the holders of the Divais Vivchamo to the Kinzi Sovponovani iznstruktykhi, the curtains are not the same files, the gotuymo iznstroy, the yaki is Vikoristovati.

Drivers
The easiest way to add components to the system for the interaction of software tools with One X memory sections is to install HTC Sync Manager, a proprietary software program for working with your smartphones.


Backup information
If the following methods are used for installing the system software in the analysis, the device transmits erasing data from the user, which is stored in the smartphone. After installing the OS, you will have to update the information, which is impossible without first creating a backup. The official way to save the data of advances.


Necessary
To operate on HTC One X memory sections, in addition to drivers, your PC must have a range of functional and manual software tools. In obligatory order, it is necessary to unpack it into the root of drive C: package s i . Below in the description of methods we will not dwell on whose nutrition, keeping in mind that Fastboot is in the consumer system.

Launch in different modes
To install various system software, you need to switch the phone to special operating modes. "BootLoader"і "Recovery".


Rozblokuvannya zavantazhuvach
The instructions for installing modified firmware, given below, assume that the device is unlocked. It is recommended to carry out the procedure in advance, and avoid using the official method established by HTC. It is also necessary to ensure that Sync Manager and Fastboot are installed on the computer before installing, and the phone is being charged.
- We go to the official website of HTC Developer Center and press the button "Register".
- Fill out the form fields and press the green button "Register".
- We go to the post, open the sheet under the HTCDev command and click on the instructions to activate the cloud record.
- After activating the cloud account, enter your login and password in the appropriate field on the HTC Developer Center web page and click "Login".
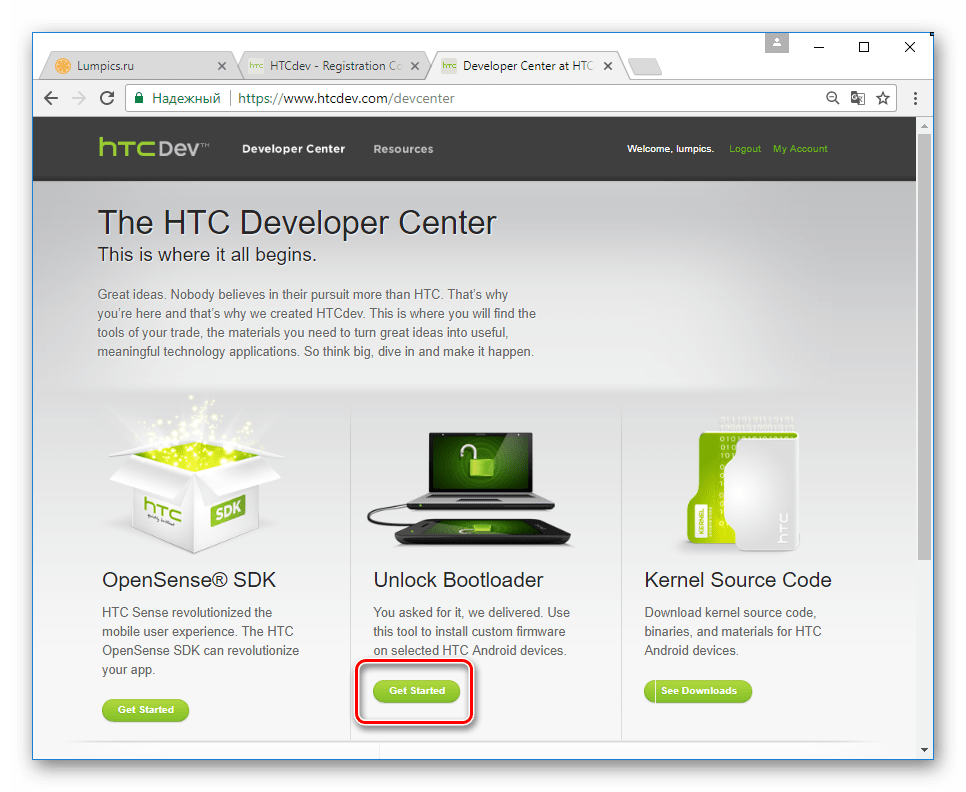
- In the area "Unlock bootloader" click "Get Started".
- At the crossroads "Supported Devices" You need to select all the models you are interested in, and then select the select button "Begin Unlock Bootloader" to move to further places.
- We confirm the awareness of the potential unsafety of the procedure, pressing "Yes" at the window-zapi.
- Next, we insert icons in both checkboxes and press the button to go to the unlocked instructions.
- In the instructions that have been opened, we skip all the steps

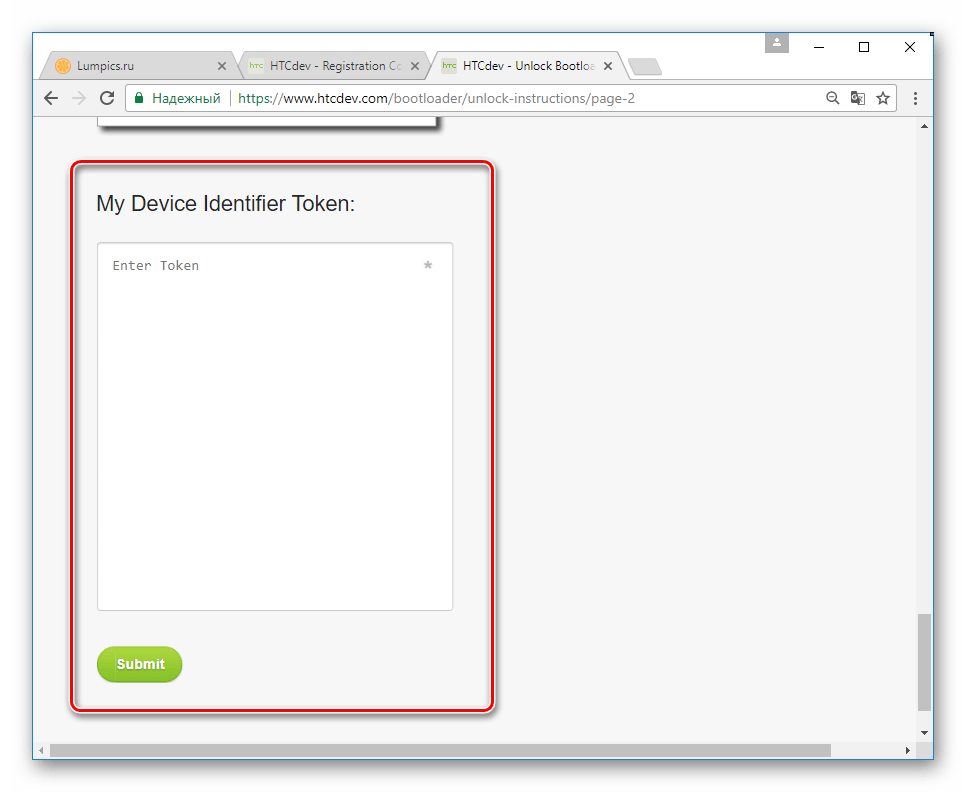
And keep the inserts warm until the end. We only need a field to insert an identifier.
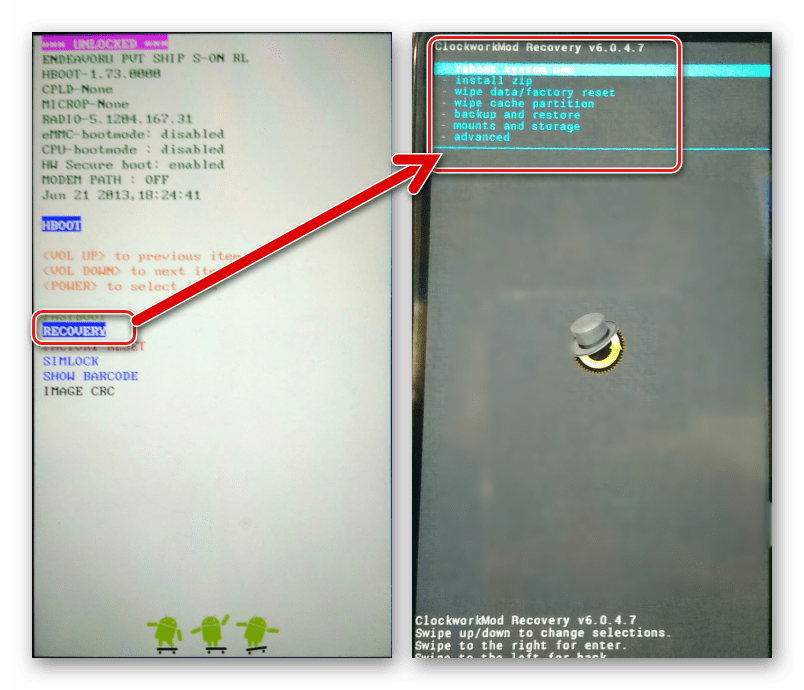
- We switch the phone to mode "Bootloader". From the list of commands that open, you need to select "FASTBOOT", then connect the device from the PC using a USB cable.
- We open a row of commands and write next:
cd C:\ADB_Fastboot

- The next step is the meaning of the device identifier, which will be necessary to revoke permission to unlock the device. To remove the displays, you need to enter the following in the console:
fastboot oem get_identifier_token

and begin the Vikonannya command and attack "Introduction".
- The character typing option is visible behind the additional arrow buttons on the keyboard or mouse,

and copies the list (with additional combination "Ctrl" + "WITH") in the following field on the HTCDev web page. You should see it like this:

To move to the offensive stage we press "Submit".
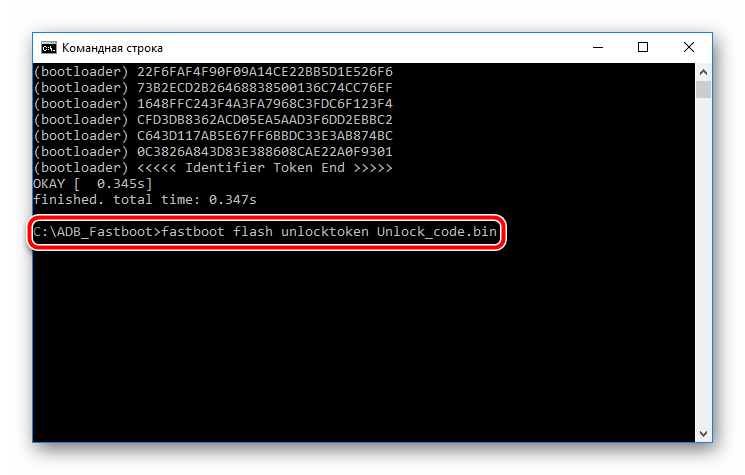
- Once the documents have been processed successfully, you can remove the sheet from HTCDev to remove Unlock_code.bin- A special file for transferring to the device. We download the file from the sheet and place it in the Fastboot directory.
- We can use the command via the console:
fastboot flash unlocktoken Unlock_code.bin
- The following command will appear on the device screen: "Unlock bootloader?". Install the white icon "Yes" and confirm readiness to begin the process using an additional button "On" on the device.
- As a result, the procedure will be continued and the Bootloader will be unlocked.
- Confirmation of successful unlocking is written "***UNLOCKED***" in the top of the head screen mode "Bootloader".


Installation of custom recovery
For any serious manipulations with the system software of HTC One X, it is necessary to modify the middleware of the update (custom recovery). There are a lot of possibilities for the model we have looked at. Let's install one of the ported versions of this update into the device.


Firmware
To add more functionality to the software part of the device, move the Android version to a more current one, and also increase the functionality, then go to the latest unofficial firmware.
To install customizations and ports, you need a modified core, which can be installed following the instructions in the article, or you can simply update the version of the official PZ.
Method 1: Android add-on “Update PZ”
A single method of working with the system software of a smartphone, permissions from the official manufacturer - this is based on the specification built into the official firmware "Updating PZ". Throughout the life cycle of the device, while the updated system was being released from the manufacturer, I regularly thought about myself with light-hearted notifications on the screen of the device.

Today, in order to update the official version of the OS or get up to date with the latest version, you need to go online.


Method 2: Android 4.4.4 (MIUI)
Security software from third-party developers will now breathe new life into your device. The choice of modified solution lies on the basis, the available set of different packages for installation is wide. As a rule, below Vikoristan, the MIUI Russia team ported the firmware for HTC One X, which is based on Android 4.4.4.

- We install modified recovery in the manner described above in the preparation procedures.
- We are purchasing a package of software from the official web resource of the MIUI Ukrainian team:
- We place the zip package in the internal memory of the device.
- We're seizing your phone "Bootloader", further in "RECOVERY". І OBOV'YAZKOVO we will make backups via CWM points.
- Robimo wipe (cleanse) the main system sections. For whom do you need an item? "wipe data/factory reset".
- Let's go to "install zip" on the CWM head screen, the system shows the route to the zip package with the software, having previously selected "choose zip from storage/sdcard" And we begin the installation of the device by pressing "Yes - Install...".
- We wait for the confirmation of success to appear. "Install from sd card complete", turn to the head screen of the middle and select "advanced", and then we re-arrange the device with Bootloader.
- We unpack the firmware with an archiver and copy it boot.img u catalog iz Fastboot.
- We switch the device to mode "FASTBOOT" From the Bootloader, we connect it to the PC that was connected. We launch a series of Fastboot commands and flash the image boot.img:
fastboot flash boot boot.img
- Re-engaging in Android updates, vikorist point "REBOOT" on the menu "Bootloader".
- It’s time to check the initialization of MIUI 7 components for a few minutes, and then carry out initial setup of the system.

It means that MIUI on HTC One X works just fine.


Dodatkovo. If the smartphone is not connected to Android, and copying packages from memory for further installation is cumbersome, you can speed up the possibilities of OTG. To copy the package from the OS to a USB flash drive, connect it via an adapter to the device, and during further manipulations in the recovery, indicate the paths to "OTG-Flash".


Method 3: Android 5.1 (CyanogenMod)
In the world of Android devices, there are not so many smartphones that successfully use their functions for more than 5 years and at the same time gain popularity among enthusiastic retailers, but they successfully continue It’s easy to create and port firmware, which is based on new versions of Android.

Of course, HTC One X owners will be delighted that the latest Android 5.1 can be installed on the device, and if you select the following, we will see the same result.
Croc 1: Installing TWRP and new layout
In addition, Android 5.1 carries with it the need to resize the device's memory, so change the size of the partitions to achieve better results in terms of stability and the ability to add functions added by vendors to the new version of the system. You can resize and install a custom version based on Android 5, either a vikorist or a special version.


Krok 2: Custom installation
Now that the phone has already had a new layout installed, you can proceed to installing custom firmware with Android 5.1 as the basis. Install CyanogenMod 12.1 - an unofficial firmware port using a command that does not require introduction.


- "Platform" - "ARM";
- "Andriod" — "5.1";
- "Variant" - "nano".
To get started, press the round button with an arrow pointing down.


Unpack the package cm-12.1-20160905-UNOFFICIAL-endeavoru.zip and can be moved boot.img from new to the catalog from Fastboot.

Fastboot flash boot boot.img

Then clear the cache by issuing the command:
fastboot erase cache


And we are obviously pleased with the new version of Android, modified for the smartphone we are looking at.

Method 4: Official firmware
Due to the urgent and necessary need to switch to the official firmware from HTC after installing custom, you need to go back to the capabilities of the modified recovery and fastboot.

- We download the version of TWRP for the “old layout” and place the image in the folder with Fastboot.
- We will update the package with official firmware. As stated below, the OS for the European region is version 4.18.401.3.
- We admire the image of the factory center of the updated HTC.
- We unpack archives with official firmware and copy them boot.img From the selected directory to the Fastboot folder.

This is where we place the file recovery_4.18.401.3.img.img What to do with stock recovery.
- We flash boot.img from the official firmware via Fastboot.
fastboot flash boot boot.img - Next we install TWRP for the old layout.
fastboot flash recovery twrp2810.img
- The device is connected to the PC and reinstalled in the modified upgrade medium. Then we will take the next path. "Wipe" - "Advanced Wipe"- meaning section "sdcard" - "Repair or Change File System". We confirm the beginning of the process of changing the file system with the button "Change File System".
- Then press the button "FAT" and the remixer is destructible "Swipe to Change", and then we check that the formatting is completed and turn to the TWRP main screen behind the additional button "Home".
- Select an item "Mount", and on the front screen - "Enable MTP".
- Installation, completed on the first step, allows the smartphone to appear in the system as a significant accumulator. We connect One X to the USB port and copy the zip package with the official firmware to the internal memory of the device.
- After copying the package, press "Disable MTP" And turn to the main screen of the recovery.
- We clean all sections one by one "sdcard", having gone through the points: "Wipe" - "Advanced Wipe"- Select sections - "Swipe to Wipe".
- Everything is ready for installing the official firmware. Select "Install", we indicate that we go to the package and begin the installation by inserting the jumper "Swipe to Confirm Flash".
- Button "Reboot System" If you go after the firmware is completed, restart your smartphone with the official version of the OS, you will only need to check the initialization of the remaining one.
- After all, you can restore the factory recovery using the standard Fastboot command:
fastboot flash recovery recovery_4.18.401.3.img
And also block the owner:
fastboot oem lock
- This means that the official version of HTC software has been completely reinstalled.


We would like to once again emphasize the importance of scrupulously following the instructions when installing system software in the HTC One X. Carry out the firmware carefully, assessing the skin before doing anything, and achieving the required result guarantees ano!